
Operation Manual


217
USING ILLUSTRATOR
Selecting and arranging objects
Last updated 11/8/2011
If you paste more than one object, all pasted objects appear in front or in back of the selected artwork. However,
the relative painting order among the individual pasted objects remains the same.
Pasting objects between layers
The Paste Remembers Layers option determines where artwork is pasted in the layer hierarchy. By default, Paste
Remembers Layers is off, and artwork is pasted into whichever layer is active in the Layers panel. When Paste
Remembers Layers is on, artwork is pasted into the layer from which it was copied, regardless of which layer is active
in the Layers panel.
You set this option by selecting Paste Remembers Layers from the Layers panel menu. A check mark displays when
the option is
on.
Turn on Paste Remembers Layers if you’re pasting artwork between documents and you want to automatically place
it into a layer of the same name as that from which it originated. If the target document does not have a layer of the
same name, Illustrator creates a new layer.
More Help topics
“Layers panel overview” on page 223
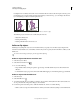
Paste in place and paste on all artboards
The Paste in Place command pastes artwork on the active artboard. To use this command, click Edit > Paste in Place.
The keyboard shortcut is Ctrl+Shift+V (Windows) or Cmd+Shift+V (Mac).
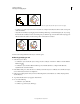
The Paste on All Artboards command pastes the selected artwork on all the artboards. Before using the Paste on All
Artboards command, make sure that the artboard from which you are copying the object, is the active artboard.
To use the Paste on All Artboards command, click Edit > Paste on All Artboards when you cut or copy the artwork.
If you copy artwork, and then select Paste on All Artboards, the artwork is repasted on the artboard from where it is
copied. (Recommended) Cut and then paste objects if you do not need to modify the original objects before using the
Paste on All Artboards command.
Note: Paste in Place and Paste on All Artboards commands paste the object at the same position as the copied objects
referenced from the active artboard at the time of copying.
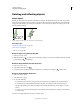
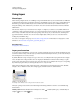
Align and distribute objects
You use the Align panel (Window > Align) and the align options in the Control panel to align or distribute selected
objects along the axis you specify. You can use either the object edges or anchor points as the reference point, and you
can align to a selection, an artboard, or a key object. A key object is one specific object in a selection of multiple objects.
The Align options are visible in the Control panel when an object is selected. If they do not appear, choose Align from
the Control panel menu.
By default, Illustrator calculates alignment and distribution based on the objects’ paths. However, when working with
objects that have different stroke weights, you can use the edge of the stroke to calculate alignment and distribution
instead. To do this, select Use Preview Bounds from the Align panel menu.
For a video on aligning and distributing objects, see www.adobe.com/go/vid0035.