
Operation Manual


214
USING ILLUSTRATOR
Selecting and arranging objects
Last updated 11/8/2011
Expanding is particularly helpful if you are having difficulty printing transparency effects, 3D objects, patterns,
gradients, strokes, blends, flares, envelopes, or symbols.
1 Select the object.
2 Choose Object > Expand.
If the object has appearance attributes applied to it, the Object > Expand command is dimmed. In this case, choose
Object
> Expand Appearance and then choose Object > Expand.
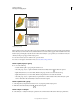
3 Set options, and then click OK:
Object Expands complex objects, including live blends, envelopes, symbol sets, and flares.
Fill Expands fills.
Stroke Expands strokes.
Gradient Mesh Expands gradients to a single mesh object.
Specify Sets the tolerance for color values between color stops. Higher numbers help maintain a smooth color
transition; low numbers can create a more banded appearance.
Hold down Alt (Windows) or Option (Mac OS) as you choose Object > Expand to expand a gradient using the
settings last entered in the Expand dialog box.
Moving, aligning, and distributing objects
Move objects
You can move objects by dragging them with specific tools, by using the arrow keys on the keyboard, or by entering
precise values in a panel or dialog box.
You can use snapping to help you position objects as you move them. For example, you can snap the pointer to guides
and anchor points and snap object boundaries to gridlines. You can also use the Align panel to position objects in
relation to each other.
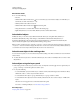
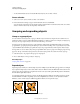
You can then use the Shift key to constrain the movement of one or more objects so that they move in a precise
horizontal, vertical, or diagonal direction relative to the current orientation of the x and y axes. You can also use the
Shift key to rotate objects in multiples of 45°.
Hold down Shift while dragging or drawing to limit movement to the nearest 45° angle.
More Help topics
“Use the grid” on page 45
“Rotate objects” on page 219