
Operation Manual


211
USING ILLUSTRATOR
Selecting and arranging objects
Last updated 11/8/2011
Select a single object within a group
1 Do one of the following:
• Select the Group Selection tool , and click the object.
• Select the Lasso tool , and drag around or across the object’s path.
•
Select the Direct Selection tool , and click within the object, or drag a marquee around part or all of the object’s path.
2 To add or remove an object or group to or from the selection (with any selection tool), hold down Shift and select
the object to add or remove.
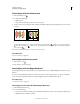
Select objects and groups with the Group Selection tool
1 Select the Group Selection tool , and click an object that’s within the group you want to select. The object is
selected.
2 To select the object’s parent group, click the same object again.
3 Click the same object again to select additional groups that are grouped with the selected group until you have
selected everything you want to include in your selection.
The first click with the Group Selection tool selects an object in a group (left); the second click selects the object’s group (right).
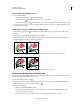
The third click adds the next group to the selection (left); the fourth click adds the third group (right).
Select faces and edges in a Live Paint group
You select faces and edges of a Live Paint tool using the Live Paint Selection tool. If you want to select the entire Live
Paint group, simply click it with the Selection tool.
1 Select the Live Paint Selection tool .
2 Move the tool over the Live Paint group until the face or edge you want to select is highlighted. (When the Live
Paint Selection tool is over an edge, the tool changes to
.)
3 Do any of the following:
• Click to select the highlighted face or edge.
• Drag a marquee around multiple faces or edges. Any face or edge that is fully or partially enclosed by the
marquee is included in the selection.
• Double-click a face or edge to select all connected faces/edges of the same color (flood select).