
Operation Manual

198
USING ILLUSTRATOR
Painting
Last updated 11/8/2011
• As you create your pattern tile, zoom in on the artwork to align elements more accurately, and then zoom out from
the artwork for the final selection.
• The more complex the pattern, the smaller should be the selection used to create it; however, the smaller the
selection (and the pattern tile it creates), the more copies are needed to create the pattern. Thus, a 1-inch-square
tile is more efficient than a 1/4-inch-square tile. If you are creating a simple pattern, you can include multiple copies
of the object within the selection intended for the pattern tile.
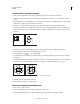
• To create simple line patterns, layer stroked lines of varying widths and colors, and place an unfilled, unstroked
bounding box behind the lines to create a pattern tile.
• To make an organic or textural pattern appear irregular, vary the tile artwork subtly for a more realistic effect. You
can use the Roughen effect to control variations.
• To ensure smooth tiling, close paths before defining the pattern.
• Enlarge your artwork view and check for flaws before defining a pattern.
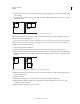
• If you draw a bounding box around the artwork, make sure that the box is a rectangle, that it is the backmost object
of the tile, and that it is unfilled and unstroked. To have Illustrator use this bounding box for a brush pattern, make
sure that nothing protrudes from it.
Follow these additional guidelines when creating brush patterns:
• When possible, confine artwork to an unpainted bounding box so that you can control how the pattern tiles.
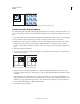
• Corner tiles must be square and have the same height as side tiles to align properly on the path. If you plan to use
corner tiles with your brush pattern, align objects in the corner tiles horizontally with objects in the side tiles so that
the patterns tile correctly.
• Create special corner effects for brush patterns using corner tiles.
More Help topics
“Apply a fill color to an object” on page 153
Create pattern swatches
1 Create artwork for the pattern.
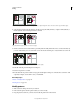
2 (Optional) To control the spacing between pattern elements or to clip out portions of the pattern, draw a pattern
bounding box (an unfilled rectangle) around the artwork you want to use as a pattern. Choose Object
> Arrange >
Send To Back to make the rectangle the backmost object. To use the rectangle as a bounding box for a brush or fill
pattern, fill and stroke it with None.
3 Use the Selection tool to select the artwork and bounding box (if any) that will make up the pattern tile.
4 Do one of the following:
• Choose Edit > Define Pattern, enter a name in the New Swatch dialog box, and click OK. The pattern displays in
the Swatches panel.
• Drag the artwork to the Swatches panel.
More Help topics
“Guidelines for constructing pattern tiles” on page 197
“About swatches” on page 124