
Operation Manual


164
USING ILLUSTRATOR
Painting
Last updated 11/8/2011
• Make Opacity Mask (in the Transparency panel menu)
• Brushes (You can apply brushes to an entire Live Paint group if you add a new stroke to the group using the
Appearance panel.)
Features that don’t work on Live Paint groups
• Gradient meshes
• Graphs
• Symbols from the Symbols panel
• Flares
• Align Stroke options from the Stroke panel
• The Magic Wand tool
Object commands that don’t work on Live Paint groups
• Outline Stroke
• Expand (You can use the Object > Live Paint > Expand command instead.)
• Blend
• Slice
• Clipping Mask > Make
• Create Gradient Mesh
Other commands that don’t work on Live Paint groups
• Pathfinder commands
• File > Place
• View > Guides > Make
• Select > Same >Blending Mode, Fill & Stroke, Opacity, Style, Symbol Instance, or Link Block Series
• Object > Text Wrap > Make
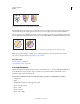
Create Live Paint groups
When you want to color objects using different colors for each edge, or intersection, convert the artwork into a Live
Paint Group.
Certain types of objects, such as type, bitmap images, and brushes, cannot be directly made into Live Paint groups. You
first need to convert these objects into paths. For example, if you try to convert an object that uses brushes or effects,
the complex visual appearance is lost in the conversion to Live Paint. However, you can retain much of the appearance
by first converting the objects to regular paths and then converting the resulting paths to Live Paint.
Note: When you convert artwork to a Live Paint group, you cannot return the artwork to its original state. You can
expand the group into its individual components, or release the group back to its original paths with no fill and a .5 black
stroke.
For a video on using Live Paint, see www.adobe.com/go/vid0042.
More Help topics
“Keys for working with Live Paint groups” on page 483