
Operation Manual


155
USING ILLUSTRATOR
Painting
Last updated 11/8/2011
Create dotted or dashed lines
You can create a dotted or dashed line by editing an object’s stroke attributes.
1 Select the object.
2 In the Stroke panel, select Dashed Line. If the Dashed Line option isn’t showing, choose Show Options from the
Stroke panel menu.
3 Click the icon: Align Dashes to Corners and Path Ends, Adjusting Length to Fit . This option allows you to make
the dashes at the corners and ends of the paths consistent and predictable. If you need to retain the appearance of
the dashes without aligning then select the Preserve exact dash and gap lengths
icon.
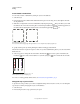
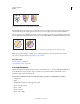
Dash Adjustments at the corners
A. Preserved exact dash and gap lengths B. Aligned dashes to corners and path ends, adjusting lengths to fit
4 Specify a dash sequence by entering the lengths of dashes and the gaps between them.
The numbers entered are repeated in sequence so that once you have established the pattern, you don’t need to fill in
all the text boxes.
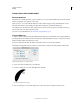
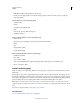
5 Select a cap option to change the ends of the dashes. The Butt Cap option creates square-ended dashes; the
Round Cap option creates rounded dashes or dots; the Projecting Cap option extends the ends of dashes.
6-point dashed lines with dash gaps of 2, 12, 16, 12
A. Butt cap B. Round cap C. Projecting cap
For a video on creating perfectly dashed strokes, see www.adobe.com/go/lrvid5213_ai_en.
Change the caps or joins of a line
A cap is the end of an open line; a join is where a straight line changes direction (turns a corner). You can change the
caps and joins of a line by changing the object’s stroke attributes.
1 Select the object.
2 In the Stroke panel, select a cap option and a join option.
A
B
ABC