
Operation Manual


10
USING ILLUSTRATOR
Workspace
Last updated 11/8/2011
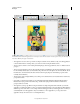
Open and close a panel or dialog box from the Control panel
1 Click a blue underlined word to open its associated panel or dialog box.
2 Click anywhere outside of the panel or dialog box to close it.
Dock the Control panel at the bottom of the workspace
❖ Choose Dock To Bottom from the Control panel menu.
Convert the Control panel to a floating panel
❖ Drag the gripper bar (located on the left edge of the panel) away from its current position.
To redock the Control panel, drag the gripper bar to the top or bottom of the application window (Windows) or screen
(Mac
OS).
Customizing the workspace
Manage windows and panels
You can create a custom workspace by moving and manipulating Document windows and panels. You can also save
workspaces and switch among them. For Fireworks, renaming custom workspaces can lead to unexpected behavior.
Note: The following examples use Photoshop for demonstration purposes. The workspace behaves the same in all the
products.
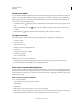
Rearrange, dock, or float document windows
When you open more than one file, the Document windows are tabbed.
• To rearrange the order of tabbed Document windows, drag a window’s tab to a new location in the group.
• To undock (float or untab) a Document window from a group of windows, drag the window’s tab out of the group.
Note: In Photoshop you can also choose Window > Arrange > Float in Window to float a single Document window,
or Window > Arrange > Float All In Windows to float all of the Document windows at once. See tech note
kb405298
for more information.
Note: Dreamweaver does not support docking and undocking Document windows. Use the Document window’s
Minimize button to create floating windows (Windows), or choose Window > Tile Vertically to create side-by-side
Document windows. Search “Tile Vertically” in Dreamweaver Help for more information on this topic. The workflow
is slightly different for Macintosh users.
• To dock a Document window to a separate group of Document windows, drag the window into the group.
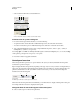
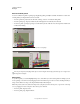
• To create groups of stacked or tiled documents, drag the window to one of the drop zones along the top, bottom, or
sides of another window. You can also select a layout for the group by using the Layout button on the Application bar.
Note: Some products do not support this functionality. However, your product may have Cascade and Tile commands
in the Window menu to help you lay out your documents.
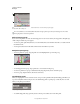
• To switch to another document in a tabbed group when dragging a selection, drag the selection over the document’s
tab for a moment.
Note: Some products do not support this functionality.