
Operation Manual

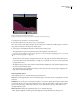
Table Of Contents
- Contents
- Chapter 1: Getting started
- Chapter 2: Digital audio fundamentals
- Chapter 3: Workflow and workspace
- Chapter 4: Setting up Adobe Audition
- Chapter 5: Importing, recording, and playing audio
- Chapter 6: Editing audio files
- Displaying audio in Edit View
- Selecting audio
- Copying, cutting, pasting, and deleting audio
- Visually fading and changing amplitude
- Working with markers
- Creating and deleting silence
- Inverting and reversing audio
- Generating audio
- Analyzing phase, frequency, and amplitude
- Converting sample types
- Recovery and undo
- Chapter 7: Applying effects
- Chapter 8: Effects reference
- Amplitude and compression effects
- Delay and echo effects
- Filter and equalizer effects
- Modulation effects
- Restoration effects
- Reverb effects
- Special effects
- Stereo imagery effects
- Changing stereo imagery
- Binaural Auto-Panner effect (Edit View only)
- Center Channel Extractor effect
- Channel Mixer effect
- Doppler Shifter effect (Edit View only)
- Graphic Panner effect
- Pan/Expand effect (Edit View only)
- Stereo Expander effect
- Stereo Field Rotate VST effect
- Stereo Field Rotate process effect (Edit View only)
- Time and pitch manipulation effects
- Multitrack effects
- Chapter 9: Mixing multitrack sessions
- Chapter 10: Composing with MIDI
- Chapter 11: Loops
- Chapter 12: Working with video
- Chapter 13: Creating surround sound
- Chapter 14: Saving and exporting
- Saving and exporting files
- Audio file formats
- About audio file formats
- 64-bit doubles (RAW) (.dbl)
- 8-bit signed (.sam)
- A/mu-Law Wave (.wav)
- ACM Waveform (.wav)
- Amiga IFF-8SVX (.iff, .svx)
- Apple AIFF (.aif, .snd)
- ASCII Text Data (.txt)
- Audition Loop (.cel)
- Creative Sound Blaster (.voc)
- Dialogic ADPCM (.vox)
- DiamondWare Digitized (.dwd)
- DVI/IMA ADPCM (.wav)
- Microsoft ADPCM (.wav)
- mp3PRO (.mp3)
- NeXT/Sun (.au, .snd)
- Ogg Vorbis (.ogg)
- SampleVision (.smp)
- Spectral Bitmap Image (.bmp)
- Windows Media Audio (.wma)
- Windows PCM (.wav, .bwf)
- PCM Raw Data (.pcm, .raw)
- Video file formats
- Adding file information
- Chapter 15: Automating tasks
- Chapter 16: Building audio CDs
- Chapter 17: Keyboard shortcuts
- Chapter 18: Digital audio glossary
- Index

ADOBE AUDITION 3.0
User Guide
90
For very long periods of noise, it’s faster to generate a shorter period (say, about 10 to 20 seconds) and delete excess
noise at the beginning and end so that the waves start and end at the midpoint. Then, copy and loop (choose Edit >
Mix Paste) as many times as needed.
Generate tones
The Tones command lets you create a simple waveform and gives you control over numerous amplitude- and
frequency-related settings. Generating tones is a great place to start when you create new sound effects.
1 Place the cursor where you want to insert the tones. Or, if you want to replace part of the existing waveform, select
the desired range of audio data.
2 Choose Generate > Tones.
3 Do one of the following:
• To create a constant tone, select Lock To These Settings Only. Then, set options as desired, and click OK.
• To create a tone that changes dynamically over time, deselect Lock To These Settings Only. Use the Initial Settings
tab to set options for the initial tone, and use the Final Settings tab to set options for the final tone. After you set
options, click OK. The tone generated will gradually go from the initial state to the final state.
Tones options
The Generate Tones dialog box provides the following options:
Base Frequency Specifies the main frequency to be used for generating tones.
Modulate By Modulates the base frequency in pitch over a user-defined range. For example, a 100 Hz setting
modulates the original frequency by +– 100 Hz. At a setting of 100 Hz, a 1000 Hz tone would modulate between 950
Hz and 1050 Hz.
Modulation Frequency Specifies the rate (times per second) at which the frequency modulates. Entering a value of
10, for instance, generates tones that seem to warble in amplitude at the rate of 10 times per second. The tones
actually warble in pitch (frequency) as they should, but because of the variance in the perceived energy levels of
different frequencies to the human ear, they seem to warble in amplitude.
Frequency Components Adds up to five overtones to the fundamental frequency (Base Frequency).
Enter a multiplier for each overtone below the Frequency Components sliders. (The actual frequency will be this
many times the fundamental.) Then, use the sliders to mix each of the individual components (0 to 100%) in
proportion to one another. The overall gain (signal level) may be adjusted with the dB Volume sliders.
IfLockToTheseSettingsOnlyisn’tselected,allofthevaluescanchangeoverthedurationoftheaudiofile,sothat
they morph from the initial to final settings.
dB Volume Specifies the overall gain for each of the right and left channels from –80 db to 0 dB. You can control both
channels independently when generating stereo tones.
Start Phase Specifies the starting location in the cycle that will be produced. If Start Phase is set to 0˚, waves will
start at the baseline. If Start Phase is set to 90˚, the wave will start at full amplitude (generating a noticeable click as
well). If you work in great detail with tones and need to have the phase “just so,” this option gives you that control.
Phase Difference Allowstheleftchanneltobeoutofphasewiththerightchannel.Avalueof0causesthechannels
to be completely in phase and a value of 180 causes them to be completely out of phase.
Change Rate Dynamicallychangestherelativephasebetweenthetwochannelsofastereoaudiofileovertimeata
given rate. For example, if you enter 1 Hz, the phase difference will cycle through 360˚ each second.