
Operation Manual

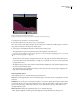
Table Of Contents
- Contents
- Chapter 1: Getting started
- Chapter 2: Digital audio fundamentals
- Chapter 3: Workflow and workspace
- Chapter 4: Setting up Adobe Audition
- Chapter 5: Importing, recording, and playing audio
- Chapter 6: Editing audio files
- Displaying audio in Edit View
- Selecting audio
- Copying, cutting, pasting, and deleting audio
- Visually fading and changing amplitude
- Working with markers
- Creating and deleting silence
- Inverting and reversing audio
- Generating audio
- Analyzing phase, frequency, and amplitude
- Converting sample types
- Recovery and undo
- Chapter 7: Applying effects
- Chapter 8: Effects reference
- Amplitude and compression effects
- Delay and echo effects
- Filter and equalizer effects
- Modulation effects
- Restoration effects
- Reverb effects
- Special effects
- Stereo imagery effects
- Changing stereo imagery
- Binaural Auto-Panner effect (Edit View only)
- Center Channel Extractor effect
- Channel Mixer effect
- Doppler Shifter effect (Edit View only)
- Graphic Panner effect
- Pan/Expand effect (Edit View only)
- Stereo Expander effect
- Stereo Field Rotate VST effect
- Stereo Field Rotate process effect (Edit View only)
- Time and pitch manipulation effects
- Multitrack effects
- Chapter 9: Mixing multitrack sessions
- Chapter 10: Composing with MIDI
- Chapter 11: Loops
- Chapter 12: Working with video
- Chapter 13: Creating surround sound
- Chapter 14: Saving and exporting
- Saving and exporting files
- Audio file formats
- About audio file formats
- 64-bit doubles (RAW) (.dbl)
- 8-bit signed (.sam)
- A/mu-Law Wave (.wav)
- ACM Waveform (.wav)
- Amiga IFF-8SVX (.iff, .svx)
- Apple AIFF (.aif, .snd)
- ASCII Text Data (.txt)
- Audition Loop (.cel)
- Creative Sound Blaster (.voc)
- Dialogic ADPCM (.vox)
- DiamondWare Digitized (.dwd)
- DVI/IMA ADPCM (.wav)
- Microsoft ADPCM (.wav)
- mp3PRO (.mp3)
- NeXT/Sun (.au, .snd)
- Ogg Vorbis (.ogg)
- SampleVision (.smp)
- Spectral Bitmap Image (.bmp)
- Windows Media Audio (.wma)
- Windows PCM (.wav, .bwf)
- PCM Raw Data (.pcm, .raw)
- Video file formats
- Adding file information
- Chapter 15: Automating tasks
- Chapter 16: Building audio CDs
- Chapter 17: Keyboard shortcuts
- Chapter 18: Digital audio glossary
- Index

ADOBE AUDITION 3.0
User Guide
86
Creating and deleting silence
Create silence
Creating silence is useful for inserting pauses and removing nonessential noise from an audio file. Adobe Audition
provides two ways to create silence in a waveform: by muting part of the existing waveform or by inserting a new
duration of silence.
❖ Do either of the following:
• To mute existing audio data, select the desired range of audio data and choose Effects > Mute. Unlike deleting or
cutting a selection, which splices the surrounding material together, applying the Mute effect leaves the duration
of the selection intact, and simply zeros the amplitude within it.
• To insert a new duration of silence, place the cursor where you want to insert the silence. Or, if you want to replace
part of the existing waveform, select the desired range of audio data. Then choose Generate > Silence and enter
the number of seconds of silence you want to generate. Use decimals to enter partial seconds. For example, enter
.3 to generate three-tenths of a second of silence. Click OK. Any audio to the right of the cursor is pushed out in
time, thereby lengthening the waveform’s duration.
Delete silence
The Delete Silence command detects and removes silence between words or other audio. It’s ideal for cleaning up
voice prompts and speeding up narratives without affecting the foreground audio.
1 If you want to delete silence from part of a waveform, select the desired range of audio data. If you don’t select a
range, Adobe Audition deletes silence from the entire waveform.
2 Choose Edit > Delete Silence.
3 Set the following options as desired, and click OK:
“Silence” Is Defined As Determines what Adobe Audition considers silence. In the Signal Is Below text box, enter the
amplitude value (in decibels) you want Adobe Audition to consider as the maximum level for silence. In the For More
Than text box, enter the duration (in milliseconds) of this maximum amplitude value.
For very quiet, low-noise-floor audio, enter a lower amplitude value (such as –60 dB). For noisier audio, you might
enter a higher value (such as –30 dB). Enter a longer duration to keep groups of words together, for example.
“Audio” Is Defined As Determines what Adobe Audition considers audio. In the Signal Is Above text box, enter the
amplitudevalue(indecibels)youwantAdobeAuditiontoconsiderastheminimumlevelforaudio.IntheForMore
Than text box, enter the duration (in milliseconds) of this minimum amplitude value.
Enter a higher duration to ignore short periods of undesired audio (like clicks, static, or other noise). However, if the
value is too high (above 200 milliseconds), short words might be skipped.
Find Levels Scans the waveform (or selected range) to have Adobe Audition automatically determine a good starting
point for signal levels. Suggested values appear in the appropriate text boxes.
If these values don’t do the job—for example, words or phrases are chopped off—lower the signal level values.
Increase the signal level values if not enough silence is removed.
Mark Deletions In Marker List Adds each location where silence is removed to the marker list.
Limit Continuous Silence To Specifies the minimum amount of silence (in milliseconds) to keep at all times. Silent
ranges shorter than this length aren’t removed; silent ranges greater than this length are shortened so that exactly the
specified amount of silence remains. Set this value to zero to remove as much silence as possible.