
Operation Manual

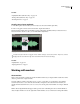
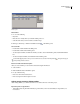

Table Of Contents
- Contents
- Chapter 1: Getting started
- Chapter 2: Digital audio fundamentals
- Chapter 3: Workflow and workspace
- Chapter 4: Setting up Adobe Audition
- Chapter 5: Importing, recording, and playing audio
- Chapter 6: Editing audio files
- Displaying audio in Edit View
- Selecting audio
- Copying, cutting, pasting, and deleting audio
- Visually fading and changing amplitude
- Working with markers
- Creating and deleting silence
- Inverting and reversing audio
- Generating audio
- Analyzing phase, frequency, and amplitude
- Converting sample types
- Recovery and undo
- Chapter 7: Applying effects
- Chapter 8: Effects reference
- Amplitude and compression effects
- Delay and echo effects
- Filter and equalizer effects
- Modulation effects
- Restoration effects
- Reverb effects
- Special effects
- Stereo imagery effects
- Changing stereo imagery
- Binaural Auto-Panner effect (Edit View only)
- Center Channel Extractor effect
- Channel Mixer effect
- Doppler Shifter effect (Edit View only)
- Graphic Panner effect
- Pan/Expand effect (Edit View only)
- Stereo Expander effect
- Stereo Field Rotate VST effect
- Stereo Field Rotate process effect (Edit View only)
- Time and pitch manipulation effects
- Multitrack effects
- Chapter 9: Mixing multitrack sessions
- Chapter 10: Composing with MIDI
- Chapter 11: Loops
- Chapter 12: Working with video
- Chapter 13: Creating surround sound
- Chapter 14: Saving and exporting
- Saving and exporting files
- Audio file formats
- About audio file formats
- 64-bit doubles (RAW) (.dbl)
- 8-bit signed (.sam)
- A/mu-Law Wave (.wav)
- ACM Waveform (.wav)
- Amiga IFF-8SVX (.iff, .svx)
- Apple AIFF (.aif, .snd)
- ASCII Text Data (.txt)
- Audition Loop (.cel)
- Creative Sound Blaster (.voc)
- Dialogic ADPCM (.vox)
- DiamondWare Digitized (.dwd)
- DVI/IMA ADPCM (.wav)
- Microsoft ADPCM (.wav)
- mp3PRO (.mp3)
- NeXT/Sun (.au, .snd)
- Ogg Vorbis (.ogg)
- SampleVision (.smp)
- Spectral Bitmap Image (.bmp)
- Windows Media Audio (.wma)
- Windows PCM (.wav, .bwf)
- PCM Raw Data (.pcm, .raw)
- Video file formats
- Adding file information
- Chapter 15: Automating tasks
- Chapter 16: Building audio CDs
- Chapter 17: Keyboard shortcuts
- Chapter 18: Digital audio glossary
- Index

ADOBE AUDITION 3.0
User Guide
84
4 Click Save To Files, set the following options as desired, and click OK:
Use Marker Label As Filename Uses the marker name as the prefix for the filename.
Filename Prefix Specifies a prefix for the new files. Adobe Audition automatically adds numbers after the prefix
(phrase02, phrase03, and so on) as well as the correct extension for the output format you choose.
Seq. Start Specifies the number to begin with when adding numbers to the filename prefix.
Destination Folder Specifies the folder where Adobe Audition places the new files. Click Browse to specify a
different folder.
Output Format Specifies the output format for the new files. If the specified format has unique settings, you can click
Options to access them.
See also
“Add silence between markers” on page 83
“About audio file formats” on page 244
“Batch processing overview” on page 259
Set markers automatically
The Auto-Mark feature lets you locate phrases or beats and automatically add them to the marker list. You can also
use this feature to remove silence from the beginning and end of a file.
1 Select the general range in which you want to find phrases or beats.
2 Choose Edit > Auto-Mark, and choose one of the following commands:
Adjust Selection To Phrase Selects a phrase within the selected range by adjusting the highlight inward, ignoring any
silence before and after the audio. Nothing is added to the marker list.
Find Phrases And Mark Scans the selected range, marking nonsilent ranges as basic markers in the marker list.
Find Beats And Mark Scans the selected range, marking beats as beat markers in the marker list.
Trim Digital Silence Trims silence from the beginning and ending of a file. If you select the middle of a waveform,
this command functions like the normal Trim command, trimming out everything else, in addition to any digital
silence in the highlighted range at the endpoints.
Customize Auto-Mark settings
1
Choose Edit > Auto-Mark > Auto-Mark Settings.
2 Adjust the following options, and click OK:
Audio Will Be Considered “Silence” When Specifies parameters for finding silence. In the Signal Is Below text box,
enter the amplitude value (in decibels) you want Adobe Audition to consider as the maximum level for silence. In
the For More Than text box, enter the duration (in milliseconds) of this maximum amplitude value.
For very quiet, high-quality audio, enter a lower amplitude value (such as –60 dB). For noisier audio, the value might
be much higher (such as –30 dB). Enter a longer duration to keep groups of words together, for example.
Audio Will Be Considered As Valid When Specifies parameters for determining if audio is valid. In the Signal Is
Above text box, enter the amplitude value (in decibels) you want Adobe Audition to consider as the minimum level
for audio. In the For More Than text box, enter the duration (in milliseconds) of this minimum amplitude.