Operation Manual
Table Of Contents
- Contents
- Chapter 1: Getting started
- Chapter 2: Digital audio fundamentals
- Chapter 3: Workflow and workspace
- Chapter 4: Setting up Adobe Audition
- Chapter 5: Importing, recording, and playing audio
- Chapter 6: Editing audio files
- Displaying audio in Edit View
- Selecting audio
- Copying, cutting, pasting, and deleting audio
- Visually fading and changing amplitude
- Working with markers
- Creating and deleting silence
- Inverting and reversing audio
- Generating audio
- Analyzing phase, frequency, and amplitude
- Converting sample types
- Recovery and undo
- Chapter 7: Applying effects
- Chapter 8: Effects reference
- Amplitude and compression effects
- Delay and echo effects
- Filter and equalizer effects
- Modulation effects
- Restoration effects
- Reverb effects
- Special effects
- Stereo imagery effects
- Changing stereo imagery
- Binaural Auto-Panner effect (Edit View only)
- Center Channel Extractor effect
- Channel Mixer effect
- Doppler Shifter effect (Edit View only)
- Graphic Panner effect
- Pan/Expand effect (Edit View only)
- Stereo Expander effect
- Stereo Field Rotate VST effect
- Stereo Field Rotate process effect (Edit View only)
- Time and pitch manipulation effects
- Multitrack effects
- Chapter 9: Mixing multitrack sessions
- Chapter 10: Composing with MIDI
- Chapter 11: Loops
- Chapter 12: Working with video
- Chapter 13: Creating surround sound
- Chapter 14: Saving and exporting
- Saving and exporting files
- Audio file formats
- About audio file formats
- 64-bit doubles (RAW) (.dbl)
- 8-bit signed (.sam)
- A/mu-Law Wave (.wav)
- ACM Waveform (.wav)
- Amiga IFF-8SVX (.iff, .svx)
- Apple AIFF (.aif, .snd)
- ASCII Text Data (.txt)
- Audition Loop (.cel)
- Creative Sound Blaster (.voc)
- Dialogic ADPCM (.vox)
- DiamondWare Digitized (.dwd)
- DVI/IMA ADPCM (.wav)
- Microsoft ADPCM (.wav)
- mp3PRO (.mp3)
- NeXT/Sun (.au, .snd)
- Ogg Vorbis (.ogg)
- SampleVision (.smp)
- Spectral Bitmap Image (.bmp)
- Windows Media Audio (.wma)
- Windows PCM (.wav, .bwf)
- PCM Raw Data (.pcm, .raw)
- Video file formats
- Adding file information
- Chapter 15: Automating tasks
- Chapter 16: Building audio CDs
- Chapter 17: Keyboard shortcuts
- Chapter 18: Digital audio glossary
- Index

ADOBE AUDITION 3.0
User Guide
81
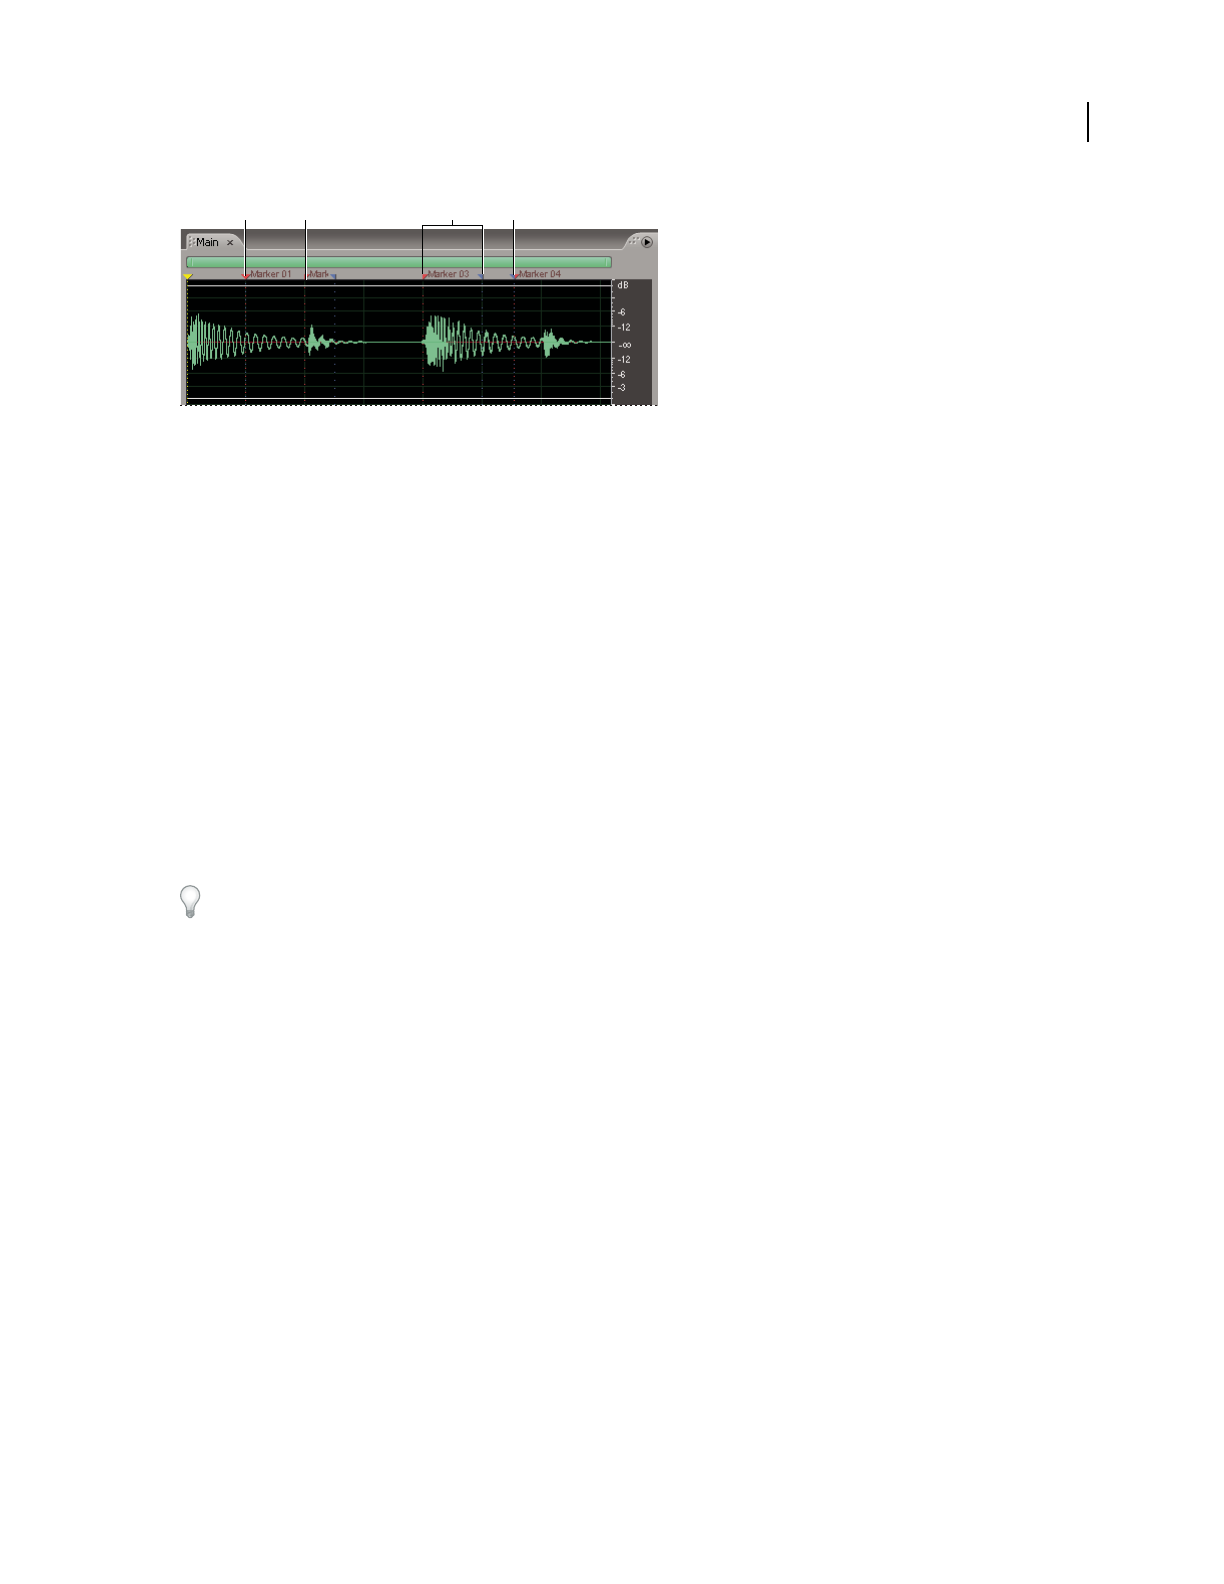
Examples of markers
A. Marker handle B. Marker point C. Marker range D. Nonsplit marker range
Note: To preserve markers when you save a file, make sure that you select Save Extra Non-Audio Information.
Marker types
AdobeAuditionprovidesfivemarkertypes.Allfivecanberangesaswellaspoints.Youcanchangemarkertypesby
clicking Edit Marker Info in the Markers panel and choosing a marker type from the Type menu. (Alternatively,
right-click the marker handle, and choose a marker type from the context menu.)
Cue markers Mark important sections of a waveform for later reference (for example, to identify an editing point).
Beat markers Similar to Basic markers, but also identify musical beats for loops, providing very accurate beat
mapping. (See “About loops” on page 221.)
Track markers Indicate tracks for an audio compact disc. Use these markers only for burning CDs. (See “Insert CD
tracks” on page 264.)
Index markers Set markers within a CD track. (Some CD players can navigate to index markers in addition to track
markers.)
For the smoothest CD-creation workflow, specify ranges for Track markers and points for Index markers.
BWF-J markers Specify marker points for Broadcast Wave files for the Japanese broadcasting environment.
Note: To specify a marker as BWF-J, you must first name it with one of the following labels: BC$START, BC$STANDBY,
BC$CM, BC$END, BC$STOP, BC$STOP, BC$FILE, BC$PAUSE, or BC$UTL [*], where * represents the number 1, 2,
3, or 4.
Add, select, and rename markers
Though you can add markers directly in the Main panel, you use the Markers panel (Windows > Marker List) to
define and select markers.
B C DA


