
Operation Manual
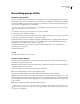
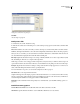
Table Of Contents
- Contents
- Chapter 1: Getting started
- Chapter 2: Digital audio fundamentals
- Chapter 3: Workflow and workspace
- Chapter 4: Setting up Adobe Audition
- Chapter 5: Importing, recording, and playing audio
- Chapter 6: Editing audio files
- Displaying audio in Edit View
- Selecting audio
- Copying, cutting, pasting, and deleting audio
- Visually fading and changing amplitude
- Working with markers
- Creating and deleting silence
- Inverting and reversing audio
- Generating audio
- Analyzing phase, frequency, and amplitude
- Converting sample types
- Recovery and undo
- Chapter 7: Applying effects
- Chapter 8: Effects reference
- Amplitude and compression effects
- Delay and echo effects
- Filter and equalizer effects
- Modulation effects
- Restoration effects
- Reverb effects
- Special effects
- Stereo imagery effects
- Changing stereo imagery
- Binaural Auto-Panner effect (Edit View only)
- Center Channel Extractor effect
- Channel Mixer effect
- Doppler Shifter effect (Edit View only)
- Graphic Panner effect
- Pan/Expand effect (Edit View only)
- Stereo Expander effect
- Stereo Field Rotate VST effect
- Stereo Field Rotate process effect (Edit View only)
- Time and pitch manipulation effects
- Multitrack effects
- Chapter 9: Mixing multitrack sessions
- Chapter 10: Composing with MIDI
- Chapter 11: Loops
- Chapter 12: Working with video
- Chapter 13: Creating surround sound
- Chapter 14: Saving and exporting
- Saving and exporting files
- Audio file formats
- About audio file formats
- 64-bit doubles (RAW) (.dbl)
- 8-bit signed (.sam)
- A/mu-Law Wave (.wav)
- ACM Waveform (.wav)
- Amiga IFF-8SVX (.iff, .svx)
- Apple AIFF (.aif, .snd)
- ASCII Text Data (.txt)
- Audition Loop (.cel)
- Creative Sound Blaster (.voc)
- Dialogic ADPCM (.vox)
- DiamondWare Digitized (.dwd)
- DVI/IMA ADPCM (.wav)
- Microsoft ADPCM (.wav)
- mp3PRO (.mp3)
- NeXT/Sun (.au, .snd)
- Ogg Vorbis (.ogg)
- SampleVision (.smp)
- Spectral Bitmap Image (.bmp)
- Windows Media Audio (.wma)
- Windows PCM (.wav, .bwf)
- PCM Raw Data (.pcm, .raw)
- Video file formats
- Adding file information
- Chapter 15: Automating tasks
- Chapter 16: Building audio CDs
- Chapter 17: Keyboard shortcuts
- Chapter 18: Digital audio glossary
- Index

ADOBE AUDITION 3.0
User Guide
259
See also
“Normalize a group of files” on page 258
Group Waveform Normalize options
In the Group Waveform Normalize dialog box, click the Normalize tab to display the following options:
Normalization Specifies whether to normalize to an average level or a specific level you enter in decibels.
Note: Unlike the Normalize effect, this Normalization option doesn’t use percentages, because it is RMS-based rather
than peak-based.
Use Equal Loudness Contour Applies an equal loudness contour, where the middle frequencies are most important.
Because the human ear is much more sensitive to frequencies between 2 kHz and 4 kHz, two different pieces of audio
with the same RMS amplitude but with different frequencies will have different apparent volumes. Select this option
to ensure that audio has the same perceived loudness, regardless of what frequencies are present.
Out of Band Peaks When you amplify audio, the audio samples may extend beyond the clipping point. If out-of-
band peaks occur, you can choose to clip the waveform (causing distortion) or apply limiting (increasing perceived
volume without distortion).
Options include the following:
• No Limiting (Clip) Prevents limiting, so clipped (distorted) audio might occur.
• Use Limiting Applies the Hard Limiter, if needed, to keep out-of-band peaks from being clipped. This option
provides two additional options: Lookahead Time and Release Time.
• Lookahead Time Specifies the number of milliseconds generally needed to attenuate audio before reaching the
loudest peak.
Note: If this value is too small, audible distortion might occur. Make sure that the value is at least 5 milliseconds.
• Release Time Specifies the number of milliseconds needed for the attenuation to rebound 12 dB (or roughly the
time needed for audio to resume normal volume if an extremely loud peak is encountered).
Note: A setting of 200 milliseconds works well to preserve low bass frequencies. If the setting is too high, audio may stay
below normal levels for a while.
Statistics RMS Width Specifies the length of audio segments used to calculate the Analyze Loudness statistics. If you
change this setting, click Analyze Statistical Information to update the statistics.
See also
“Normalize a group of files” on page 258
Batch processing files
Batch processing overview
The Batch Processing dialog box in Adobe Audition enables you to process multiple files in three possible ways; you
can run a script, resample, or save to a new file format.
Adobe Audition comes with several scripts that you can use to batch process files. You can also create your own
scripts. To use a script for batch processing, you must record the script on an open waveform with no selection.