
Operation Manual
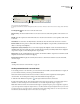


Table Of Contents
- Contents
- Chapter 1: Getting started
- Chapter 2: Digital audio fundamentals
- Chapter 3: Workflow and workspace
- Chapter 4: Setting up Adobe Audition
- Chapter 5: Importing, recording, and playing audio
- Chapter 6: Editing audio files
- Displaying audio in Edit View
- Selecting audio
- Copying, cutting, pasting, and deleting audio
- Visually fading and changing amplitude
- Working with markers
- Creating and deleting silence
- Inverting and reversing audio
- Generating audio
- Analyzing phase, frequency, and amplitude
- Converting sample types
- Recovery and undo
- Chapter 7: Applying effects
- Chapter 8: Effects reference
- Amplitude and compression effects
- Delay and echo effects
- Filter and equalizer effects
- Modulation effects
- Restoration effects
- Reverb effects
- Special effects
- Stereo imagery effects
- Changing stereo imagery
- Binaural Auto-Panner effect (Edit View only)
- Center Channel Extractor effect
- Channel Mixer effect
- Doppler Shifter effect (Edit View only)
- Graphic Panner effect
- Pan/Expand effect (Edit View only)
- Stereo Expander effect
- Stereo Field Rotate VST effect
- Stereo Field Rotate process effect (Edit View only)
- Time and pitch manipulation effects
- Multitrack effects
- Chapter 9: Mixing multitrack sessions
- Chapter 10: Composing with MIDI
- Chapter 11: Loops
- Chapter 12: Working with video
- Chapter 13: Creating surround sound
- Chapter 14: Saving and exporting
- Saving and exporting files
- Audio file formats
- About audio file formats
- 64-bit doubles (RAW) (.dbl)
- 8-bit signed (.sam)
- A/mu-Law Wave (.wav)
- ACM Waveform (.wav)
- Amiga IFF-8SVX (.iff, .svx)
- Apple AIFF (.aif, .snd)
- ASCII Text Data (.txt)
- Audition Loop (.cel)
- Creative Sound Blaster (.voc)
- Dialogic ADPCM (.vox)
- DiamondWare Digitized (.dwd)
- DVI/IMA ADPCM (.wav)
- Microsoft ADPCM (.wav)
- mp3PRO (.mp3)
- NeXT/Sun (.au, .snd)
- Ogg Vorbis (.ogg)
- SampleVision (.smp)
- Spectral Bitmap Image (.bmp)
- Windows Media Audio (.wma)
- Windows PCM (.wav, .bwf)
- PCM Raw Data (.pcm, .raw)
- Video file formats
- Adding file information
- Chapter 15: Automating tasks
- Chapter 16: Building audio CDs
- Chapter 17: Keyboard shortcuts
- Chapter 18: Digital audio glossary
- Index

ADOBE AUDITION 3.0
User Guide
241
2 Set the following options, and then click OK.
Destination Folder Specifies the folder files are saved to. To visually navigate to a folder, click Browse.
Filename Template Names each file using information drawn from the Text Fields tab of the File Info dialog box.
(See “Add audio file information” on page 253.) If you extracted a file from CD, any track information acquired from
a CD database is available. Each symbol corresponds to information such as Artist (%a), Album (%d), and Song (%s).
To add a new filename template, click the plus icon. To delete the current template, click the minus icon .
When adding a new template, you can specify subfolders within the destination folder; simply insert the subfolder
name followed by a backslash (\). For example, the entry MyFiles\%s savesallfilesinaMyFilessubfolderandnames
them after the song title.
Output Format Specifies the file format. To change settings for a selected format, click Options.
Ifthesourcefileshavedifferentsamplerates,bitdepths,orchannels,clickOptionstospecifyuniqueformatsettings
for each sample type.
Audio Files list In the Proposed Filename column, shows how saved filenames will appear. In the Status column,
indicates filename conflicts and if files will be newly saved, overwritten, or skipped. If the Status field indicates
Invalid Filename or Duplicate Filename, you must choose a different filename template. The current one specifies
either unavailable or identical file information.
Show Folder Displays the complete path for each file in the Audio Files list.
Skip Excludes selected files from the saving process.
Overwrite Existing Files Automatically replaces files of the same name, without asking you to confirm each
replacement.
See also
“Extract CD tracks with the Extract Audio From CD command” on page 51
“Audio file formats” on page 244
Save multitrack sessions
A multitrack session file is a small, non-audio file. It merely stores information about locations of related audio files
on your hard drive, the duration of each audio file within the session, the envelopes and effects applied to various
tracks, and so forth. You can reopen a saved session file later to make further changes to the mix.
If you create multitrack compositions entirely in Adobe Audition, save session files in the native SES format. If you
plan to share multitrack compositions with other applications, however, save sessions in XML format.
Third-party developers may provide support for additional formats by using the Adobe Audition Software
Developer’s Kit (SDK). For more information, see www.adobe.com/go/learn_au_sdk.
1 In Multitrack View, do one of the following:
• Choose File > Save Session to save changes to the current session file.
• Choose File > Save Session As to save changes to a different session file.
• Choose File > Save All to save the session file and all the audio files it uses.
2 In the dialog box, select a location for the file, and type a filename.
3 From the Save As Type menu, choose the session file format.