
Operation Manual
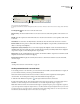
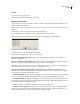


Table Of Contents
- Contents
- Chapter 1: Getting started
- Chapter 2: Digital audio fundamentals
- Chapter 3: Workflow and workspace
- Chapter 4: Setting up Adobe Audition
- Chapter 5: Importing, recording, and playing audio
- Chapter 6: Editing audio files
- Displaying audio in Edit View
- Selecting audio
- Copying, cutting, pasting, and deleting audio
- Visually fading and changing amplitude
- Working with markers
- Creating and deleting silence
- Inverting and reversing audio
- Generating audio
- Analyzing phase, frequency, and amplitude
- Converting sample types
- Recovery and undo
- Chapter 7: Applying effects
- Chapter 8: Effects reference
- Amplitude and compression effects
- Delay and echo effects
- Filter and equalizer effects
- Modulation effects
- Restoration effects
- Reverb effects
- Special effects
- Stereo imagery effects
- Changing stereo imagery
- Binaural Auto-Panner effect (Edit View only)
- Center Channel Extractor effect
- Channel Mixer effect
- Doppler Shifter effect (Edit View only)
- Graphic Panner effect
- Pan/Expand effect (Edit View only)
- Stereo Expander effect
- Stereo Field Rotate VST effect
- Stereo Field Rotate process effect (Edit View only)
- Time and pitch manipulation effects
- Multitrack effects
- Chapter 9: Mixing multitrack sessions
- Chapter 10: Composing with MIDI
- Chapter 11: Loops
- Chapter 12: Working with video
- Chapter 13: Creating surround sound
- Chapter 14: Saving and exporting
- Saving and exporting files
- Audio file formats
- About audio file formats
- 64-bit doubles (RAW) (.dbl)
- 8-bit signed (.sam)
- A/mu-Law Wave (.wav)
- ACM Waveform (.wav)
- Amiga IFF-8SVX (.iff, .svx)
- Apple AIFF (.aif, .snd)
- ASCII Text Data (.txt)
- Audition Loop (.cel)
- Creative Sound Blaster (.voc)
- Dialogic ADPCM (.vox)
- DiamondWare Digitized (.dwd)
- DVI/IMA ADPCM (.wav)
- Microsoft ADPCM (.wav)
- mp3PRO (.mp3)
- NeXT/Sun (.au, .snd)
- Ogg Vorbis (.ogg)
- SampleVision (.smp)
- Spectral Bitmap Image (.bmp)
- Windows Media Audio (.wma)
- Windows PCM (.wav, .bwf)
- PCM Raw Data (.pcm, .raw)
- Video file formats
- Adding file information
- Chapter 15: Automating tasks
- Chapter 16: Building audio CDs
- Chapter 17: Keyboard shortcuts
- Chapter 18: Digital audio glossary
- Index

ADOBE AUDITION 3.0
User Guide
236
• To edit a control point, drag it. The pan point moves in tandem to show you the relative position in the surround
field.
• To delete an individual control point, drag it up or down beyond the waveform display.
• To delete all control points, click Clear All.
• To create smoother transitions between control points, select Splines.
5 Click Play Track or Play All to hear the dynamically panned track.
Adjust volume levels for surround mixes
❖ In the Surround Encoder dialog box, select a track, and then set any of the following options:
Sub Channel Level Controls the amplitude level sent to the LFE channel.
Use a bass management circuit in your monitoring setup to ensure that you hear the same bass levels as your
audience.
Center Channel Level For tracks assigned to the Surround Panner, determines the Center channel level relative to
the Front Left and Front Right level. At 100, the Center channel receives an equal percentage of signal.
Track Level Controls the amplitude level of the selected track.
Zoom waveforms in the Surround Encoder
❖ In the Surround Encoder dialog box, do any of the following:
• Place the mouse cursor over the time ruler that runs across the bottom of the waveform display, right-click, and
select a zoom option from the context menu.
• Right-click and drag the desired zoom area on the time ruler. (To zoom back out, right-click and choose Zoom
Out or Zoom Full from the context menu.)
• Position the mouse pointer in the waveform display, and spin the mouse wheel. This zooms into the time area
directly beneath the mouse pointer.
Previewing and exporting surround mixes
Preview controls for surround mixes
The preview controls in the Surround Encoder let you fine-tune a surround mix before exporting it.