
Operation Manual
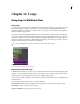
Table Of Contents
- Contents
- Chapter 1: Getting started
- Chapter 2: Digital audio fundamentals
- Chapter 3: Workflow and workspace
- Chapter 4: Setting up Adobe Audition
- Chapter 5: Importing, recording, and playing audio
- Chapter 6: Editing audio files
- Displaying audio in Edit View
- Selecting audio
- Copying, cutting, pasting, and deleting audio
- Visually fading and changing amplitude
- Working with markers
- Creating and deleting silence
- Inverting and reversing audio
- Generating audio
- Analyzing phase, frequency, and amplitude
- Converting sample types
- Recovery and undo
- Chapter 7: Applying effects
- Chapter 8: Effects reference
- Amplitude and compression effects
- Delay and echo effects
- Filter and equalizer effects
- Modulation effects
- Restoration effects
- Reverb effects
- Special effects
- Stereo imagery effects
- Changing stereo imagery
- Binaural Auto-Panner effect (Edit View only)
- Center Channel Extractor effect
- Channel Mixer effect
- Doppler Shifter effect (Edit View only)
- Graphic Panner effect
- Pan/Expand effect (Edit View only)
- Stereo Expander effect
- Stereo Field Rotate VST effect
- Stereo Field Rotate process effect (Edit View only)
- Time and pitch manipulation effects
- Multitrack effects
- Chapter 9: Mixing multitrack sessions
- Chapter 10: Composing with MIDI
- Chapter 11: Loops
- Chapter 12: Working with video
- Chapter 13: Creating surround sound
- Chapter 14: Saving and exporting
- Saving and exporting files
- Audio file formats
- About audio file formats
- 64-bit doubles (RAW) (.dbl)
- 8-bit signed (.sam)
- A/mu-Law Wave (.wav)
- ACM Waveform (.wav)
- Amiga IFF-8SVX (.iff, .svx)
- Apple AIFF (.aif, .snd)
- ASCII Text Data (.txt)
- Audition Loop (.cel)
- Creative Sound Blaster (.voc)
- Dialogic ADPCM (.vox)
- DiamondWare Digitized (.dwd)
- DVI/IMA ADPCM (.wav)
- Microsoft ADPCM (.wav)
- mp3PRO (.mp3)
- NeXT/Sun (.au, .snd)
- Ogg Vorbis (.ogg)
- SampleVision (.smp)
- Spectral Bitmap Image (.bmp)
- Windows Media Audio (.wma)
- Windows PCM (.wav, .bwf)
- PCM Raw Data (.pcm, .raw)
- Video file formats
- Adding file information
- Chapter 15: Automating tasks
- Chapter 16: Building audio CDs
- Chapter 17: Keyboard shortcuts
- Chapter 18: Digital audio glossary
- Index
ADOBE AUDITION 3.0
User Guide
218
• Click the Triplet button to divide each beat into three subdivisions. This option is particularly useful for
music with swing and shuffle rhythms, like jazz and blues.
• Click the Dotted button to mark every 1.5 beats. This option is particularly helpful for music with an odd
number of beats per bar. In a waltz with three beats per bar, for example, a dotted note perfectly spans half a
measure.
Snap edited or recorded MIDI to musical scales
In the Sequencer, Snap To Scale options restrict all newly edited and recorded notes to a musical scale you specify.
Snapping to a scale gives music a unified, harmonic feel.
By default, the root note of the scale reflects the session key, which controls the pitch of all voiced audio loops in a
session. If your session doesn’t contain loops, or if you understand how musical keys interact, feel free to specify a
root note that differs from the session key.
1 Click the Snap To Scale button .
2 From the pop-up menus to the right of the button, select a root note and scale type.
See also
“Set tempo, time signature, and key for a session” on page 223
Edit MIDI notes
The Sequencer lets you edit notes with an intuitive, grid-based approach that even nonmusicians easily understand.
See also
“Edit velocity and controller data” on page 219
“Prevent changes to MIDI data” on page 220
Select MIDI data
The Sequencer provides a variety of ways to select MIDI data on the grid. Selections in a track’s Note and
Velocity views are automatically linked. Selections in the Controller view are independent.
Do any of the following:
• Click or drag with the Select tool . (Hold down Ctrl to select additional notes.)
• Click the desired track, and then choose Edit > Select All. (To add notes on another track, click that track, and
again choose Edit > Select All.)
• In the vertical keyboard for a track, click a key to select all notes at that pitch.
Delete notes
❖ Click individual notes with the Erase tool . Or, select groups of notes with the Select tool , and then choose
Edit > Delete.
Manually enter notes
❖ Click the grid with the Draw tool .