
Operation Manual
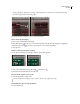
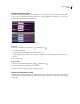
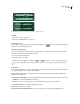
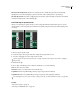
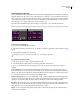
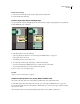
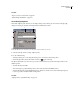
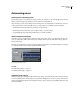
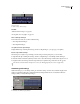
Table Of Contents
- Contents
- Chapter 1: Getting started
- Chapter 2: Digital audio fundamentals
- Chapter 3: Workflow and workspace
- Chapter 4: Setting up Adobe Audition
- Chapter 5: Importing, recording, and playing audio
- Chapter 6: Editing audio files
- Displaying audio in Edit View
- Selecting audio
- Copying, cutting, pasting, and deleting audio
- Visually fading and changing amplitude
- Working with markers
- Creating and deleting silence
- Inverting and reversing audio
- Generating audio
- Analyzing phase, frequency, and amplitude
- Converting sample types
- Recovery and undo
- Chapter 7: Applying effects
- Chapter 8: Effects reference
- Amplitude and compression effects
- Delay and echo effects
- Filter and equalizer effects
- Modulation effects
- Restoration effects
- Reverb effects
- Special effects
- Stereo imagery effects
- Changing stereo imagery
- Binaural Auto-Panner effect (Edit View only)
- Center Channel Extractor effect
- Channel Mixer effect
- Doppler Shifter effect (Edit View only)
- Graphic Panner effect
- Pan/Expand effect (Edit View only)
- Stereo Expander effect
- Stereo Field Rotate VST effect
- Stereo Field Rotate process effect (Edit View only)
- Time and pitch manipulation effects
- Multitrack effects
- Chapter 9: Mixing multitrack sessions
- Chapter 10: Composing with MIDI
- Chapter 11: Loops
- Chapter 12: Working with video
- Chapter 13: Creating surround sound
- Chapter 14: Saving and exporting
- Saving and exporting files
- Audio file formats
- About audio file formats
- 64-bit doubles (RAW) (.dbl)
- 8-bit signed (.sam)
- A/mu-Law Wave (.wav)
- ACM Waveform (.wav)
- Amiga IFF-8SVX (.iff, .svx)
- Apple AIFF (.aif, .snd)
- ASCII Text Data (.txt)
- Audition Loop (.cel)
- Creative Sound Blaster (.voc)
- Dialogic ADPCM (.vox)
- DiamondWare Digitized (.dwd)
- DVI/IMA ADPCM (.wav)
- Microsoft ADPCM (.wav)
- mp3PRO (.mp3)
- NeXT/Sun (.au, .snd)
- Ogg Vorbis (.ogg)
- SampleVision (.smp)
- Spectral Bitmap Image (.bmp)
- Windows Media Audio (.wma)
- Windows PCM (.wav, .bwf)
- PCM Raw Data (.pcm, .raw)
- Video file formats
- Adding file information
- Chapter 15: Automating tasks
- Chapter 16: Building audio CDs
- Chapter 17: Keyboard shortcuts
- Chapter 18: Digital audio glossary
- Index
ADOBE AUDITION 3.0
User Guide
200
Time stretching audio clips
Time stretching lets you change the length of an audio clip without changing its pitch. This technique is particularly
helpful for fitting audio clips to video scenes or layering clips for sound design. You can quickly time stretch a clip
either by dragging or setting time stretch properties. When you time stretch by dragging, Adobe Audition analyzes
a clip’s contents and attempts to select the most natural sounding time-stretch method. When you set properties for
time stretching, you can specify which method of time stretching to use.
Like other features in Multitrack View, time stretching is nondestructive, so you can disable it at any time.
Note: Timestretchingchangesthetempoofaclip.Ifyoutimestretchaloop-enabledclip,itwon’tmatchthesessiontempo.
Dragging to time stretch a clip
Time stretch a clip by dragging
1
Choose View > Enable Clip Time Stretching.
2 Select the clip, and then position the cursor over the clip’s bottom left or right handle—the time stretch icon
appears.
3 Drag the handle to lengthen or shorten the clip.
To temporarily enter time stretching mode, hold down Ctrl, and drag a clip handle.
Set specific time stretch properties
1
Select the clip, and choose Clip > Clip Time Stretch Properties.
2 Select Enable Time Stretching, and enter a percentage in the Time Stretch text box.
3 Choose one of the following time stretching options from the pop-up menu, set related options, and then
click OK:
Time-Scale Stretch Stretches the clip without affecting pitch. This method is most commonly used for melodic
instruments, like piano, bass, and guitar. Because this method bases the stretch on the actual length and duration of
the file, use it only to stretch audio that doesn’t have well-defined beats, like a synth pad or sustained string section.
Solo Voice/Instrument and Preserve Formant options maintain realism.
Resample (Affects Pitch) Speeds or slows the playback of a clip to fit the new length without maintaining pitch. This
setting is commonly used in R&B and hip hop to achieve exaggerated stretching and compressing of drum tracks,
creating a lo-fi sound. This setting also works well for vocals, allowing subtle to radical changes in timbre.
Beat Splice Stretchestheclipbasedonbeatsdetectedwithinthefile.Thissettingworksonlyonclipsthathavevery
sharp, transient sounds, like drums. If the waveform already has beat markers, select Use File’s Beat Markers to use
them. Otherwise, select Auto-Find and adjust the default values as needed.
Hybrid Uses the current Time-Scale Stretch settings when you shorten the clip, and uses the current Beat Splice
settings when you lengthen it.