
Operation Manual
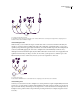
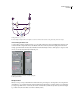
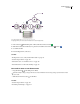

Table Of Contents
- Contents
- Chapter 1: Getting started
- Chapter 2: Digital audio fundamentals
- Chapter 3: Workflow and workspace
- Chapter 4: Setting up Adobe Audition
- Chapter 5: Importing, recording, and playing audio
- Chapter 6: Editing audio files
- Displaying audio in Edit View
- Selecting audio
- Copying, cutting, pasting, and deleting audio
- Visually fading and changing amplitude
- Working with markers
- Creating and deleting silence
- Inverting and reversing audio
- Generating audio
- Analyzing phase, frequency, and amplitude
- Converting sample types
- Recovery and undo
- Chapter 7: Applying effects
- Chapter 8: Effects reference
- Amplitude and compression effects
- Delay and echo effects
- Filter and equalizer effects
- Modulation effects
- Restoration effects
- Reverb effects
- Special effects
- Stereo imagery effects
- Changing stereo imagery
- Binaural Auto-Panner effect (Edit View only)
- Center Channel Extractor effect
- Channel Mixer effect
- Doppler Shifter effect (Edit View only)
- Graphic Panner effect
- Pan/Expand effect (Edit View only)
- Stereo Expander effect
- Stereo Field Rotate VST effect
- Stereo Field Rotate process effect (Edit View only)
- Time and pitch manipulation effects
- Multitrack effects
- Chapter 9: Mixing multitrack sessions
- Chapter 10: Composing with MIDI
- Chapter 11: Loops
- Chapter 12: Working with video
- Chapter 13: Creating surround sound
- Chapter 14: Saving and exporting
- Saving and exporting files
- Audio file formats
- About audio file formats
- 64-bit doubles (RAW) (.dbl)
- 8-bit signed (.sam)
- A/mu-Law Wave (.wav)
- ACM Waveform (.wav)
- Amiga IFF-8SVX (.iff, .svx)
- Apple AIFF (.aif, .snd)
- ASCII Text Data (.txt)
- Audition Loop (.cel)
- Creative Sound Blaster (.voc)
- Dialogic ADPCM (.vox)
- DiamondWare Digitized (.dwd)
- DVI/IMA ADPCM (.wav)
- Microsoft ADPCM (.wav)
- mp3PRO (.mp3)
- NeXT/Sun (.au, .snd)
- Ogg Vorbis (.ogg)
- SampleVision (.smp)
- Spectral Bitmap Image (.bmp)
- Windows Media Audio (.wma)
- Windows PCM (.wav, .bwf)
- PCM Raw Data (.pcm, .raw)
- Video file formats
- Adding file information
- Chapter 15: Automating tasks
- Chapter 16: Building audio CDs
- Chapter 17: Keyboard shortcuts
- Chapter 18: Digital audio glossary
- Index

ADOBE AUDITION 3.0
User Guide
193
See also
“Trimming and extending clips” on page 195
“Fade or crossfade clips in a track” on page 197
Group clips
1
Hold down the Ctrl key, and click each clip you want in the group.
2 Choose Clip > Group Clips. Alternatively, right-click any clip in the group, and choose Group Clips.
Ungroup clips
❖ Select any clip in the group, and choose Clip > Group Clips.
Change the color for a group
1
Select any clip in the group, and choose Clip > Group Color.
2 Select a color, and click OK.
Align clips
You can align the left or right edges of multiple clips, giving them the same start or end point.
1 Hold down Ctrl, and select the clips.
2 Choose Clip > Align Left or Clip > Align Right.
Note: Because the relative position of grouped clips is fixed, you must ungroup them to align them.
Snap to clip and loop endpoints
Snapping lets you quickly align clips with loops and other clips. If snapping is enabled, both dragged clips and the
start-time indicator snap to loop endpoints and clip edges.
While you drag a clip, a white line appears in the Main panel when snapping points meet. For example, if Snap To
Clips is selected, the white line appears when a clip is aligned with the beginning or end of another clip.
❖ Choose Edit > Snapping, and choose from the following options:
Snap To Clips Causes clips to snap to the beginning or end of other clips.
Snap To Loop Endpoints Causes clips to snap to the beginning or end of loops.
This section describes snapping options that are unique to Multitrack View. For information about snapping options
that Multitrack View shares with Edit View, see “Snap to markers, rulers, frames, and zero crossings” on page 76.
Copy a clip
You can create two types of copied audio clips: reference copies that share source files and unique copies that have
independent source files. The type of copy you choose depends upon the amount of available disk space and the
nature of destructive editing you plan to perform in Edit View.
Reference copies consume no additional disk space, letting you simultaneously edit all instances by editing the
original source file. (For example, you can add the Flanger effect to a source file in Edit View and automatically apply
the effect to all 30 referenced copies in a session.)