
Operation Manual
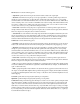
Table Of Contents
- Contents
- Chapter 1: Getting started
- Chapter 2: Digital audio fundamentals
- Chapter 3: Workflow and workspace
- Chapter 4: Setting up Adobe Audition
- Chapter 5: Importing, recording, and playing audio
- Chapter 6: Editing audio files
- Displaying audio in Edit View
- Selecting audio
- Copying, cutting, pasting, and deleting audio
- Visually fading and changing amplitude
- Working with markers
- Creating and deleting silence
- Inverting and reversing audio
- Generating audio
- Analyzing phase, frequency, and amplitude
- Converting sample types
- Recovery and undo
- Chapter 7: Applying effects
- Chapter 8: Effects reference
- Amplitude and compression effects
- Delay and echo effects
- Filter and equalizer effects
- Modulation effects
- Restoration effects
- Reverb effects
- Special effects
- Stereo imagery effects
- Changing stereo imagery
- Binaural Auto-Panner effect (Edit View only)
- Center Channel Extractor effect
- Channel Mixer effect
- Doppler Shifter effect (Edit View only)
- Graphic Panner effect
- Pan/Expand effect (Edit View only)
- Stereo Expander effect
- Stereo Field Rotate VST effect
- Stereo Field Rotate process effect (Edit View only)
- Time and pitch manipulation effects
- Multitrack effects
- Chapter 9: Mixing multitrack sessions
- Chapter 10: Composing with MIDI
- Chapter 11: Loops
- Chapter 12: Working with video
- Chapter 13: Creating surround sound
- Chapter 14: Saving and exporting
- Saving and exporting files
- Audio file formats
- About audio file formats
- 64-bit doubles (RAW) (.dbl)
- 8-bit signed (.sam)
- A/mu-Law Wave (.wav)
- ACM Waveform (.wav)
- Amiga IFF-8SVX (.iff, .svx)
- Apple AIFF (.aif, .snd)
- ASCII Text Data (.txt)
- Audition Loop (.cel)
- Creative Sound Blaster (.voc)
- Dialogic ADPCM (.vox)
- DiamondWare Digitized (.dwd)
- DVI/IMA ADPCM (.wav)
- Microsoft ADPCM (.wav)
- mp3PRO (.mp3)
- NeXT/Sun (.au, .snd)
- Ogg Vorbis (.ogg)
- SampleVision (.smp)
- Spectral Bitmap Image (.bmp)
- Windows Media Audio (.wma)
- Windows PCM (.wav, .bwf)
- PCM Raw Data (.pcm, .raw)
- Video file formats
- Adding file information
- Chapter 15: Automating tasks
- Chapter 16: Building audio CDs
- Chapter 17: Keyboard shortcuts
- Chapter 18: Digital audio glossary
- Index

ADOBE AUDITION 3.0
User Guide
171
FFT Size Sets the FFT (Fast Fourier Transform) size, or the size of the pieces of data that the effect processes. In
general, use smaller values for correcting higher frequencies. For voices, a setting of 2048 or 4096 sounds most
natural, and a setting of 1024 creates robotic effects.
Pitch Reference graph Displays the pitch in single half-step increments along the vertical ruler (y-axis) and time
along the horizontal ruler (x-axis), so that you can see the exact transitions of the pitch in all parts of the source audio.
Pitch Profile and Pitch Correction lines Show the amount of correction you need at any given point in a waveform.
The red Pitch Profile line is not editable, and the green Pitch Correction line appears as you modify the edit envelope
in the Pitch Edit graph.
Pitch Edit graph Displays the pitch in half-step pitch increments along the y-axis and time (in the same format as the
timeline along the bottom of the display window) along the x-axis. If the source is a stereo file, the graph shows the
channel you specified as the Reference Channel.
The Pitch Edit graph has two main components:
• Adjustable blue envelope line Lets you control how pitch correction is applied. Click on the line to create a
control point, which you can drag to set the correction for the audio material at that point in the time scale. For more
precision, right-click a control point to display the Edit Point dialog box, where you can enter values for Time Index
(x-axis) and Pitch (y-axis).
• Readout below the graph Shows the position of a control point as you drag it.
Vertical scroll bar Lets you scroll to a different portion of the Pitch Reference graph. Zoom in or out by dragging the
edge of the slider.
Horizontal scroll bar Lets you scroll to a different time range of the waveform in both graphs. Zoom in or out by
dragging the edge of the slider.
You can also zoom by right-clicking the sliders and choosing Zoom Out or Zoom Out Full.
Zoom buttons Zoom in and out of the Pitch Edit graph. The maximum amount you can zoom in is plus or minus
one-half step. The maximum you can zoom out is plus or minus 200 cents. (The waveform isn’t affected by vertical
zooming, so it always retains the same vertical size.)
Pitch Shifter effect
The Time And Pitch > Pitch Shifter effect changes musical pitch. Unlike the other pitch manipulation effects,
however, Pitch Shifter is VST-based, so you can combine it with other effects in the Mastering Rack or Effects Rack.
In Multitrack View, you can also vary pitch over time by using automation lanes. (See “Automating track settings” on
page 204.)
See also
“Applying effects in Edit View” on page 106
“Applying effects in Multitrack View” on page 107
“Use effect presets” on page 104
“Add preroll and postroll to effects previews” on page 107