
Operation Manual
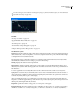

Table Of Contents
- Contents
- Chapter 1: Getting started
- Chapter 2: Digital audio fundamentals
- Chapter 3: Workflow and workspace
- Chapter 4: Setting up Adobe Audition
- Chapter 5: Importing, recording, and playing audio
- Chapter 6: Editing audio files
- Displaying audio in Edit View
- Selecting audio
- Copying, cutting, pasting, and deleting audio
- Visually fading and changing amplitude
- Working with markers
- Creating and deleting silence
- Inverting and reversing audio
- Generating audio
- Analyzing phase, frequency, and amplitude
- Converting sample types
- Recovery and undo
- Chapter 7: Applying effects
- Chapter 8: Effects reference
- Amplitude and compression effects
- Delay and echo effects
- Filter and equalizer effects
- Modulation effects
- Restoration effects
- Reverb effects
- Special effects
- Stereo imagery effects
- Changing stereo imagery
- Binaural Auto-Panner effect (Edit View only)
- Center Channel Extractor effect
- Channel Mixer effect
- Doppler Shifter effect (Edit View only)
- Graphic Panner effect
- Pan/Expand effect (Edit View only)
- Stereo Expander effect
- Stereo Field Rotate VST effect
- Stereo Field Rotate process effect (Edit View only)
- Time and pitch manipulation effects
- Multitrack effects
- Chapter 9: Mixing multitrack sessions
- Chapter 10: Composing with MIDI
- Chapter 11: Loops
- Chapter 12: Working with video
- Chapter 13: Creating surround sound
- Chapter 14: Saving and exporting
- Saving and exporting files
- Audio file formats
- About audio file formats
- 64-bit doubles (RAW) (.dbl)
- 8-bit signed (.sam)
- A/mu-Law Wave (.wav)
- ACM Waveform (.wav)
- Amiga IFF-8SVX (.iff, .svx)
- Apple AIFF (.aif, .snd)
- ASCII Text Data (.txt)
- Audition Loop (.cel)
- Creative Sound Blaster (.voc)
- Dialogic ADPCM (.vox)
- DiamondWare Digitized (.dwd)
- DVI/IMA ADPCM (.wav)
- Microsoft ADPCM (.wav)
- mp3PRO (.mp3)
- NeXT/Sun (.au, .snd)
- Ogg Vorbis (.ogg)
- SampleVision (.smp)
- Spectral Bitmap Image (.bmp)
- Windows Media Audio (.wma)
- Windows PCM (.wav, .bwf)
- PCM Raw Data (.pcm, .raw)
- Video file formats
- Adding file information
- Chapter 15: Automating tasks
- Chapter 16: Building audio CDs
- Chapter 17: Keyboard shortcuts
- Chapter 18: Digital audio glossary
- Index

ADOBE AUDITION 3.0
User Guide
151
If the selected range is too short, Capture Profile is disabled. Reduce the FFT Size or select a longer range of noise. If
you can’t find a longer range, copy and paste the currently selected range to create one. (You can later remove the
pasted noise by using the Edit > Delete Selection command.)
Snapshots In Profile Determines how many snapshots of noise to include in the captured profile. A value of 4000 is
optimal for producing accurate data.
Very small values greatly affect the quality of the various noise reduction levels. With more samples, a noise
reduction level of 100 will likely cut out more noise, but also cut out more original signal. However, a low noise
reduction level with more samples will also cut out more noise, but likely will not disrupt the intended signal.
Load From File Opens any noise profile previously saved from Adobe Audition in FFT format. However, you can
apply noise profiles only to identical sample types. (For example, you can’t apply a 22 kHz, mono, 16-bit profile to
44kHz, stereo, 8-bit samples.)
Note: Because noise profiles are so specific, a profile for one type of noise won’t produce good results with other types. If
you regularly remove similar noise, however, a saved profile can greatly increase efficiency.
Save Saves the noise profile as an .fft file, which contains information about sample type, FFT (Fast Fourier
Transform) size, and three sets of FFT coefficients: one for the lowest amount of noise found, one for the highest
amount, and one for the power average.
Select Entire File Lets you apply a previously captured noise-reduction profile to the entire file.
Reduction graph Sets the amount of noise reduction at certain frequency ranges. For example, if you need noise
reduction only in the higher frequencies, adjust the chart to give less noise reduction in the low frequencies, or alter-
natively, more reduction in the higher frequencies.
The graph depicts frequency along the x-axis (horizontal) and the amount of noise reduction along the y-axis
(vertical). If the graph is flattened (click Reset), then the amount of noise reduction used is based on the noise profile
exactly. The readout below the graph displays the frequency and adjustment percentage at the position of the cursor.
Log Scale Displays the Noise Profile graph in either linear or logarithmic fashion.
• Select Log Scale to divide the graph evenly into 10 octaves.
• Deselect Log Scale to divide the graph linearly, with each 1000 kHz (for example) taking up the same amount of
horizontal width.
Live Update Enables the Noise Profile graph to be redrawn as you move control points on the Reduction graph.
Noise Reduction Level Adjusts the amount of noise reduction to be applied to the waveform or selection. Alterna-
tively, enter the desired amount in the text box to the right of the slider.
Note: Depending on the original waveform and the type of noise removed, high noise reduction levels can sometimes
cause the remaining audio to have a flanged or phaselike quality. For better results, undo the effect and try a lower
setting.
Noise Reduction Settings Provides the following options:
• FFT Size Determines how many individual frequency bands are analyzed. This option causes the most drastic
changes in quality. The noise in each frequency band is treated separately, so the more bands you have, the finer
frequency detail you get in removing noise. For example, if there’s a 120 Hz hum, but not many frequency bands,
frequencies from 80 Hz on up to 160 Hz may be affected. With more bands, less spacing between them occurs, so
the actual noise is detected and removed more precisely. However, with too many bands, time slurring occurs,
making the resulting sound reverberant or echo-like (with pre- and post-echoes). So the tradeoff is frequency
resolution versus time resolution, with lower FFT sizes giving better time resolution and higher FFT sizes giving
better frequency resolution. Good settings for FFT Size range from 4096 to 12000.