
Operation Manual
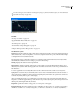

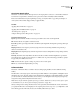
Table Of Contents
- Contents
- Chapter 1: Getting started
- Chapter 2: Digital audio fundamentals
- Chapter 3: Workflow and workspace
- Chapter 4: Setting up Adobe Audition
- Chapter 5: Importing, recording, and playing audio
- Chapter 6: Editing audio files
- Displaying audio in Edit View
- Selecting audio
- Copying, cutting, pasting, and deleting audio
- Visually fading and changing amplitude
- Working with markers
- Creating and deleting silence
- Inverting and reversing audio
- Generating audio
- Analyzing phase, frequency, and amplitude
- Converting sample types
- Recovery and undo
- Chapter 7: Applying effects
- Chapter 8: Effects reference
- Amplitude and compression effects
- Delay and echo effects
- Filter and equalizer effects
- Modulation effects
- Restoration effects
- Reverb effects
- Special effects
- Stereo imagery effects
- Changing stereo imagery
- Binaural Auto-Panner effect (Edit View only)
- Center Channel Extractor effect
- Channel Mixer effect
- Doppler Shifter effect (Edit View only)
- Graphic Panner effect
- Pan/Expand effect (Edit View only)
- Stereo Expander effect
- Stereo Field Rotate VST effect
- Stereo Field Rotate process effect (Edit View only)
- Time and pitch manipulation effects
- Multitrack effects
- Chapter 9: Mixing multitrack sessions
- Chapter 10: Composing with MIDI
- Chapter 11: Loops
- Chapter 12: Working with video
- Chapter 13: Creating surround sound
- Chapter 14: Saving and exporting
- Saving and exporting files
- Audio file formats
- About audio file formats
- 64-bit doubles (RAW) (.dbl)
- 8-bit signed (.sam)
- A/mu-Law Wave (.wav)
- ACM Waveform (.wav)
- Amiga IFF-8SVX (.iff, .svx)
- Apple AIFF (.aif, .snd)
- ASCII Text Data (.txt)
- Audition Loop (.cel)
- Creative Sound Blaster (.voc)
- Dialogic ADPCM (.vox)
- DiamondWare Digitized (.dwd)
- DVI/IMA ADPCM (.wav)
- Microsoft ADPCM (.wav)
- mp3PRO (.mp3)
- NeXT/Sun (.au, .snd)
- Ogg Vorbis (.ogg)
- SampleVision (.smp)
- Spectral Bitmap Image (.bmp)
- Windows Media Audio (.wma)
- Windows PCM (.wav, .bwf)
- PCM Raw Data (.pcm, .raw)
- Video file formats
- Adding file information
- Chapter 15: Automating tasks
- Chapter 16: Building audio CDs
- Chapter 17: Keyboard shortcuts
- Chapter 18: Digital audio glossary
- Index
ADOBE AUDITION 3.0
User Guide
148
To reduce other types of noise that have a wide frequency range, try the Noise Reduction effect. (See “Noise Reduction
effect (Edit View only)” on page 149.)
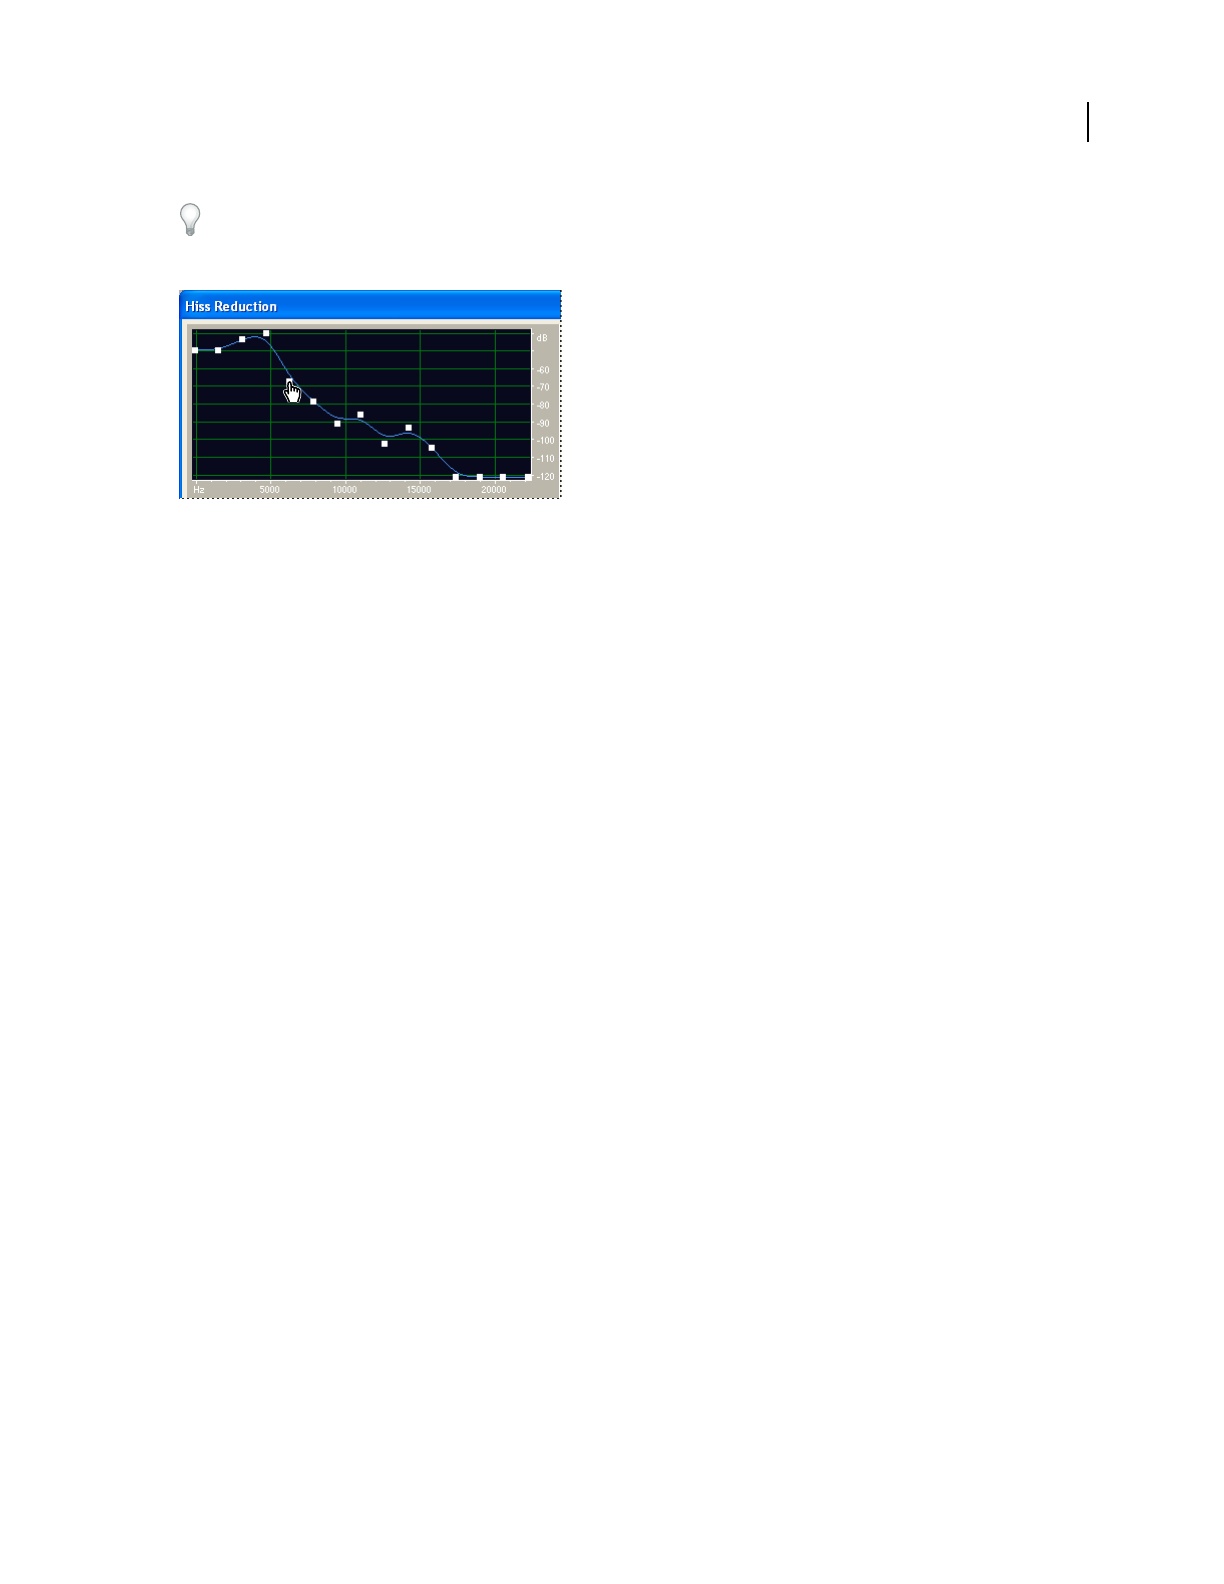
Using the Hiss Reduction graph to adjust the noise floor
See also
“About process effects” on page 104
“Apply individual effects in Edit View” on page 107
“Use effect presets” on page 104
“Control effects settings with graphs” on page 104
“Add preroll and postroll to effects previews” on page 107
Hiss Reduction options
Graph Represents the estimated noise floor that exists for each frequency in the source audio, with frequency along
the horizontal ruler (x-axis) and amplitude, or noise floor, along the vertical ruler (y-axis). This information helps
to distinguish hiss from desirable audio data.
The actual value used to perform hiss reduction is a combination of the graph and the Noise Floor Adjust slider,
which shifts the estimated noise floor reading up or down for fine tuning.
Viewing Displays the waveform’s left or right channel.
Get Noise Floor Graphs an estimate of the noise floor. The estimate is used by the Hiss Reduction effect to more
effectively remove just hiss while leaving regular audio untouched. Get Noise Floor is the most powerful feature of
Hiss Reduction.
To create a graph that most accurately reflects the noise floor, click Get Noise Floor with a section of just hiss
highlighted in a waveform. If you can’t identify such a section, select an area that has the least amount of music or
other desired audio, in addition to the least amount of high frequency information. (In spectral view, such an area
won’t have any activity in the top 75% of the display.)
After you identify the noise floor, you might need to lower the control points on the left (representing the lower
frequencies) to make the graph as flat as possible. If music was present at any frequency, the control points around
that frequency will be higher than they should be.
Drag Points Specifies the number of drag points, or control points, on the graph.
Reset (Hi, Med, Low) Resets the estimated noise floor. Click Hi to set the noise floor at - 50 dB (for very loud hiss),
click Med to set the floor to -70 dB (for average hiss), or click Low to set the floor to -90 dB (for very little hiss).