
Operation Manual
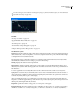

Table Of Contents
- Contents
- Chapter 1: Getting started
- Chapter 2: Digital audio fundamentals
- Chapter 3: Workflow and workspace
- Chapter 4: Setting up Adobe Audition
- Chapter 5: Importing, recording, and playing audio
- Chapter 6: Editing audio files
- Displaying audio in Edit View
- Selecting audio
- Copying, cutting, pasting, and deleting audio
- Visually fading and changing amplitude
- Working with markers
- Creating and deleting silence
- Inverting and reversing audio
- Generating audio
- Analyzing phase, frequency, and amplitude
- Converting sample types
- Recovery and undo
- Chapter 7: Applying effects
- Chapter 8: Effects reference
- Amplitude and compression effects
- Delay and echo effects
- Filter and equalizer effects
- Modulation effects
- Restoration effects
- Reverb effects
- Special effects
- Stereo imagery effects
- Changing stereo imagery
- Binaural Auto-Panner effect (Edit View only)
- Center Channel Extractor effect
- Channel Mixer effect
- Doppler Shifter effect (Edit View only)
- Graphic Panner effect
- Pan/Expand effect (Edit View only)
- Stereo Expander effect
- Stereo Field Rotate VST effect
- Stereo Field Rotate process effect (Edit View only)
- Time and pitch manipulation effects
- Multitrack effects
- Chapter 9: Mixing multitrack sessions
- Chapter 10: Composing with MIDI
- Chapter 11: Loops
- Chapter 12: Working with video
- Chapter 13: Creating surround sound
- Chapter 14: Saving and exporting
- Saving and exporting files
- Audio file formats
- About audio file formats
- 64-bit doubles (RAW) (.dbl)
- 8-bit signed (.sam)
- A/mu-Law Wave (.wav)
- ACM Waveform (.wav)
- Amiga IFF-8SVX (.iff, .svx)
- Apple AIFF (.aif, .snd)
- ASCII Text Data (.txt)
- Audition Loop (.cel)
- Creative Sound Blaster (.voc)
- Dialogic ADPCM (.vox)
- DiamondWare Digitized (.dwd)
- DVI/IMA ADPCM (.wav)
- Microsoft ADPCM (.wav)
- mp3PRO (.mp3)
- NeXT/Sun (.au, .snd)
- Ogg Vorbis (.ogg)
- SampleVision (.smp)
- Spectral Bitmap Image (.bmp)
- Windows Media Audio (.wma)
- Windows PCM (.wav, .bwf)
- PCM Raw Data (.pcm, .raw)
- Video file formats
- Adding file information
- Chapter 15: Automating tasks
- Chapter 16: Building audio CDs
- Chapter 17: Keyboard shortcuts
- Chapter 18: Digital audio glossary
- Index

ADOBE AUDITION 3.0
User Guide
147
Clip Restoration effect (Edit View only)
The Restoration > Clip Restoration effect repairs clipped waveforms by filling in clipped sections with new audio
data. Clipping occurs when the amplitude of a signal exceeds the maximum level for the current bit resolution (for
example, levels above 256 in 8-bit audio). Commonly, clipping results from recording levels that are too high. You
can monitor clipping during recording or playback by watching the Level Meters; when clipping occurs, the boxes
on the far right of the meters turn red.
Visually, clipped audio appears as broad flat areas at the top of a waveform. Sonically, clipped audio is a static-like
distortion.
Note: IfyouneedtoadjusttheDCoffsetofclippedaudio,firstusetheClipRestorationeffect.IfyouinsteadadjustDC
offset first, the Clip Restoration effect won’t identify clipped areas that fall below 0 dBFS.
See also
“About process effects” on page 104
“Apply individual effects in Edit View” on page 107
“Use effect presets” on page 104
Clip Restoration options
Input Attenuation Specifies the amount of amplification that occurs before processing.
Overhead Specifies the percentage of variation in clipped regions. A value of 0% detects clipping only in perfectly
horizontal lines at maximum amplitude. A value of 1% detects clipping beginning at 1% below maximum amplitude.
(A value of 1% detects almost all clipping and leads to a more thorough repair.)
Minimum Run Size Specifies the length of the shortest run of clipped samples to repair. A value of 1 repairs all
samples that seem to be clipped, while a value of 2 repairs a clipped sample only if it’s followed or preceded by another
clipped sample.
FFT Size Sets an FFT (Fast Fourier Transform) Size, measured in samples, if audio is severely clipped (for example,
because of too much bass). In this case, you want to estimate the higher frequency signals in the clipped areas. Using
the FFT Size option in other situations might help with some types of clipping. (Try a setting of 40 for normal clipped
audio.) In general, however, leave FFT Size unselected. If FFT Size is unselected, Adobe Audition uses spline curve
estimation.
Clipping Statistics Shows the minimum and maximum sample values found in the current selected range, as well as
the percent of samples clipped based on that data.
Gather Statistics Now Updates the Clipping Statistics values for the current selection or file.
To retain amplitude when restoring clipped audio, work at 32-bit resolution for more precise editing. (See “Change
the bit depth of a file” on page 99.) Then apply the Clip Restoration effect with no attenuation, followed by the Hard
Limiting effect with a Boost value of 0 and a Limit value of -0.2 dB.
Hiss Reduction effect (Edit View only)
The Restoration > Hiss Reduction effect reduces hiss from sources such as audio cassettes, vinyl records, or micro-
phones. This effect greatly lowers the amplitude of a frequency range if it falls below an amplitude threshold called
the noise floor. Audio in frequency ranges that are louder than the threshold remain untouched. If audio has a
consistent level of background hiss, that hiss can be removed completely.