
Operation Manual

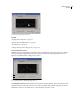
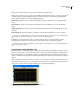
Table Of Contents
- Contents
- Chapter 1: Getting started
- Chapter 2: Digital audio fundamentals
- Chapter 3: Workflow and workspace
- Chapter 4: Setting up Adobe Audition
- Chapter 5: Importing, recording, and playing audio
- Chapter 6: Editing audio files
- Displaying audio in Edit View
- Selecting audio
- Copying, cutting, pasting, and deleting audio
- Visually fading and changing amplitude
- Working with markers
- Creating and deleting silence
- Inverting and reversing audio
- Generating audio
- Analyzing phase, frequency, and amplitude
- Converting sample types
- Recovery and undo
- Chapter 7: Applying effects
- Chapter 8: Effects reference
- Amplitude and compression effects
- Delay and echo effects
- Filter and equalizer effects
- Modulation effects
- Restoration effects
- Reverb effects
- Special effects
- Stereo imagery effects
- Changing stereo imagery
- Binaural Auto-Panner effect (Edit View only)
- Center Channel Extractor effect
- Channel Mixer effect
- Doppler Shifter effect (Edit View only)
- Graphic Panner effect
- Pan/Expand effect (Edit View only)
- Stereo Expander effect
- Stereo Field Rotate VST effect
- Stereo Field Rotate process effect (Edit View only)
- Time and pitch manipulation effects
- Multitrack effects
- Chapter 9: Mixing multitrack sessions
- Chapter 10: Composing with MIDI
- Chapter 11: Loops
- Chapter 12: Working with video
- Chapter 13: Creating surround sound
- Chapter 14: Saving and exporting
- Saving and exporting files
- Audio file formats
- About audio file formats
- 64-bit doubles (RAW) (.dbl)
- 8-bit signed (.sam)
- A/mu-Law Wave (.wav)
- ACM Waveform (.wav)
- Amiga IFF-8SVX (.iff, .svx)
- Apple AIFF (.aif, .snd)
- ASCII Text Data (.txt)
- Audition Loop (.cel)
- Creative Sound Blaster (.voc)
- Dialogic ADPCM (.vox)
- DiamondWare Digitized (.dwd)
- DVI/IMA ADPCM (.wav)
- Microsoft ADPCM (.wav)
- mp3PRO (.mp3)
- NeXT/Sun (.au, .snd)
- Ogg Vorbis (.ogg)
- SampleVision (.smp)
- Spectral Bitmap Image (.bmp)
- Windows Media Audio (.wma)
- Windows PCM (.wav, .bwf)
- PCM Raw Data (.pcm, .raw)
- Video file formats
- Adding file information
- Chapter 15: Automating tasks
- Chapter 16: Building audio CDs
- Chapter 17: Keyboard shortcuts
- Chapter 18: Digital audio glossary
- Index

ADOBE AUDITION 3.0
User Guide
134
High Shelf Cutoff and Level Determines affected high frequencies and their amplitude. Set the cutoff frequency with
the second slider below the graph, and increase or decrease treble with the slider at the right of the graph. Use the
High Shelf Cutoff to reduce hiss, amplifier noise, and the like.
Second Order buttons Adjust the low and high shelves by 12 dB per octave. (The default, first-order filters adjust the
shelves by 6 dB per octave.)
Frequency Bands Places up to five intermediate bands into the EQ circuit, giving you very fine control over the
shape of the equalization curve. Select the box next to a slider to activate the band and its corresponding volume
slider and Hz text box, both of which control the center frequency at which the boost or cut occurs. The vertical
sliders in the upper right of the Parametric Equalizer dialog box control the amount of boost or cut. You can also
specify the amount of boost or cut in the text box below each slider.
Amplitude sliders Set the boost or attenuation for each frequency band.
Ultra-Quiet Virtually eliminates noise and artifacts, but requires significant processing. This option is audible only
on state-of-the-art, professional monitoring systems.
Constant Q, Constant Width Describes a frequency band’s width as either a Q value (which is a ratio of width to
center frequency) or an absolute width value in Hz. Constant Q is the most common setting, but you may want to
use Constant Width if, for example, you want the length of ringing to be a constant, no matter what frequency is
boosted.
Q / Width Controls the width of the affected frequency band, measured in either Q or Width values. Low Q values
(or high Width values) affect a larger range of frequencies. Very high Q values (close to 100) affect only a very narrow
band and are ideal for notch filters where only a particular frequency needs to be removed, like a 60 Hz hum.
Be aware that whenever a very narrow band is boosted, it tends to ring or resonate at the audio at that frequency. Q
values of 1 to 10 are used most often for general equalization.
Gain Compensates for an overall volume level that might be too loud or too soft after you adjust the EQ settings.
Quick Filter effect (Edit View only)
The Filter And EQ > Quick Filter effect is an 8-band graphic equalizer that you can easily customize to suit many
filtering needs. Unlike a standard graphic equalizer, settings for the individual frequency bands interact with nearby
frequencies. For example, significantly boosting the level of the highest 22 kHz frequency band moderately boosts
the level of lower frequencies. This behavior helps you to quickly and easily enhance audio tone.
To change the equalization setting over time, use different Initial and Final settings. Using this approach, you can
create many interesting effects, such as bass-heavy equalization that gradually changes to flat equalization at the
introduction of a song.
See also
“About process effects” on page 104
“Apply individual effects in Edit View” on page 107
“Use effect presets” on page 104
“Add preroll and postroll to effects previews” on page 107
Quick Filter options
Lock To These Settings Only Determines whether settings are fixed or varied.