
Operation Manual

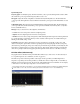
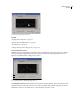
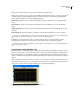
Table Of Contents
- Contents
- Chapter 1: Getting started
- Chapter 2: Digital audio fundamentals
- Chapter 3: Workflow and workspace
- Chapter 4: Setting up Adobe Audition
- Chapter 5: Importing, recording, and playing audio
- Chapter 6: Editing audio files
- Displaying audio in Edit View
- Selecting audio
- Copying, cutting, pasting, and deleting audio
- Visually fading and changing amplitude
- Working with markers
- Creating and deleting silence
- Inverting and reversing audio
- Generating audio
- Analyzing phase, frequency, and amplitude
- Converting sample types
- Recovery and undo
- Chapter 7: Applying effects
- Chapter 8: Effects reference
- Amplitude and compression effects
- Delay and echo effects
- Filter and equalizer effects
- Modulation effects
- Restoration effects
- Reverb effects
- Special effects
- Stereo imagery effects
- Changing stereo imagery
- Binaural Auto-Panner effect (Edit View only)
- Center Channel Extractor effect
- Channel Mixer effect
- Doppler Shifter effect (Edit View only)
- Graphic Panner effect
- Pan/Expand effect (Edit View only)
- Stereo Expander effect
- Stereo Field Rotate VST effect
- Stereo Field Rotate process effect (Edit View only)
- Time and pitch manipulation effects
- Multitrack effects
- Chapter 9: Mixing multitrack sessions
- Chapter 10: Composing with MIDI
- Chapter 11: Loops
- Chapter 12: Working with video
- Chapter 13: Creating surround sound
- Chapter 14: Saving and exporting
- Saving and exporting files
- Audio file formats
- About audio file formats
- 64-bit doubles (RAW) (.dbl)
- 8-bit signed (.sam)
- A/mu-Law Wave (.wav)
- ACM Waveform (.wav)
- Amiga IFF-8SVX (.iff, .svx)
- Apple AIFF (.aif, .snd)
- ASCII Text Data (.txt)
- Audition Loop (.cel)
- Creative Sound Blaster (.voc)
- Dialogic ADPCM (.vox)
- DiamondWare Digitized (.dwd)
- DVI/IMA ADPCM (.wav)
- Microsoft ADPCM (.wav)
- mp3PRO (.mp3)
- NeXT/Sun (.au, .snd)
- Ogg Vorbis (.ogg)
- SampleVision (.smp)
- Spectral Bitmap Image (.bmp)
- Windows Media Audio (.wma)
- Windows PCM (.wav, .bwf)
- PCM Raw Data (.pcm, .raw)
- Video file formats
- Adding file information
- Chapter 15: Automating tasks
- Chapter 16: Building audio CDs
- Chapter 17: Keyboard shortcuts
- Chapter 18: Digital audio glossary
- Index

ADOBE AUDITION 3.0
User Guide
129
Dynamic EQ options
Frequency graph Sets the EQ frequency. The horizontal ruler (x-axis) represents the length of the selection, while
the vertical ruler (y-axis) represents the frequency that’s boosted or cut.
Gain graph Adjusts the amount of amplitude or attenuation the Dynamic EQ effect uses. The horizontal ruler
(x-axis) represents the length of the selection, while the vertical ruler (y-axis) represents the dB level that’s boosted
or cut.
Q (Bandwidth) graph Adjusts the frequency bandwidth affected by the Dynamic EQ effect. The horizontal ruler
(x-axis) represents time, and the vertical ruler (y-axis) represents bandwidth, measured in Q values. (As Q values
increase, bandwidth narrows.)
Filter Type Lets you select from Low Pass, High Pass, and Band Pass:
• Low Pass Preserves low frequencies and removes high frequencies.
• High Pass Preserves high frequencies and removes low frequencies.
• Band Pass Preserves a band (a range of frequencies) while attenuating all other frequencies. In the Stop Band text
box, specify the number of decibels by which you want to attenuate other frequencies. For traditional band pass
filtering, use the default setting, -30 dB.
Loop Graph Restricts the graph to the length you specify so the effect loops repeatedly over the course of the
selection. Selecting this option enables a menu for specifying Period (how long the graph should be), Frequency
(how fast the loop should repeat), Tempo (how many beats per minute the loop should have), and Total Cycles (how
many times you want the graph to loop in the given selection). These settings interact; changing one changes the
others. If Loop Graph is deselected, the graph equals the length of the entire selection, so the effect doesn’t loop.
FFT Filter effect (Edit View only)
The graphic nature of the Filter And EQ > FFT Filter effect makes it easy to draw curves or notches that reject or
boost specific frequencies. (For a definition, see “FFT” on page 275.)
This effect can produce broad band-pass filters such as high- and low-pass filters (to maintain high and low
frequencies, respectively), narrow band-pass filters (to simulate the sound of a telephone call), or notch filters (to
eliminate very narrow frequency bands). The noise level of the FFT Filter effect is lower than that of 16-bit samples,
so it introduces no noise when processing audio at 16-bit resolution or lower.
For optimal results, filter 32-bit samples so you can perform multiple transforms without losing audible data. If the
source audio is 8- or 16-bit, convert it to 32-bit, filter it, and convert back to 8- or 16-bit with dithering.
FFT Filter graph (De-Esser preset)