
Operation Manual

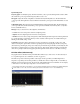
Table Of Contents
- Contents
- Chapter 1: Getting started
- Chapter 2: Digital audio fundamentals
- Chapter 3: Workflow and workspace
- Chapter 4: Setting up Adobe Audition
- Chapter 5: Importing, recording, and playing audio
- Chapter 6: Editing audio files
- Displaying audio in Edit View
- Selecting audio
- Copying, cutting, pasting, and deleting audio
- Visually fading and changing amplitude
- Working with markers
- Creating and deleting silence
- Inverting and reversing audio
- Generating audio
- Analyzing phase, frequency, and amplitude
- Converting sample types
- Recovery and undo
- Chapter 7: Applying effects
- Chapter 8: Effects reference
- Amplitude and compression effects
- Delay and echo effects
- Filter and equalizer effects
- Modulation effects
- Restoration effects
- Reverb effects
- Special effects
- Stereo imagery effects
- Changing stereo imagery
- Binaural Auto-Panner effect (Edit View only)
- Center Channel Extractor effect
- Channel Mixer effect
- Doppler Shifter effect (Edit View only)
- Graphic Panner effect
- Pan/Expand effect (Edit View only)
- Stereo Expander effect
- Stereo Field Rotate VST effect
- Stereo Field Rotate process effect (Edit View only)
- Time and pitch manipulation effects
- Multitrack effects
- Chapter 9: Mixing multitrack sessions
- Chapter 10: Composing with MIDI
- Chapter 11: Loops
- Chapter 12: Working with video
- Chapter 13: Creating surround sound
- Chapter 14: Saving and exporting
- Saving and exporting files
- Audio file formats
- About audio file formats
- 64-bit doubles (RAW) (.dbl)
- 8-bit signed (.sam)
- A/mu-Law Wave (.wav)
- ACM Waveform (.wav)
- Amiga IFF-8SVX (.iff, .svx)
- Apple AIFF (.aif, .snd)
- ASCII Text Data (.txt)
- Audition Loop (.cel)
- Creative Sound Blaster (.voc)
- Dialogic ADPCM (.vox)
- DiamondWare Digitized (.dwd)
- DVI/IMA ADPCM (.wav)
- Microsoft ADPCM (.wav)
- mp3PRO (.mp3)
- NeXT/Sun (.au, .snd)
- Ogg Vorbis (.ogg)
- SampleVision (.smp)
- Spectral Bitmap Image (.bmp)
- Windows Media Audio (.wma)
- Windows PCM (.wav, .bwf)
- PCM Raw Data (.pcm, .raw)
- Video file formats
- Adding file information
- Chapter 15: Automating tasks
- Chapter 16: Building audio CDs
- Chapter 17: Keyboard shortcuts
- Chapter 18: Digital audio glossary
- Index

ADOBE AUDITION 3.0
User Guide
127
See also
“Applying effects in Edit View” on page 106
“Applying effects in Multitrack View” on page 107
“Use effect presets” on page 104
“Add preroll and postroll to effects previews” on page 107
Multitap Delay options
Delay Units Displays the different delay units and their settings in the format: Delay [delay time] at [Offset]
([Feedback percentage]). Select a delay unit in the list to adjust its delay settings. Click Add New to create a new Delay
Unit with the current Delay Settings. Click Remove to delete the selected Delay Unit.
Delay Lets you adjust the following delay parameters for each unit:
• Delay Offset Adjusts the point in the delay line from which Adobe Audition takes the audio. It is then mixed into
an earlier point in the delay line, which causes echoing. Keep in mind that it’s the relative positions of the offsets of
the delay units that make a difference, not their absolute position. For instance, if you have two delay units at offsets
of 200 and 500, the resulting audio sounds the same as if they were at 100 and 400. The difference between the offsets
is what is important.
• Delay Time Specifies the number of milliseconds to wait before feeding the audio back into the delay line. The
result is an echo with a period of the delay given to be generated. With several delay units of varying delays added,
the final echo pattern can become very complex. Very short delays give ringing or robotic sounding events. Longer
delays give more distinct echoes.
• Feedback Represents the percentage of the original signal to feed back into the delay line. If the feedback is set
too high, ringing and feedback occur. The audio gets louder and louder until it clips and becomes distorted.
However,sometimesyoumaywantthiseffect,whichissimilartothefeedbackyouhearwhenalivemicrophoneis
settooclosetoaloudspeaker.Ifthefeedbackpercentageistoolow,thennotverymuchoftheoriginalsignalisfed
back into the loop. This results in a very subtle effect.
• Allpass Feedback Helps prevent the DC component from getting out of hand (the waveform tending upwards or
downwards until it clips). With the option selected, audio from the destination of the delay loop is mixed back into
audio from the originating delay offset. Instead of going one way (from the offset back a certain number of milli-
seconds), it also goes from the destination up to the source, creating a sort of forward feedback, or “feed-forward.”
This setting is handy when designing reverb effects.
Low Cut Filter and High Cut Filter Filter the audio being fed back into the delay line. Low Cut Filter reduces or boosts
the low frequencies, depending on the Cutoff and Boost settings. High Cut Filter reduces or boosts the high
frequencies, making each successive echo filtered slightly differently for interesting effects. The Low Cut Filter and
High Cut Filter provide two options:
• Cutoff Determines which frequencies are affected. Frequencies below this setting are affected by the Low Cut
Filter. Frequencies above this setting are affected by the High Cut Filter. Changes in the cutoff value affect the tone
of the echoes, as more or less of the frequencies are affected by the filter.
• Gain Sets the amount of filtering. Gain settings are usually negative, which means the audio is reduced in the
affected frequency range. Lower negative values result in more audio being cut. Positive values result in boosted
frequencies.