
Operation Manual
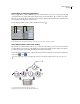
Table Of Contents
- Contents
- Chapter 1: Getting started
- Chapter 2: Digital audio fundamentals
- Chapter 3: Workflow and workspace
- Chapter 4: Setting up Adobe Audition
- Chapter 5: Importing, recording, and playing audio
- Chapter 6: Editing audio files
- Displaying audio in Edit View
- Selecting audio
- Copying, cutting, pasting, and deleting audio
- Visually fading and changing amplitude
- Working with markers
- Creating and deleting silence
- Inverting and reversing audio
- Generating audio
- Analyzing phase, frequency, and amplitude
- Converting sample types
- Recovery and undo
- Chapter 7: Applying effects
- Chapter 8: Effects reference
- Amplitude and compression effects
- Delay and echo effects
- Filter and equalizer effects
- Modulation effects
- Restoration effects
- Reverb effects
- Special effects
- Stereo imagery effects
- Changing stereo imagery
- Binaural Auto-Panner effect (Edit View only)
- Center Channel Extractor effect
- Channel Mixer effect
- Doppler Shifter effect (Edit View only)
- Graphic Panner effect
- Pan/Expand effect (Edit View only)
- Stereo Expander effect
- Stereo Field Rotate VST effect
- Stereo Field Rotate process effect (Edit View only)
- Time and pitch manipulation effects
- Multitrack effects
- Chapter 9: Mixing multitrack sessions
- Chapter 10: Composing with MIDI
- Chapter 11: Loops
- Chapter 12: Working with video
- Chapter 13: Creating surround sound
- Chapter 14: Saving and exporting
- Saving and exporting files
- Audio file formats
- About audio file formats
- 64-bit doubles (RAW) (.dbl)
- 8-bit signed (.sam)
- A/mu-Law Wave (.wav)
- ACM Waveform (.wav)
- Amiga IFF-8SVX (.iff, .svx)
- Apple AIFF (.aif, .snd)
- ASCII Text Data (.txt)
- Audition Loop (.cel)
- Creative Sound Blaster (.voc)
- Dialogic ADPCM (.vox)
- DiamondWare Digitized (.dwd)
- DVI/IMA ADPCM (.wav)
- Microsoft ADPCM (.wav)
- mp3PRO (.mp3)
- NeXT/Sun (.au, .snd)
- Ogg Vorbis (.ogg)
- SampleVision (.smp)
- Spectral Bitmap Image (.bmp)
- Windows Media Audio (.wma)
- Windows PCM (.wav, .bwf)
- PCM Raw Data (.pcm, .raw)
- Video file formats
- Adding file information
- Chapter 15: Automating tasks
- Chapter 16: Building audio CDs
- Chapter 17: Keyboard shortcuts
- Chapter 18: Digital audio glossary
- Index

ADOBE AUDITION 3.0
User Guide
113
Linear Fades (Fade tab) Causes the waveform’s sample values to be faded in an even, linear fashion, producing a
smooth slope from beginning to end.
Logarithmic Fades (Fade tab) Applies a logarithmic-style fade (also known as a power fade). If you select this option,
the amplitude of a signal fades at a constant rate, producing a steeper slope at one end of the fade (depending on
whether you fade in or out).
DC Bias Adjust Ensures that new recordings are perfectly centered. Some recording hardware may introduce a DC
bias, causing the recorded waveform to appear to be above or below the normal center line in the wave display. Many
waveform transformations require that the signal be centered.
• Select Absolute and then specify the final DC percentage in the L and R boxes. This option lets you cancel out DC
that’s not constant throughout a waveform. An extreme low-cut filter achieves this result. Keep in mind that the
actual amount adjusted varies with each sample. For example, if you have a significant DC change in one area of
thewave,atthatboundarywheretheDCchanges,theAbsoluteoptionmakesallpartsthesame.(However,there
willbeadiporpeakrightattheboundarypoint.)TointroduceaDCbiasbyskewingtheentireselectedwaveform
above or below the center line, enter a positive or negative percentage. For example, a setting of 50% moves the
entire waveform up halfway, and one of -50% moves it down halfway.
• Select Differential and click Find Zero Now to analyze the entire selected area to get the DC offset, and adjust every
sample by the inverse of that exact amount. The correct L and R percentages are entered automatically.
Peak Level Sets the peak level used for normalizing audio.
Calculate Now Scans the selection and adjusts the amplification sliders to normalize the selection according to the
peak level
Lock Left/Right Lets you adjust channels together or separately. Select this option to adjust the channels together,
maintaining the same settings for each. Leave this option unselected to adjust each channel separately. Separate
adjustments let you tweak the stereo balance or create cool panning effects.
View All Settings In dB Causes amplification values to appear in decibels; otherwise, they appear as a percentage of
the original waveform.
Dynamics Processing effect
The Amplitude And Compression > Dynamics Processing effect can be used as a compressor, limiter, or expander.
As a compressor and limiter, this effect reduces dynamic range, producing consistent volume levels. As an expander,
it increases dynamic range by reducing the level of low-level signals. (With extreme expander settings, you can totally
eliminate noise that falls below a specific amplitude threshold.)
The Dynamics Processing effect can produce subtle changes that you notice only after repeated listening. When
applying this effect in Edit View, use a copy of the original file so you can return to the original audio if necessary.
Use the Broadcast Limiter preset to simulate the processed sound of a contemporary FM radio station.