
Operation Manual
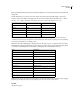
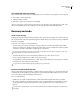
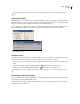
Table Of Contents
- Contents
- Chapter 1: Getting started
- Chapter 2: Digital audio fundamentals
- Chapter 3: Workflow and workspace
- Chapter 4: Setting up Adobe Audition
- Chapter 5: Importing, recording, and playing audio
- Chapter 6: Editing audio files
- Displaying audio in Edit View
- Selecting audio
- Copying, cutting, pasting, and deleting audio
- Visually fading and changing amplitude
- Working with markers
- Creating and deleting silence
- Inverting and reversing audio
- Generating audio
- Analyzing phase, frequency, and amplitude
- Converting sample types
- Recovery and undo
- Chapter 7: Applying effects
- Chapter 8: Effects reference
- Amplitude and compression effects
- Delay and echo effects
- Filter and equalizer effects
- Modulation effects
- Restoration effects
- Reverb effects
- Special effects
- Stereo imagery effects
- Changing stereo imagery
- Binaural Auto-Panner effect (Edit View only)
- Center Channel Extractor effect
- Channel Mixer effect
- Doppler Shifter effect (Edit View only)
- Graphic Panner effect
- Pan/Expand effect (Edit View only)
- Stereo Expander effect
- Stereo Field Rotate VST effect
- Stereo Field Rotate process effect (Edit View only)
- Time and pitch manipulation effects
- Multitrack effects
- Chapter 9: Mixing multitrack sessions
- Chapter 10: Composing with MIDI
- Chapter 11: Loops
- Chapter 12: Working with video
- Chapter 13: Creating surround sound
- Chapter 14: Saving and exporting
- Saving and exporting files
- Audio file formats
- About audio file formats
- 64-bit doubles (RAW) (.dbl)
- 8-bit signed (.sam)
- A/mu-Law Wave (.wav)
- ACM Waveform (.wav)
- Amiga IFF-8SVX (.iff, .svx)
- Apple AIFF (.aif, .snd)
- ASCII Text Data (.txt)
- Audition Loop (.cel)
- Creative Sound Blaster (.voc)
- Dialogic ADPCM (.vox)
- DiamondWare Digitized (.dwd)
- DVI/IMA ADPCM (.wav)
- Microsoft ADPCM (.wav)
- mp3PRO (.mp3)
- NeXT/Sun (.au, .snd)
- Ogg Vorbis (.ogg)
- SampleVision (.smp)
- Spectral Bitmap Image (.bmp)
- Windows Media Audio (.wma)
- Windows PCM (.wav, .bwf)
- PCM Raw Data (.pcm, .raw)
- Video file formats
- Adding file information
- Chapter 15: Automating tasks
- Chapter 16: Building audio CDs
- Chapter 17: Keyboard shortcuts
- Chapter 18: Digital audio glossary
- Index

ADOBE AUDITION 3.0
User Guide
97
Amplitude Statistics options
In the Amplitude Statistics dialog box, you can access specific waveform points from the General tab or change RMS
settings to recalculate the statistics.
General tab
Minimum Sample Value Shows the sample with the lowest amplitude. Click the arrow button to place the
start-time indicator at that location and close the Amplitude Statistics dialog box.
Maximum Sample Value Shows the sample with the highest amplitude. Click the arrow button to place the
start-time indicator at that location and close the Amplitude Statistics dialog box.
Peak Amplitude Shows the sample with the highest amplitude in decibel form. Click the arrow button to place
the start-time indicator at that location and close the Amplitude Statistics dialog box.
Possibly Clipped Samples Shows the number of samples that could exceed 0 dBFS. Click the arrow button to
place the start-time indicator at the first clipped sample and close the Amplitude Statistics dialog box. (If necessary,
choose Window > Amplitude Statistics, and click this arrow button again to detect subsequent clipped samples.)
DC Offset Shows the direct current offset of the center of the waveform, measured in percent. Positive values are
above the center line (zero volts), and negative values are below it.
Minimum RMS Power Shows the minimum RMS amplitude. Click the arrow button to place the start-time
indicator at that location and close the Amplitude Statistics dialog box.
Maximum RMS Power Shows the maximum RMS amplitude. Click the arrow button to place the start-time
indicator at that location and close the Amplitude Statistics dialog box.
Average RMS Power Shows the average amplitude. This value reflects perceived loudness.
Total RMS Power Represents the total power of the entire selection.
Actual Bit Depth Reports the waveform’s bit depth (or “float” if the waveform uses the full 32-bit float range).
Copy Data To Clipboard Copies all statistics on the General tab.
RMS Settings section
0dB = FS Sine Wave Sets the dB level of the RMS settings to correspond to a full-scale sine wave (where peak
amplitude is at 0 dB, using every sample value in the 16-bit range).
0dB = FS Square Wave Sets the dB level of the RMS settings to correspond to a full-scale square wave, where peak
amplitude is about 3.02 dB louder than a full-scale sine wave.
Account For DC Subtracts any DC offset to achieve the most accurate RMS values.
Window Width Specifies the number of milliseconds in each RMS window. A selected range contains a series of such
windows, which Adobe Audition averages to calculate the Minimum RMS and Maximum RMS values. To achieve
the most accurate RMS values, use wide windows for audio with a wide dynamic range, and narrow windows for
audio with a narrow dynamic range.
Recalculate RMS Updates the RMS values after you specify new RMS settings.