
Operation Manual


ENCORE CS3
User Guide
94
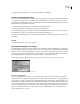
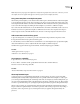
Dragging an image to a replacement layer replaces the contents of the layer and scales the imported image to fit within the drop zone.
You can add replacement layers to the Library panel, where they’re sorted in their own category. (See “Add items or
sets to the Library” on page 43.)
Create replacement layers
You can convert an object in a menu to a replacement layer or add a replacement layer to a menu in Photoshop and
then bring the menu back into your project. The key to creating a replacement layer is to size the placeholder appro-
priately for the image or video.
See also
“Convert a button or replacement layer to an object” on page 74
Convert an object to a replacement layer
1
In the Menu Viewer, open the menu to which you want to add the replacement layer.
2 Using the Direct Select tool, select the object that you want to use as the replacement layer.
3 Choose Object > Convert To Replacement Layer.
Encore creates a layer set with the (!) prefix, which indicates a replacement layer.
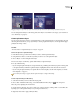
4 Do any of the following:
• If you’re using the replacement layer as a design element, drag a still image from the Project panel or Library panel
to the replacement layer. When the replacement layer is highlighted with a border, release the mouse button.
• If you’re using the replacement layer as a placeholder in a menu template, save the menu template. (See “Create
menu templates” on page 92.)
If too much of the image is cropped, edit the replacement layer or image in Photoshop.
Create a replacement layer in Photoshop
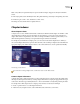
1
Select the menu that you want to edit in the Project panel.
2 Choose Edit > Edit Menu In Photoshop, or click the Edit Menu In Photoshop tool in the Tools panel.
Photoshop starts, displaying the selected menu.
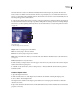
3 Create a layer for the image. You can use a shape tool or import an image. (Adding a white or colored fill to the
layer helps you see the replacement layer once you import it into Encore.)
4 (Optional) Add a mask or apply other layer effects.