
Operation Manual


ENCORE CS3
User Guide
63
See also
“Create menus using predesigned assets” on page 63
“Add objects to a menu” on page 64
“About creating menus in Photoshop” on page 97
Create menus using predesigned assets
An easy way to begin a project is to base your menu on the predesigned menus, buttons, images, and shapes found
in the Library panel.
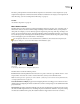
In addition to standard definition, Encore provides an assortment of high-definition menu templates and other
assets, and distinguishes them with an “HD” in their names. These can be used for any type of project (DVD, Blu-
ray, or Flash) and Encore will automatically scale them to the desired menu size when you build the project.
Note: You can use standard-definition menu templates in Blu-ray projects, but rather than scaling up, Encore will create
a standard-definition menu on the Blu-ray disc.
See also
“Add objects to a menu” on page 64
“About creating menus in Photoshop” on page 97
Create a menu based on a predesigned menu
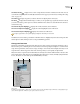
You can create a menu quickly using predefined menus from the Library panel. You can use a menus as is, just
changingthetext,oryoucanswapoutimagesthatbetterreflectthelookandfeelofyourproject.Thebuttonsonthe
Library panel let you view the elements of the current set by type: menus, buttons, images, backgrounds, layer sets,
text, shapes, and replacement layers.
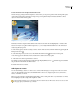
When you select an item, its preview appears at the top of the panel. Many menus have a companion submenu that
reflects the same style and contains a different number of buttons. The menus include buttons with subpictures (for
highlighting when the button is selected) and fully styled placeholders for text. The buttons on some menus provide
a thumbnail layer for video.
Note: Menus in the Library panel can be saved as regular menus (PSD) or as menu templates (EM). Regular menus
include a background and buttons, but no settings or links are stored. Menu templates include additional information
such as menu settings and background video and audio clips. (See “About menu templates” on page 92.)
1 In the Library panel, select the set you want to view from the Set menu, and then click the Toggle Display Of
Menus button to display the predesigned menus.
2 Selectthemenuthatyouwanttouse,andclicktheNewMenubutton atthebottomoftheLibrarypanel.(Press
the Up Arrow and Down Arrow keys to browse through the templates.)
The new menu appears in the Menu Viewer, and the menu is added to the Project panel.
3 Edit the menu to suit the needs of your project:
• Editthetext.IntheToolspanel,clicktheappropriatetexttool.Then,clickinthemenutocreateanewtextobject,
or click an existing text layer and edit the text as desired.
• Delete or duplicate buttons as desired. (See “Cut, copy, or duplicate a menu object” on page 73.)
• Set links from the buttons to other submenus or to items in the Project panel. (See “Buttons and navigation” on
page 156.)