
Operation Manual

ENCORE CS3
User Guide
56
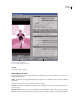
Create a custom preset
1 Choose File > Edit Quality Presets.
2 In the Export Settings section, choose MPEG2 Blu-ray, MPEG2 DVD, or H.264 Blu-ray from the Format menu,
and choose the preset you want to edit from the Preset menu.
3 If applicable, type a comment in the Comment box.
4 Click either the Audio or Video tab and adjust an option as desired. (See “Preset options for video” on page 54 and
“Preset options for audio” on page 55.)
5 When you finish adjusting the options, click the Save Preset button .
6 Type a name for your preset, and click OK.
Your new preset appears in the Presets menu in the Export Settings section of the Project Transcode Presets dialog box.
7 Click OK to close the Project Transcode Presets dialog box.
Export and import presets
After you fine-tune a preset for a project, you can export it for use in other projects.
Export a preset
1
Choose File > Edit Quality Presets.
2 In the Export Settings section, choose the preset you want to export from the Presets menu.
3 Alt-click (Windows) or Option-click (Mac OS) the Save Preset button to display the Export Preset dialog box.
4 Choose the location to save the preset, name it, and then click Save.
Import a preset
1
Choose File > Edit Quality Presets.
2 In the Export Settings section, click the Import Preset button to open the Import Preset dialog box.
3 Navigate to the location of the preset, select it, and then click Open.
4 Enter a name for the imported preset, and then click OK.
Delete custom presets
1 Choose File > Edit Quality Presets.
2 In the Export Settings section, do one of the following:
• To delete a single preset, choose the preset you want to delete from the Preset menu, and then click the Delete
Preset button . Click OK to confirm the deletion.
• To delete all custom presets, Ctrl-Alt-click (Windows) or Command-Option-click (Mac OS) the Delete Preset
button. Click Yes to confirm the deletion.