
Operation Manual

ENCORE CS3
User Guide
52
See also
“Transcode assets from the Project panel” on page 52
Transcode settings
You can specify an item’s transcode settings (by using a preset) from the DVD Transcode Settings or Blu-ray
Transcode Settings columns in the Project panel. (Separate columns, DVD Transcode Status and Blu-ray Transcode
Status, display either Transcoded or Untranscoded to show the item’s current state.) When you specify a preset, that
preset’s data rate is used, not the data rate you calculated in bit budgeting.
Assets are designated as follows in the DVD Transcode Settings and Blu-ray Transcode Settings columns:
Automatic Displayed for all non-DVD-compliant or non-Blu-ray Disc-compliant assets by default.
For assets with the Automatic designation, Encore determines the optimal settings for transcoding. Encore bases
these settings on the number, length, and size of the assets and the available disc space. (See “About bit budgeting”
on page 29.) You can override the Automatic data rate setting by specifying the Maximum Audio/Video Bitrate on
the Advanced tab of the Project Settings dialog box. (See “Transcode assets from the Project panel” on page 52.)
Alternatively, you can specify a transcode preset for any of these assets.
[A transcode preset name] Displayed for all non-DVD-compliant or non-Blu-ray Disc-compliant assets for which
you have specified a Project Transcode Preset.
Don’t Transcode Displayed for those assets that are already DVD-compliant or Blu-ray Disc-compliant. You can
override this setting and specify Automatic or a transcode preset, if desired.
Note: DVD/Blu-ray Disc-compliant, audio-only files that don’t match the audio encoding preference are the exception;
Encore assigns these audio files a designation of Automatic. You can override this setting and specify either Don’t
Transcode or a transcode preset. (Dolby® Digital 5.1 AC3 files retain the Don’t Transcode designation for quality
purposes; this designation can also be overridden to transcode to Dolby® Stereo format.)
N/A Displayed for those items, such as menus and timelines, that don’t require transcoding.
Transcode assets from the Project panel
You can assign transcode settings and transcode individual assets directly from the Project panel. Upon transcoding
a file, Encore updates the project link so that it points to the transcoded file. Consequently, unless you delete the
original file, you can revert transcoded assets to their original version. Encore transcodes in the background, so you
can continue to work while transcoding.
Note: If Encore is transcoding an asset in the background, you cannot delete timelines associated with the asset or assign
a different preset.
The data rate calculated for the Automatic transcode setting, determined by Encore, appears in the Bitrate column
in the Project panel. You can specify the maximum automatic data rate using the Advanced tab in the Project Settings
dialog box.
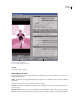
Assign a transcode setting to an asset
1
In the Project panel, right-click (Windows) or Control-click (Mac OS) the asset you want to transcode, and choose
Transcode Settings.
2 In the Transcode Settings dialog box, choose a transcode preset from one of the Quality Preset menus for DVD
Transcoding or Blu-ray Transcoding, and then click OK. (For information on editing the presets, see “About project
transcode presets” on page 53.)