
Operation Manual

ENCORE CS3
User Guide
127
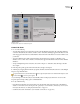
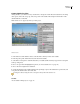
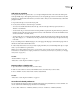
Slideshow Viewer
A. Slides area B. Audio area C. Slideshow options
Create slide shows
1 Do one of the following:
• To create a slide show from assets in the Project panel, select the still images and audio clips, right-click (Windows)
or Control-click (Mac OS) the selection, and choose New > Slideshow. Still images appear in the Slides area, and
audio clips appear in the Audio area of the Slideshow Viewer. The name of the slide show is based on the first asset
you selected.
• To create a blank slide show, make sure that nothing is selected in the project and choose Timeline > New
SlideshoworchooseFile>New>Slideshow.AnewslideshowappearsintheSlideshowViewernamed“Untitled
Slideshow.”
• To import multiple images into a slide show, choose File > Import As > Slideshow, select the images, and then
choose Open.
2 In the Properties panel, type the name of the slide show, and type a description.
3 Add images by dragging them from the Project panel to the Slides area in the Slideshow Viewer. To select multiple
images to drag, Shift-click them.
To expand the Slides area, click the Hide button on the right side of the Slides area to hide Slideshow Options. Click
the Show button to view the options again.
As you add images to a slide show, they are automatically scaled to fit the project dimensions. You can use the
Properties panel to change scaling options of individual slides.
4 Do any of the following:
• Drag the slides in the Slides area to change their order. Use the slider in the lower-left corner of the Slideshow
Viewer to zoom in and out. You can also press the + (plus) key to zoom in and the - (minus) key to zoom out. For
more keyboard shortcuts, see “Using keyboard shortcuts” on page 181.
• Set the slide show audio and duration. (See “Add audio to slide shows” on page 128.)
A
B
C