
Operation Manual

ENCORE CS3
User Guide
118
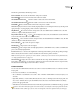
The Monitor panel includes the following controls:
Previous Subtitle Moves back to the first frame of the previous subtitle.
Next Subtitle Moves forward to the first frame of the next subtitle.
Trim Subtitle In-Point To Here Trims the subtitle so that it starts on the current frame.
Trim Subtitle Out-Point To Here Trims the subtitle so that it ends on the current frame.
Add Subtitle Adds a subtitle with the same format as the previous subtitle.
Timecode Displaysthetimecodeofthecurrentlydisplayedframe. You can change the timecode by selecting it and
typing new digits or by dragging the pointer to the left or right inside it.
Skip Backward Moves back one frame. To skip back to the closest GOP header in a MPEG-2 video, Alt-click
(Windows) or Option-click (Mac OS) the button.
Play and Pause buttons Plays orpauses thecurrentlyactivevideo,audio,andsubtitletrack.(Activetrackshave
an icon in the track selector box next to the track name.)
Skip Forward Moves forward one frame. To skip forward to the next GOP header in a MPEG-2 video, Alt-click
(Windows) or Option-click (Mac OS) the button.
Previous Chapter Skips back to the previous chapter.
Next Chapter Skips forward to the next chapter.
Add Chapter Adds a chapter at the currently displayed frame or, with MPEG-2 video, at the closest GOP header
prior to the currently displayed frame.
Zoom Level Increases or decreases the magnification of the image in the Monitor panel by the specified percentage.
If Fit is selected, the video frame is scaled to match the size of the monitor panel’s boundaries.
Note: You can also press the + (plus) key to zoom in and the - (minus) key to zoom out. For more keyboard shortcuts,
see “Using keyboard shortcuts” on page 181.
Show Safe Area Displays the action safe areas and title safe areas. Keep subtitles within the boundaries of the
inner guides to avoid clipping on some monitors. (Television monitors reduce the visible area of footage and menus.
The actual amount that is clipped varies from monitor to monitor.)
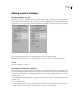
Create a timeline
You can create new blank timelines and add assets to them or create new timelines based on a selected asset in the
Project panel.
❖ To create a new timeline, do one of the following:
• Choose Timeline > New Timeline or choose File > New > Timeline. A blank timeline is created, ready for you to
add assets.
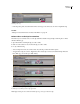
• Right-click (Windows) or Control-click (Mac OS) the video, audio, or still image asset in the Project panel, and
choose New > Timeline. Encore opens the Timeline Viewer and creates a new timeline with the asset already
placed on the appropriate track.
•
Click the Create A New Item button at the bottom of the Project panel and choose Timeline from the pop-up menu.
To place a video and an audio file together in the same timeline, select both files in the Project panel and click the
New Timeline button. (Other types of assets, when selected together, will create separate timelines for each type.)