
Operation Manual


ENCORE CS3
User Guide
109
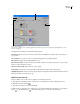
5 Click the color swatch of any color you want to change. The Color Picker dialog box appears.
6 If you want to limit your color selection to NTSC-safe colors, choose RGB colors between 16 and 235.
7 Adjust the color using one of the following methods (the color you select appears in the top half of the color
swatch; the original color remains in the bottom half):
• Locate the color range you want using the triangle sliders on the color spectrum bar, and then click the desired
color in the color field.
• Change the numeric values for H (hue), S (saturation), B (brightness), R (red), G (green), or B (blue).
8 Click OK. The new color replaces the original color in the Menu Color Set dialog box.
9 Choose the desired opacity level from the Opacity pop-up menu adjacent to the color swatch.
10 To set the Activated State colors to the same values as the Selected State colors, select Use Selected Colors For
Activated Colors.
11 Repeat steps 5 through 10 for any color you want to change.
12 Click OK when you have defined all the colors to your satisfaction.
Encore applies the new color set to the currently open menu.
Automatic color set
When you import a menu into your project, Encore looks at the colors and opacity settings in the subpicture layers
and automatically generates a color set based on those values. The Automatic color set is different from other color
sets in that it cannot be edited directly, but instead updates automatically any time you edit the menu in Photoshop
(using the Edit Menu In Photoshop command).
Note: Designing your subpictures in Photoshop and using the Automatic color set in Encore is a much simpler approach
than creating them in Encore.
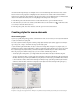
To generate the Automatic color set, Encore reads the color and opacity settings in each subpicture layer in the menu,
starting at the bottommost button (the button listed closest to the Background in the Layers panel), moving up:
• Highlight Group 1 is assigned the values from the bottommost button. Specifically, the layer with the prefix (=1)
sets the values for color 1; layers with prefixes (=2) and (=3) set the values for color 2 and color 3. The Selected
and Activated states are set to the same values.
• Highlight Group 2 is assigned the color values from the first button containing subpicture color values that are
different than the bottommost button. The Selected and Activated states are set to the same values.
• Normal group is set to 0% opacity (fully transparent), but uses the color values of the default color set.
Upon import, Encore not only generates the automatic color set, it also applies the appropriate highlight group to
each button. If the subpicture colors in a button do not match either of the two highlight groups, Encore assigns
Highlight Group 1 to them.
Base a new color set on the Automatic color set
The Automatic color set of each menu is automatically generated from the menu’s subpicture layers. If you want to
create an independent copy of a particular menu’s Automatic color set, create a new color set based on the menu’s
Automatic color set. This new set behaves like the regular color set, and can be assigned to other menus.
1 Select the menu containing the Automatic color set you want to copy in the Project or Menus panel.
2 Choose Menu > Edit Menu Color Set.