ADOBE ENCORE CS3 ® USER GUIDE ®
© 2007 Adobe Systems Incorporated. All rights reserved. Copyright Adobe® Encore® 3.0 User Guide for Windows® and Mac OS If this guide is distributed with software that includes an end user agreement, this guide, as well as the software described in it, is furnished under license and may be used or copied only in accordance with the terms of such license.
iii Contents Chapter 1: Getting started Installation . . . . . . . . . . . . . . . . . . . . . . . . . . . . . . . . . . . . . . . . . . . . . . . . . . . . . . . . . . . . . . . . . . . . . . . . . . . . . . . 1 Adobe Help Resources ............................................................................... 2 ................................................................................ 5 New features . . . . . . . . . . . . . . . . . . . . . . . . . . . . . . . . . . . . . . . . . . . . . . . .
iv Chapter 7: Timelines and slide shows Timeline basics . . . . . . . . . . . . . . . . . . . . . . . . . . . . . . . . . . . . . . . . . . . . . . . . . . . . . . . . . . . . . . . . . . . . . . . . . 115 Editing assets in timelines Slide show basics . . . . . . . . . . . . . . . . . . . . . . . . . . . . . . . . . . . . . . . . . . . . . . . . . . . . . . . . . . . . . . . . . . . . . . . 126 Editing slide shows Chapter points . . . . . . . . . . . . . . . . . . . . . . . . . . . . . . . . . . . . . .
1 Chapter 1: Getting started If you haven’t installed your new software, begin by reading some information on installation and other preliminaries. Before you begin working with your software, take a few moments to read an overview of Adobe® Help and of the many resources available to users. You have access to instructional videos, plug-ins, templates, user communities, seminars, tutorials, RSS feeds, and much more.
ENCORE CS3 2 User Guide Read Me The installation disc contains the Read Me file for your software. (This file is also copied to the application folder during product installation.
ENCORE CS3 3 User Guide Most versions of in-product and LiveDocs Help let you search across the Help systems of multiple products. Topics may also contain links to relevant content on the web or to topics in the Help of another product. Think of Help, both in the product and on the web, as a hub for accessing additional content and communities of users. The most complete and up-to-date version of Help is always on the web.
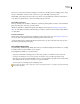
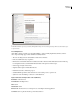
ENCORE CS3 4 User Guide A C D B Adobe Help A. Back/Forward buttons (previously visited links) B. Expandable subtopics C. Icons indicating shared topic D. Previous/Next buttons (topics in sequential order) Accessibility features Adobe Help content is accessible to people with disabilities—such as mobility impairments, blindness, and low vision. In-product Help supports these standard accessibility features: • The user can change text size with standard context menu commands.
ENCORE CS3 5 User Guide Keyboard shortcuts for Help navigation (Windows) • To move between panes, press Ctrl+Tab (forward) and Shift+Ctrl+Tab (backward). • To move through and outline links in a pane, press Tab (forward) or Shift+Tab (backward). • To activate an outlined link, press Enter. • To make text bigger, press Ctrl+equal sign. • To make text smaller, press Ctrl+hyphen.
ENCORE CS3 6 User Guide When you start the Adobe Video Workshop, you choose the products you want to learn and the subjects you want to view. You can see details about each video to focus and direct your learning. Community of presenters With this release, Adobe Systems invited the community of its users to share their expertise and insights. Adobe and lynda.com present tutorials, tips, and tricks from leading designers and developers such as Joseph Lowery, Katrin Eismann, and Chris Georgenes.
ENCORE CS3 7 User Guide Videos also show you how to use Encore with other Adobe products: • Using Dynamic Link • Creating DVDs using Adobe Premiere Pro® CS3 and Encore • Working with markers and cue points To access Adobe Creative Suite 3 video tutorials, visit Adobe Video Workshop at www.adobe.com/go/learn_videotutorials. Extras You have access to a wide variety of resources that will help you make the most of your Adobe software.
ENCORE CS3 8 User Guide and websites to DVD menus and video buttons. Each template file is professionally constructed and represents a best-use example of product features. Templates can be a valuable resource when you need to jump-start a project. Yo ur Inv est me nt Gu ide Are you leav ing mon ey on the tabl e? Typi non habe nt claritatem insitam; est claritatem. Investigationes usus legen tis in iis qui demonstra legunt saepi facit eorum verunt lecto us.
ENCORE CS3 9 User Guide Note: Bridge Home may not be available in all languages. Adobe Design Center Adobe Design Center offers articles, inspiration, and instruction from industry experts, top designers and Adobe publishing partners. New content is added monthly. You can find hundreds of tutorials for design products and learn tips and techniques through videos, HTML tutorials, and sample book chapters.
ENCORE CS3 10 User Guide New ideas are the heart of Think Tank, Dialog Box, and Gallery: • Think Tank articles consider how today’s designers engage with technology and what their experiences mean for design, design tools, and society. • In Dialog Box, experts share new ideas in motion graphics and digital design. • The Gallery showcases how artists communicate design in motion. Visit Adobe Design Center at www.adobe.com/designcenter.
ENCORE CS3 11 User Guide Adobe Labs Adobe Labs gives you the opportunity to experience and evaluate new and emerging technologies and products from Adobe.
12 Chapter 2: Workflow and workspace Adobe Encore CS3 provides a flexible workspace that you can quickly optimize for your working style. Workflow Workflow overview Encore lets you create many different kinds of projects for DVDs, Blu-ray discs, or interactive Flash files. Whether the content is a feature film, a wedding, a training course, or an art collection, the basic steps for creating a project are the same. Note: For a video tutorial about creating projects in Encore, see www.adobe.com/go/vid0239.
ENCORE CS3 13 User Guide Imported assets displayed in Project panel Create project elements and add assets An Encore project includes element types such as timelines and slide shows. You add assets to these elements to include the assets in the project. Depending upon an asset’s type, you can add it to timelines, slide shows, menus, playlists, and chapter playlists.
ENCORE CS3 14 User Guide A B Library (A) with predesigned menus and Menu Viewer (B) for customizing menus Specify navigation Menus provide the main way for viewers to navigate through the content. In addition to menus, you also use other types of navigation settings, such as end actions and overrides, to guide the viewer.
ENCORE CS3 15 User Guide Make video and audio compatible (transcoding) If you imported video and audio files that aren’t DVD or Blu-ray Disc-compatible, Encore transcodes the files before you burn the disc. You can let Encore determine the best settings for transcoding or select the options you feel are best for your project. For information, see “About transcoding” on page 51.
ENCORE CS3 16 User Guide Controls in Project Preview window simulating remote control Burn the disc You can build and burn the DVD or Blu-ray disc directly from Encore. Or, if you plan to use a replication facility, you can write to a DLT drive, prepare a folder, or create a DVD or Blu-ray image to give to the replicator. For information, see “Build a DVD or Blu-ray disc” on page 175.
ENCORE CS3 17 User Guide Build panel with output settings Export to Flash format You can export your final projects to a Flash format for interactive viewing on the web. For information, see “Exporting projects to Flash format” on page 178. Workspace basics About workspaces Adobe video and audio applications provide a consistent, customizable workspace.
ENCORE CS3 18 User Guide You can drag panels to new locations, move panels into or out of a group, place panels alongside each other, and undock a panel so that it floats in a new window above the application window. As you rearrange panels, the other panels resize automatically to fit the window. You can use floating windows to create a workspace more like those in previous versions of Adobe applications, or to place panels on multiple monitors. B C A Example workspace A. Application window B.
ENCORE CS3 19 User Guide A B C Dragging panel (A) onto docking zone (B) to dock it (C) Grouping zones Grouping zones exist in the middle of a panel or group, and along the tab area of panels. Grouping a panel stacks it with other panels. A B C Dragging panel (A) onto grouping zone (B) to group it with existing panels (C) Dock or group panels 1 If the panel you want to dock or group is not visible, choose it from the Window menu.
ENCORE CS3 20 User Guide Drag panel gripper to move one panel • To move an entire group, drag the group gripper at the upper-right corner onto the desired drop zone. Drag group gripper to move entire group The application docks or groups the panel, according to the type of drop zone. Undock a panel in a floating window When you undock a panel in a floating window, you can add panels to the window or otherwise modify it, as you do the application window.
ENCORE CS3 21 User Guide To quickly maximize a panel beneath the pointer, press the tilde (~) key. (Do not press Shift.) Press the tilde key again to return the panel to its original size. 1 Do either of the following: • To resize either horizontally or vertically, position the pointer between two panel groups. The pointer becomes a double-arrow . • To resize in both directions at once, position the pointer at the intersection between three or more panel groups. The pointer becomes a four-way arrow .
ENCORE CS3 22 User Guide Use context, panel, and viewer menus In addition to the menus at the top of your screen, Encore also provides context, panel, and viewer menus. Context menus contain commands relative to the active tool or selection. Panel menus contain commands relevant to the active panel. You use the viewer menus to choose which item to display in the viewer, or to close items.
ENCORE CS3 23 User Guide Set preferences for your workspace Encore lets you set numerous preferences for your workspace, from adjusting the brightness of the user interface to controlling the default television standard used for creating projects. Set User Interface preferences User Interface preferences include software-wide settings that affect your workspace. 1 Choose Edit > Preferences > User Interface (Windows) or Encore > Preferences > User Interface (Mac OS).
ENCORE CS3 24 User Guide and Automatic to use draft quality for playback, which changes to high quality when the playback is paused or stopped. Desktop Display Mode (Windows only) Sets one of three options for playback through a graphics display card: • Compatible Displays video on the desktop in a nonaccelerated manner. This mode is appropriate for use on a graphics card that does not support Direct3D 9.0 acceleration. This option is the lowest-performance display mode.
25 Chapter 3: Planning the project You can design, author, and build media projects in Adobe Encore CS3 for high-definition Blu-ray Disc and standarddefinition DVD. Encore gives you options to burn directly to a disc or other types of output for disc replication. As an added bonus, you can export Blu-ray and DVD projects to Flash format for interactive viewing on the web. Planning the content About planning The first task of authoring the project is planning.
ENCORE CS3 26 User Guide Planning with the Flowchart The Flowchart feature provides a visual interface that helps you to plan and manage the creation of the project. Although you can use the Flowchart at any time during the authoring process, it’s especially useful during the initial stages of the project, when you determine navigation and begin organizing assets.
ENCORE CS3 27 User Guide You determine the optimal data rate through the process of bit budgeting. To understand bit budgeting, you first need to understand the variables involved: disc size, types and amounts of assets (audio, video, and motion menus), and data rates and transcoding. Once familiar with the variables involved, you’ll be able to produce a bit budget to guide you in producing high-quality projects that fit within the allotted disc space.
ENCORE CS3 28 User Guide 4 If you want to create a dual-sided disc, specify which side this project is for. 5 Close the Build panel and save the project. See also “Check the space remaining on your disc” on page 28 Check the space remaining on your disc The Build panel displays the available space and the used space for the specified disc size during the authoring process. The display conveys size information only and has no bearing on quality.
ENCORE CS3 29 User Guide Although data rates are a general indicator of quality, there are no hard-and-fast rules to equate data rate to quality. That is, a data rate of 4 Mbps may or may not produce a high-quality asset; quality depends on the image data and type of compression used as well as data rate.
ENCORE CS3 30 User Guide Note: Keep your calculations simple by working with megabits (Mbits) and not megabytes (MB) when bit budgeting. Mbps denotes megabits per second. Also, hard-disk capacity is typically calculated as a power of 2 (1 KB = 2^10 bytes = 1024 bytes) while optical disc (DVD) capacity is labeled as a power of 10 (1 KB = 10^3 bytes = 1,000 bytes). Use the power-of-10 scheme for bit budgeting.
ENCORE CS3 31 User Guide 3 Calculate the data rate of the video. Divide the disc space available for video that you determined in step 2 by the amount of video (in seconds) the project contains. 36,096,000,000 bits / (133 minutes x 60 seconds per minute) = 4,523,308.27 bps. Divide the bps amount by 1 million bits per Mbit to convert the video data rate to Mbps. 4,523,308.27 / 1,000,000 = 4.5 Mbps. 4 Determine the maximum video data rate.
ENCORE CS3 32 User Guide 2 Space required for the audio, motion menu, and slide show: • 127-minute audio stream with a data rate of 0.192 Mbps = 127 minutes x 60 seconds x 0.192 = 1,463.04 Mbits; divided by 8 bits = 182.88 MB rounded off to 183 MB. • 30-second menu audio stream = 30 seconds x 0.192 Mbps = 5.76 Mbits; divided by 8 bits = 0.72 MB rounded off to 1 MB. • 8-minute slide show audio stream = 8 minutes x 60 seconds x 0.192 Mbps = 92.16 Mbits; divided by 8 bits = 11.52 MB rounded off to 12 MB.
33 Chapter 4: Creating projects and importing assets After planning the navigation of your project and preparing the content, you’re ready to begin. First, you’ll create an Adobe Encore CS3 project and then import the assets. Working with projects About projects Encore files are called projects. A project stores links to all the content you intend to include, as well as the menus and timelines (which combine video or stills, audio, and subtitles).
ENCORE CS3 34 User Guide Create and open projects Before you can import your assets, you need to create or open a project. You can have only one project open at a time. See also “About transcoding” on page 51 “Transcode settings” on page 52 “Preset options for audio” on page 55 Create a new project When you create a new project, Encore prompts you to select an authoring mode (DVD or Blu-ray) and a default TV standard.
ENCORE CS3 35 User Guide Note: When you open a project file you’ve moved, a dialog box may appear if the application can’t locate specific assets. You can either relink them in the dialog box, select Offline to open the project without them, or select Skip Missing Files to temporarily set the assets offline (so that the next time you open the project, Encore prompts you again to locate the assets).
ENCORE CS3 36 User Guide High-definition video and still images have either square 1:1 pixel aspect ratios or a 1.333 anamorphic pixel aspect ratio. They come in three sizes (1280 x 720 or 1920 x 1080 with square aspect ratios, and 1440 x 1080 pixels with anamorphic aspect ratios), and fit in a 16:9 screen aspect ratio. Screen aspect ratios Screen aspect ratios (also known as frame aspect ratios) describe the width-to-height ratio of an image or device.
ENCORE CS3 37 User Guide Specify the screen aspect ratio Encore determines the screen aspect ratio for you. You can, however, change it if necessary. The type of asset determines how you specify the screen aspect ratio. For menus, and timelines containing still images but no video, you specify the screen aspect ratio in the Properties panel. For timelines with video, you specify the screen aspect ratio by setting the pixel aspect ratio of the video asset.
ENCORE CS3 38 User Guide A C B D 16:9 NTSC footage A. Original B. Displayed by a DVD player using the original widescreen format on a widescreen TV C. Using automatic pan and scan to crop the image on a 4:3 TV D. Using automatic letterbox to reduce resolution and display the entire image on a 4:3 TV Importing Supported file formats for import Imported files may require transcoding. DVD or Blu-ray Disc-compliant assets typically do not require transcoding, while noncompliant assets do.
ENCORE CS3 39 User Guide Standard NTSC PAL Frame rate (frames per second) 29.97 25 23.976* 23.978* 24* Frame size (pixels) 720 x 480 720 x 576 720 x 486 704 x 576 704 x 480 *Transcoded on import to convert to 29.97 Frame rates and sizes for high-definition video formats are as follows. Standard NTSC PAL Frame rate (frames per second) 23.976p 25i 29.97i 50p 59.
ENCORE CS3 40 User Guide • Digital Theater Sound (DTS) • mp3 • MPG or M2P (including MPEG-1, MPA, Layer II) • QuickTime (MOV) • WAV (32-bit floating-point files are transcoded; 96-kHz 16/24-bit files are not transcoded) • WMA Note: DTS audio files will not play during Preview in Encore, even though they will play from the burned disc. Advantages of transcoding before or after import A DVD or Blu-ray Disc player can play only video that conforms to certain standards.
ENCORE CS3 41 User Guide You can save a step by importing content directly to a timeline, slide show, or menu. The content must be of the appropriate type to use these shortcuts. While you can import any supported file type as a timeline, you can import only still images as a slide show and only PSD files as a menu. For a list of supported file types, see “Supported file formats for import” on page 38. Import as an asset 1 Make sure that the Project panel is active, and choose File > Import As > Asset.
ENCORE CS3 42 User Guide Importing from Adobe Premiere Pro You can import movie files exported from Adobe Premiere Pro into Encore. In Adobe Premiere Pro, export the file you want to use in one of the following formats: • MPEG-2 files, which include a project link by default • H.264 files • AVI files using the export movie command. When you export, make sure that you choose Project from the Embedding Options menu.
ENCORE CS3 43 User Guide Add items or sets to the Library The Library panel contains predesigned templates for menus and other design elements, such as buttons, images, and shapes. If you have still images, logos, buttons, and menus that you use frequently, you can store them in the Library, where you can quickly access them from any project. To keep them organized, you can group them into sets. The Library imports layered Photoshop files, as well as BMP, GIF, JPEG, PNG, and TIFF images.
ENCORE CS3 44 User Guide Create a new Library set ❖ Choose New Set from the Library panel menu. Type a name for the new set, and click OK. Adobe Dynamic Link About Dynamic Link (Production Premium only) In the past, sharing media assets among post-production applications has required you to render your work in one application before importing it into another—an inefficient and time-consuming workflow. If you wanted to make changes in the original application, you had to rerender the asset.
ENCORE CS3 45 User Guide If you use the Save As command to copy an After Effects project that contains compositions referenced by Adobe Dynamic Link, Adobe Premiere Pro or Encore uses the original composition—not the new copy—as its source for the linked composition. You can relink a composition to the new copy at any time.
ENCORE CS3 46 User Guide • Drag one or more compositions from the After Effects Project panel to the Adobe Premiere Pro or the Encore Project panel. • In Adobe Premiere Pro, choose File > Import. Choose an After Effects project file and click Open, and then choose a composition in the Import Composition dialog box and click OK. • In Adobe Premiere Pro, drag an After Effects project file into the Project panel.
ENCORE CS3 47 User Guide Offline compositions and Dynamic Link (Production Premium only) Adobe Premiere Pro and Encore display dynamically linked compositions as offline in any of the following circumstances: • You’ve renamed, moved, or deleted the After Effects project that contains the composition. • You’ve purposely taken the composition offline. • You’ve opened the project that contains the composition on a system on which Production Premium isn’t installed.
ENCORE CS3 48 User Guide A B C D E F G H Project panel A. Preview B. Audio C. Menu D. Timeline E. Still image F. Video G. Toggle display of different item types H. Create a new item (If nothing is selected in the Project panel, Encore uses the default assets from the Library panel.) When you select an asset, a thumbnail preview appears in the upper-left corner of the Project panel. If the asset contains video or audio, a play controller appears below it so that you can preview the asset.
ENCORE CS3 49 User Guide Media Category Displays the asset type. This category is useful for sorting your assets according to their status as audio or video files, or both. Description Displays any comments you add to this row. You may type up to 254 characters in the Properties panel. Last Modified Displays date and time of the last modification to the file. File Path Displays the system location of the asset. This column is blank if Encore can’t find the asset. (See “Locate a missing asset” on page 51.
ENCORE CS3 50 User Guide Rename a folder 1 Select a folder in the Project panel and then choose Edit > Rename. 2 Type a new name, and click OK. Show or hide the contents of a folder ❖ Click the triangle to the left of the folder icon. Preview assets in the Project panel You can preview any asset from the Asset Preview thumbnail at the upper-left corner of the Project panel. Text next to the thumbnail displays the filename and file format of the selected asset.
ENCORE CS3 51 User Guide Locate a missing asset If Encore cannot find an asset when you open a project, the Locate Asset dialog box appears. You can then choose to select the missing asset, skip the file, or work offline. Missing or offline assets names appear italicized in the Project panel. 1 Click the Project panel, and select the missing asset. 2 Choose File > Locate Asset. 3 Navigate to the location of the missing asset, select it, and then click Select.
ENCORE CS3 52 User Guide See also “Transcode assets from the Project panel” on page 52 Transcode settings You can specify an item’s transcode settings (by using a preset) from the DVD Transcode Settings or Blu-ray Transcode Settings columns in the Project panel. (Separate columns, DVD Transcode Status and Blu-ray Transcode Status, display either Transcoded or Untranscoded to show the item’s current state.
ENCORE CS3 53 User Guide Override the Automatic data rate setting ❖ To specify the maximum audio/video transcoding bit rate that Encore uses automatically, choose File > Project Settings, click the Advanced tab, choose the data rate limit from the Maximum Audio/Video Bitrate menu, and then click OK. Transcode an asset 1 In the Project panel, right-click (Windows) or Control-click (Mac OS) the asset you want to transcode. 2 Choose Transcode Now.
ENCORE CS3 54 User Guide A B Project Transcode Presets dialog box A. Source or output image B. Preset settings See also “About transcoding” on page 51 Preset options for video Depending on the preset you’ve selected, the Video tab of the Project Transcode Presets dialog box contains some or all of the following options: Quality Specifies the encoding quality. Quality values range from 1 to 5, with higher values increasing quality and render time. Note: H.
ENCORE CS3 55 User Guide data rate. Variable bit rate (VBR) compresses data to fit between a fixed minimum and fixed maximum rate. VBR allows the compression to vary, which can result in better quality than CBR. Bitrate Specifies the number of Mbps you want the encoded file to have. Only appears if you select CBR as the Bitrate Encoding option.
ENCORE CS3 56 User Guide Create a custom preset 1 Choose File > Edit Quality Presets. 2 In the Export Settings section, choose MPEG2 Blu-ray, MPEG2 DVD, or H.264 Blu-ray from the Format menu, and choose the preset you want to edit from the Preset menu. 3 If applicable, type a comment in the Comment box. 4 Click either the Audio or Video tab and adjust an option as desired. (See “Preset options for video” on page 54 and “Preset options for audio” on page 55.
ENCORE CS3 57 User Guide Specify a pre- or post-encoding task Included with the transcode presets are pre- and post-encoding tasks. You can use these tasks to make changes to the asset either before or after it’s transcoded. You can apply a filter to reduce noise in the files before they’re transcoded, or you can specify that a text log of errors, warnings, and settings be saved with the transcoded file. When you add encoding tasks to a preset, you generate a custom preset.
58 Chapter 5: Menus Menus contain navigation buttons that give viewers access to the contents. Menu buttons can play a movie or individual chapter, jump to other menus, set active audio and subtitle tracks, or play back special features. Menus can range from a single button on a plain background to a flashy screen with moving images and buttons that change as you select them. Menu basics About menus The main menu in an Adobe Encore CS3 project is usually the first screen the viewer sees.
ENCORE CS3 59 User Guide A B C Menu A. Buttons lead to content B. Subpicture highlights button when selected or activated C. Background Types of menus A menu can include text, still images, motion footage, and audio. Depending on its composition, a menu is considered either a still menu or a motion menu: Still menu A menu composed of static images. It contains no moving footage or audio. Motion menu A menu that includes moving footage or audio. A video can play in the background of the menu.
ENCORE CS3 60 User Guide The Adobe predesigned menus and buttons include subpictures. You can let Encore create subpictures for you by using the Create Subpicture command or the Convert To Button command. You can design your own subpictures in Adobe Photoshop. (See “About creating menus in Photoshop” on page 97.) See also “About button subpictures” on page 102 Menu Viewer overview The Menu Viewer provides a canvas for creating and modifying a menu.
ENCORE CS3 61 User Guide Displays remote control routing and button numbers of all buttons in the menu. You can customize the routing only if the Automatically Route Buttons menu property is turned off. (See “Change the routing order” on page 112.) Show Button Routing Displays any guides you added to the menu for aligning buttons and objects.
ENCORE CS3 62 User Guide The Library panel contains the following controls: Set Displays the currently selected set. Items in the Library panel are organized into thematic sets, such as Education, Corporate, or Wedding. You can create your own sets or add to the existing sets. Panel menu Contains commands to add or delete items or sets and to rename existing sets. It also includes commands for undocking and closing the panel or the frame containing the panel.
ENCORE CS3 63 User Guide See also “Create menus using predesigned assets” on page 63 “Add objects to a menu” on page 64 “About creating menus in Photoshop” on page 97 Create menus using predesigned assets An easy way to begin a project is to base your menu on the predesigned menus, buttons, images, and shapes found in the Library panel. In addition to standard definition, Encore provides an assortment of high-definition menu templates and other assets, and distinguishes them with an “HD” in their names.
ENCORE CS3 64 User Guide Create a menu based on a background and other assets Instead of using a predesigned menu template to create a menu, you can piece together a menu starting with a predesigned background and then add buttons, images, shapes, and replacement layers included with Encore. These objects are located in the Library panel. Sample buttons and design items from Library panel Each button includes subpictures that define how the button looks when selected (highlighted) or activated.
ENCORE CS3 65 User Guide See also “About replacement layers” on page 93 “Library panel overview” on page 61 “Move objects in a menu” on page 71 Add objects from the Library panel to a menu 1 Open the menu to which you want to add a Library panel element. 2 In the Library panel, select the set you want to view from the Set menu, and then click any of the icons to display the items for that type. For example, click the Toggle Display Of Buttons icon to display only buttons.
ENCORE CS3 66 User Guide A B C Menu with guides displayed A. Zero point of menu B. Horizontal guide C. Vertical guide The guides you create are specific to that menu. They are saved in the menu and transfer with a menu between Encore and Photoshop. Any changes you make to the guides in either program transfer with the menu. Note: When setting guides to align objects in several menus, it is important to remember that you place guides at the pixel location of the menu, not the screen.
ENCORE CS3 67 User Guide • Click the Show Guides button at the bottom of the Menu Viewer. Name menus and buttons To make menus and buttons easier to identify, you can change their default names in the Properties panel. Properties panel for selected menu (left) and selected button (right) See also “Renumber buttons” on page 111 Name and describe menus Names and descriptions of menus can help keep your project organized.
ENCORE CS3 68 User Guide Choose Edit > Preferences > Menus (Windows) or Encore > Preferences > Menus (Mac OS) to change the default settings of the Set Name From Link and Sync Button Text And Name options. Specify the default button for a menu Each time a menu appears, one button appears highlighted (selected) for the viewer. By default, this is button number 1. When a link leads to a menu, it may designate that a different button appear highlighted.
ENCORE CS3 69 User Guide Editing menus Select objects To edit objects on a menu, you need to select them first using one of the selection tools. The Tools panel contains two selection tools for editing objects: Selection tool Selects an entire button set (a button, its text, and subpictures together) so that it can be manipu- lated as a unit. Direct Select tool Selects individual layers so that they can be manipulated on their own. Note: The Move tool does not select objects.
ENCORE CS3 70 User Guide Each object you add to a menu appears on a separate layer in the Layers panel. Selecting objects in the Menu Viewer is sometimes easier when you use the Layers panel. Regardless of where an object is in the stacking order, you can quickly select it by selecting its layer in the Layers panel. When you select a layer or layer set, selection handles appear on the element in the Menu Viewer.
ENCORE CS3 71 User Guide Move objects in a menu When a menu contains multiple objects, it’s often difficult to select just the object you want to move. The Layers panel or context menu can help you isolate an object before moving it. Move menu objects or layer sets 1 Open the menu that you want to modify. 2 In the Menu Viewer or Layers panel, use a selection tool to select the object or layer set you want to move. (See “Select objects” on page 69.
ENCORE CS3 72 User Guide 2 In the Menu Viewer or Layers panel, select the objects you want to align. 3 Choose Object > Align > Relative To Safe Areas if you want the objects aligned to the title safe area and the option is not already selected. Note: A check mark next to the Relative To Safe Areas indicates it is turned on. To turn the option off, choose it again (Object > Align > Relative To Safe Areas).
ENCORE CS3 73 User Guide Change the stacking order of menu objects As in Photoshop, the stacking order in the Layers panel determines whether the content of a layer or layer set appears in front of or behind other elements in the menu. When you create or import a menu, the background is always the bottommost layer. A menu can have only one background, and it must remain the bottom layer.
ENCORE CS3 74 User Guide Move or copy a menu object into another layer set 1 Open the menu that you want to modify. 2 In the Menu Viewer or Layers panel, select the object. For multilayered menus, it is easier to use the Layers panel to select the object. 3 Choose Edit > Cut to move the object or Edit > Copy to copy it. 4 In the Layers panel, open the layer set into which you want to add the object, and select any object in the layer set. 5 Choose Edit > Paste.
ENCORE CS3 75 User Guide 3 Choose Object > Convert To Object. See also “Convert an object to a button” on page 74 Styling and transforming menu objects About predefined styles Styles let you quickly change the appearance of a layer or object in a menu. Styles are predesigned Photoshop layer effects, such as shadows, glows, bevels, overlays, and strokes, that you can apply to most layers in a menu. Once applied, the effects are linked to the object.
ENCORE CS3 76 User Guide Apply a style to a button or layer set 1 Select the button in the Menu Viewer or in the Layers panel. 2 In the Styles panel, select the style, and click the Apply Style button . If your menu contains a styled layer that you like, you can quickly create a new style by dragging the layer directly to the Styles panel. The new style contains any effects applied to the layer. (See “About creating styles” on page 113.) Add a drop shadow Drop shadows add depth to a menu.
ENCORE CS3 77 User Guide 7 To change the other properties of the drop shadow, drag the double-arrow pointer left or right over a value to decrease or increase it. You can click the Preview option off and on to see the before and after effects of each property. Opacity Sets the opacity of the shadow. Angle Specifies the lighting angle of the shadow. Distance Specifies how far the shadow should be offset from the object. Size Sets the size of the shadow. Spread Expands the boundaries of the shadow.
ENCORE CS3 78 User Guide A B C Comparison of flipping object horizontally and vertically A. Object as originally placed B. Flipped horizontally C. Flipped vertically 1 Open the menu containing the object you want to flip. 2 In the Menu Viewer or Layers panel, select the object (or objects) you want to flip. 3 Choose either Object > Flip Horizontal or Object > Flip Vertical. Adding text to menus About text in menus Encore lets you type text directly onto a menu.
ENCORE CS3 79 User Guide Character panel overview Encore gives you advanced typographic control over your text. Using the Character panel, you can kern, track, shift the baseline, and scale text. You can set type attributes before you enter characters, or you can restyle and reformat existing text. The Character panel also provides various formatting options for Asian text. Most of the options in the panel let you either type a value or select from a menu of preset values.
ENCORE CS3 80 User Guide positive value loosens the space between letter pairs; a negative value tightens the space. Most fonts come with preset kerning values for specific letter pairs. Metric uses the font’s original kerning values. Note: You cannot apply kerning across a range of selected characters. Kerning works only when an insertion point is placed between a pair of characters. Stretches or shrinks the text vertically, relative to the baseline. Shifts type from its baseline.
ENCORE CS3 81 User Guide A B C D E F G H Alignment options in the Character panel A. Align Left B. Align Center C. Align Right D. Justify Last Left E. Align Top F. Align Center G. Align Bottom H. Justify Last Top Text anti-alias options Anti-aliasing smooths the jagged edges of text by softening the color transition between the edge pixels of the characters and the background pixels. Anti-aliasing applies to all the characters in the text block.
ENCORE CS3 82 User Guide JIS Weak set JIS Maximum set Characters that can’t begin a line Characters that can’t begin a line Characters that can’t end a line Characters that can’t end a line Mojikumi Determines spacing between punctuation, symbols, numbers, and other character classes in Japanese type. Encore includes several predefined mojikumi sets. • None turns off the use of mojikumi. • Mojikumi Set 1 uses half-width spacing for punctuation.
ENCORE CS3 83 User Guide Original text (left) and text with rotation applied (right) Tate-chuu-yoko (Also called kumimoji and renmoji) Changes the orientation of the characters from vertical to horizontal. The characters rotate 90º as a group. You can select, edit, and format the rotated text just as you do the vertically-oriented characters. These features are often used to combine Asian and Roman characters and cannot be applied to horizontal text.
ENCORE CS3 84 User Guide The text bounding box appears. Note: If you don’t see a bounding box, you entered the text freely and must manually change the line breaks. 4 Position the pointer over a selection handle. When it changes to a double-headed arrow, drag the handle to resize the bounding box. The text reflows within the box. Resizing a text bounding box with overflowed text Important: Be sure to use a text tool when resizing the text block.
ENCORE CS3 85 User Guide For more keyboard shortcuts on selecting text, such as entire blocks of text, see “Keys for working with text in menus and subtitles” on page 183. Transform a text block 1 Open the menu that you want to edit. 2 Select the text block by using one of the following techniques: • Click the text directly in the Menu Viewer using the Direct Select tool . • In the Layers panel, click the text layer. 3 Transform the text block as you would any other object.
86 Chapter 6: Menus: Beyond the basics For you more adventurous designers, Adobe Encore CS3 lets you create motion menus, video thumbnail buttons, three-color button highlighting, and auto-activating buttons. You can also customize button routing and numbering, as well as create your own styles for menu elements. Video and audio in menus About motion menus A menu can include sound and motion. You can replace the entire background of a menu with a video file, as well as link it to an audio file.
ENCORE CS3 87 User Guide See also “Animate video thumbnail buttons” on page 90 Add audio to a menu ❖ Do one of the following: • Select the menu in the Project panel. Then, in the Properties panel, click the Motion panel and drag the Audio pick whip to the audio file in the Project panel. • Drag the audio file from the Project panel to the menu in the Menu Viewer. Note: You link directly to the audio assets, not a timeline.
ENCORE CS3 88 User Guide Poster frame Using the chapter property called Poster, you can designate a specific start point or frame to display. Otherwise, the thumbnail begins at the first frame of the destination chapter or displays the first bright (nonblack) frame of the chapter if Animate Buttons is turned off for the menu.
ENCORE CS3 89 User Guide If you use a shape tool, such as the Rectangle tool, to draw the placeholder, the shape of the layer becomes the mask for the video thumbnail. You can also create a layer, draw a selection with the Rectangular Marquee tool, fill the selection with a color, and then click the Add Layer Mask button in the Layers panel. The layer mask becomes the mask for the video thumbnail. You can constrain the rectangular marquee to the screen aspect ratio by using the Style option Fixed Aspect.
ENCORE CS3 90 User Guide 2 Drag the poster frame marker onto its corresponding chapter in the timeline. Animate video thumbnail buttons You can set video thumbnail buttons to be either still or moving using the menu property Animate Buttons. When you select the menu property, you convert all the video thumbnail buttons on the menu to motion buttons. Thus, each time the viewer displays the menu, the video links play in the thumbnails.
ENCORE CS3 91 User Guide A B B D C E In this menu, duration exceeds length of video and audio content. Video background freezes on the last frame before the menu loops. Audio finishes and starts again only when menu loops. Thumbnails repeat until menu loops. A. Menu duration B. Video thumbnails C. Video background D. Last frame E. Audio About Loop Point You can set motion menus to loop either a specific number of times or until the viewer activates a button (forever).
ENCORE CS3 92 User Guide Set menu display time and looping The Properties panel contains several options that control the display time and looping of a menu. The options you choose depend upon whether you created a still or motion menu, or in other words, whether or not video, audio, or thumbnail buttons play while the menu displays. 1 In the Project panel, select the desired motion menu.
ENCORE CS3 93 User Guide Note: The file name you specify for the template does not affect the original file name of the menu, so whenever you reuse the template, the menu’s original name appears in the Project panel (not the template’s file name). Using menu templates on multiple computers When creating a menu template, you can select the Self-Contained option, which determines how the menu template is saved in the folder structure on disk.
ENCORE CS3 94 User Guide Dragging an image to a replacement layer replaces the contents of the layer and scales the imported image to fit within the drop zone. You can add replacement layers to the Library panel, where they’re sorted in their own category. (See “Add items or sets to the Library” on page 43.) Create replacement layers You can convert an object in a menu to a replacement layer or add a replacement layer to a menu in Photoshop and then bring the menu back into your project.
ENCORE CS3 95 User Guide Masks or layer effects in replacement layers are preserved when an image is dragged onto the layer in the Menu Viewer. 5 In the Layers panel, double-click the layer name of the placeholder image, and add (!) to the beginning of its name. 6 In Photoshop, choose File > Save, and then choose File > Close. The changes are saved, and the menu is updated in Encore.
ENCORE CS3 96 User Guide The Next and Previous buttons are linked automatically when the index chapters are generated. The Next and Previous buttons are hidden on the last and first submenus, respectively. If you do not include Next and Previous buttons on a menu that results in multiple submenus, Next and Previous buttons are created automatically. You can later change the appearance of these buttons.
ENCORE CS3 97 User Guide Using Photoshop to create menus About creating menus in Photoshop Encore is designed to work directly with Adobe Photoshop to build and edit menus and buttons. You can create entire menus or elements for menus (such as buttons and backgrounds) in Photoshop and import them directly into Encore. You can also edit Encore menus at any time in Photoshop, and have the changes updated immediately. Menus, even those created in Encore, use the Photoshop PSD file format.
ENCORE CS3 98 User Guide Font size Use a font size of 20 points or greater to ensure that the viewer can comfortably read titles and button text. For a video tutorial on creating menus in Photoshop, see www.adobe.com/go/vid0241. Layer name prefixes for menus For Encore to recognize the components of a menu from Photoshop, you must add predefined prefixes to the layer names. The prefixes identify the layers as button sets, video thumbnails, replacement layers, and button subpictures.
ENCORE CS3 99 User Guide Menu item Photoshop component Layer-name prefix Example Button Name Layer set that contains button components (+) (+)Daisy button 1 Chapter button Layer set that links to the chapter in a timeline or slide show when chapter indexes are created (+#) (+#)Chapter 1 See “About chapter indexes” on page 95 Next button Layer set that links to the next submenu (+>) when chapter indexes are created (+>)Next Previous button Layer set that links to the previous submenu when ch
ENCORE CS3 100 User Guide Note: When you import a menu into Encore, it creates a copy of the menu. The Edit Menu In Photoshop command opens this copy, not the original file. Photoshop saves any changes to the copy. If you want to update the original as well, be sure to first save the copy so that your project contains the revised menu. Once the copy is saved, you can also save changes to the original file by choosing File > Save As in Photoshop or Menu > Save Menu As File in Encore.
ENCORE CS3 101 User Guide A good practice is to create a layer marker in After Effects at the frame where you want the animation to end and the menu looping to begin. Name this marker “Loop Point,” and set an ending keyframe at this same location for each attribute you plan to animate. Doing this ensures that your button highlights line up correctly when you bring the finished animation into Encore. 3. Hide the animated layers in the original menu.
ENCORE CS3 102 User Guide The menu saves as a PSD file and opens as a project in After Effects. The layer sets and buttons convert to nested compositions. 3 In After Effects, animate the menu elements as desired. Set keyframes for position, scale, rotation, or any effects at the times when you want the animation to start and stop. For example, you may want each of three buttons to rotate for 5 seconds at staggered intervals.
ENCORE CS3 103 User Guide A B C Button subpictures A. Normal state B. Selected state C. Activated Regardless of how you create your button subpictures—using predesigned buttons from the Library panel, using the Create Subpicture command, or designing your own in Photoshop—you set the colors used for button subpictures in the Color Set dialog box. (See “About color sets for menus” on page 107.
ENCORE CS3 104 User Guide Paste an image as a subpicture The Paste As Subpicture command lets you quickly create a single-color subpicture from a layer in the menu. You can create invisible buttons by using the Paste As Subpicture command in a layer without any buttons selected. 1 Open the menu. 2 In the Layers panel, select the layer you want to use as a subpicture, and choose Edit > Copy. 3 Select the button layer set into which you want to paste the new subpicture. 4 Choose Edit > Paste As Subpicture.
ENCORE CS3 105 User Guide You build the image used for the subpicture by creating separate layers for each color. The layer names must include the following prefixes: (=1) for areas using color 1, (=2) for areas using color 2, and (=3) for areas using color 3. (=1) (=2) (=3) A B C D Relationship between subpicture layers in button set and color set definitions A. Separate layers for each color (1, 2, and 3) B. All three layers combine to create overlay C.
ENCORE CS3 106 User Guide Automatic color set generated from layers While the colors you use in the layers do not become part of the actual subpicture overlay, Encore does create a color set based on those values. By applying the colors you want for the selected state of the button to the three layers, you are able to design the highlight color in Photoshop and save time editing the color set in Encore. (For more information, see “About color sets for menus” on page 107.
ENCORE CS3 107 User Guide View subpictures You can view the subpictures in the Menu Viewer in each of the button states. These views show the subpictures of all the buttons at the same time using the menu’s assigned color set and each button’s Highlight group. To preview the subpictures with the mouse or a simulated remote control, see “Preview a project” on page 170. 1 Open the menu that you want to preview.
ENCORE CS3 108 User Guide A B C D F E Menu Color Set dialog box A. New Color Set B. Active menu C. Currently applied Color Set (and Color Set menu) D. Normal Group E. Highlight Group 1 and 2 F. Preview state buttons The Menu Color Set dialog box contains the following options: New Color Set Creates a new color set based on the current color definitions, and adds its name to the Color Set pop-up menu. Color Set Menu Lets you choose a color set to display and apply to the currently active menu.
ENCORE CS3 109 User Guide 5 Click the color swatch of any color you want to change. The Color Picker dialog box appears. 6 If you want to limit your color selection to NTSC-safe colors, choose RGB colors between 16 and 235.
ENCORE CS3 110 User Guide 3 Click the New Color Set button , type a new name, and click OK. 4 Adjust the colors and opacity settings as needed. (See “About color sets for menus” on page 107.) 5 Click OK when you have defined all the colors to your satisfaction. Encore applies the new colors to the menu. To dynamically update the color set to reflect changes you make in Photoshop, switch back to the Automatic color set. Assign color sets and highlight groups To each menu, you can apply one color set.
ENCORE CS3 111 User Guide Import a color set 1 Open a menu to which you want to apply the imported color set. 2 Choose Menu > Edit Menu Color Set. 3 Click the Import Color Set button , locate and select the file, and click Open. 4 Click OK. Encore applies the color set to the active menu. Button routing Renumber buttons Encore assigns each button a number. Viewers can select buttons by using the remote control. You can renumber buttons within a menu.
ENCORE CS3 112 User Guide A B C D Comparison of the preset routing options for remote control buttons A. Wrap around left/right, wrap within the same row (default) B. Wrap around left/right, wrap to the next row C. Wrap around up/down, wrap within same column D. Wrap around up/down, wrap to next column Change the routing order When you turn off automatic routing, you can manually set the path for the remote control through the menu buttons. You display the routing icons in the Menu Viewer.
ENCORE CS3 113 User Guide An advanced authoring technique uses multiple versions of a menu that change when the viewer selects certain buttons. Instead of using subpictures to highlight a button, the buttons auto activate when selected and link to another version of the menu. The advantage to this approach is that you can use different images to simulate button selection. The drawback is that any video or audio playing in the background is interrupted.
ENCORE CS3 114 User Guide Create a new style in Photoshop 1 Open Photoshop and create a new image. Set the image size to around 150 x 150 pixels, and delete the background layer to make the image transparent. 2 Type a character or draw a filled pixel shape or a shape layer, depending upon the type of style you want to create (text, image, or vector). 3 Style the layer as desired by using the Layer Style dialog box (choose Layer > Layer Style and select a style from the list).
115 Chapter 7: Timelines and slide shows Timelines and slide shows bring together the assets of an Adobe Encore CS3 project. After planning the project and importing the assets, you are ready to combine the video clips, still images, audio clips, and subtitles together into timelines or slide shows. Timeline basics About timelines Your projects can contain multiple features, such as movies and a slide show.
ENCORE CS3 116 User Guide Timeline Viewer overview A Timeline Viewer displays all of the components of a timeline, including its time ruler, a video track, and optional tracks for audio and subtitles. The time scale used in the ruler depends on the editing timebase of the project: for example, 29.97 fps for NTSC media and 25 fps for PAL media. You place the assets and subtitles on the tracks below the ruler.
ENCORE CS3 117 User Guide Timeline timecode Specifies the location of the current-time indicator within the timeline. The format of the timecode uses semicolons (hours;minutes;seconds;frames) for NTSC projects and colons (hours:minutes:seconds:frames) for PAL projects. You can edit the timecode to set the current time in the timeline. Source timecode Specifies the location of the current-time indicator within the video clip (using the video clip’s timecode).
ENCORE CS3 118 User Guide The Monitor panel includes the following controls: Previous Subtitle Moves back to the first frame of the previous subtitle. Moves forward to the first frame of the next subtitle. Next Subtitle Trim Subtitle In-Point To Here Trim Subtitle Out-Point To Here Add Subtitle Trims the subtitle so that it starts on the current frame. Trims the subtitle so that it ends on the current frame. Adds a subtitle with the same format as the previous subtitle.
ENCORE CS3 119 User Guide See also “Trim video and audio clips in timelines” on page 122 “About timelines” on page 115 Add videos or still images to timelines When you add a video or still image asset to an existing timeline, Encore positions it as a new clip at the end of the track adjacent to the last clip and automatically adds a chapter point at the beginning of the new clip. You can reposition the clip and its chapter point as needed.
ENCORE CS3 120 User Guide 2 If the Monitor panel is hidden, choose Window > Monitor. 3 Position the current-time indicator at the location where you want to begin. 4 Click the Track Selector (next to the track name) to activate the audio and subtitle tracks you want to play. 5 Click the Play button 6 Click the Pause button to begin viewing the timeline. to pause the timeline. See also “About previews” on page 169 Move around in timelines The Timeline Viewer and Monitor panel work in tandem.
ENCORE CS3 121 User Guide Move to the next or previous GOP header Do one of the following: • To move to the next GOP header in MPEG-2 video, Alt-click (Windows) or Option-click (Mac OS) the Skip Forward button in the Monitor panel. (See “About chapter points” on page 132.) • To move to the previous GOP header in MPEG-2 video, Alt-click (Windows) or Option-click (Mac OS) the Skip Backward button in the Monitor panel. (See “About chapter points” on page 132.
ENCORE CS3 122 User Guide Editing assets in timelines View the properties of a clip Once you add an asset to a timeline, it becomes a clip (video, audio, subtitle, or still-image clip), and the Properties panel displays the relevant information about it. You can use an asset multiple times in a project. Although the asset itself appears only once in the Project panel, each occurrence in a timeline is a unique clip with its own properties.
ENCORE CS3 123 User Guide Trimming a video clip • In the Properties panel, select the Duration timecode and type a new timecode to shorten or lengthen the clip. See also “Edit clips in Adobe Premiere Pro and Adobe After Effects” on page 124 Delete video or audio clips from timelines The method you use to delete a video or audio clip determines whether subsequent clips remain in place or shift to the left to fill in the gap. 1 Open the timeline containing the clip you want to delete.
ENCORE CS3 124 User Guide Deleting a video or audio clip removes the item from the timeline, but the item is not deleted from the Project panel. To remove an entire audio or subtitle track rather than just a clip, see “Remove audio or subtitle tracks” on page 135. To delete clips, you can also right-click (Windows) or Control-click (Mac OS) a clip and choose an option from the context menu. Move clips in timelines You can easily change the position of clips in a timeline.
ENCORE CS3 125 User Guide Change the display time of still images Although the Slideshow panel is the preferred method for creating a slide show, you can also add still images to a timeline to create a slide show. The default timeline duration for a still image is 6 seconds. You can increase or decrease the duration of any still image after you place it, or you can change the default duration before you place it.
ENCORE CS3 126 User Guide Note: Encore scales or crops the image as a clip in the timeline. It does not affect the original clip in the project or on your hard drive. Each instance of the image in a timeline can have different scale settings. Save frames as still images When you save a frame as a still image, Encore exports the still image as a Photoshop file (.psd). 1 Navigate to the frame you want to save as a still image in either the Timeline Viewer or the Monitor panel.
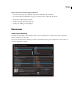
ENCORE CS3 127 User Guide A B C Slideshow Viewer A. Slides area B. Audio area C. Slideshow options Create slide shows 1 Do one of the following: • To create a slide show from assets in the Project panel, select the still images and audio clips, right-click (Windows) or Control-click (Mac OS) the selection, and choose New > Slideshow. Still images appear in the Slides area, and audio clips appear in the Audio area of the Slideshow Viewer.
ENCORE CS3 128 User Guide • Delete a slide by selecting it and pressing Delete. This removes the slide from the slide show, but it does not remove the image from the Project panel. • Adjust the properties of the slide show and individual slides. (See “Changing individual slide settings” on page 128.) Note: It isn’t necessary to use the Slideshow Viewer to create slide shows. You can instead create a slide show manually by adding still images to a timeline.
ENCORE CS3 129 User Guide The audio files are played in order during the slide show. 1 Create a slide show, and import one or more audio clips as assets in the Project panel. 2 Drag the audio assets from the Project panel to the Audio area of the Slideshow Viewer. 3 If necessary, adjust the order in which the audio files are played by dragging them elsewhere in the list.
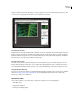
ENCORE CS3 130 User Guide Apply a pan and zoom effect to slides The pan and zoom effect provides a sense of motion to still images. Panning refers to moving across the image, and zooming refers to changing the image’s magnification. A pan and zoom effect is often used in documentaries to make pictures appear more dynamic. • To apply a random pan and zoom effect to all slides in the slide show, select Random Pan & Zoom in the Slideshow Viewer. Encore randomly assigns a pan and zoom setting to each slide.
ENCORE CS3 131 User Guide Create subtitles for slides Adding subtitles to your slide show is easy. Use the name or description of each slide as the subtitle. You can change other options, such as the color group, stroke, and position of the subtitle. The starting time and duration of the subtitle match those of the slide. Note: Subtitles are not supported for Blu-ray or Flash projects. Subtitles in slides 1 In the Slides area of the Slideshow Viewer, select the slide to which you want to add a subtitle.
ENCORE CS3 132 User Guide Chapter points About chapter points You add chapter points to mark a specific frame of a video clip in a timeline. Chapter points commonly mark the beginning of specific scenes and sequences. Chapter points also let the viewer skip forward or back through a clip by pressing the Next Chapter or Previous Chapter buttons on the remote control. You can link to chapter points, add actions to chapter points, or use them to place subtitles.
ENCORE CS3 133 User Guide 2 Choose Window > Monitor to view the video as you add chapter points. 3 Move the current-time indicator to the frame where you want a chapter point. 4 If you are working with MPEG-2 or other video that you have already transcoded for DVD, Alt-click (Windows) or Option-click (Mac OS) either the Skip Forward button or the Skip Backward button in the Monitor panel to see the next GOP header. Remember that chapter points only land on GOP headers in DVD-transcoded video.
134 Chapter 8: Audio and subtitles Providing audio or subtitles in multiple languages can expand the audience of your project. But audio and subtitle tracks need not be limited to language translations. For example, they can provide a director’s comments, teacher’s notes, or hints for students. Audio clips About multiple audio tracks A DVD or Blu-ray project can include as many as eight audio tracks. Traditionally, audio track 1 is used for the soundtrack of the video.
ENCORE CS3 135 User Guide Add audio to a timeline You can place audio files on separate tracks, or you can place multiple audio files on the same track. Although an audio clip initially snaps to the beginning of the track, you can subsequently reposition it or trim it if necessary. The Track Selector to the left of the track name lets you activate a track so that you can control which track you hear when playing the timeline. 1 Import the audio clips as assets in the Project panel.
ENCORE CS3 136 User Guide 2 In the Timeline Defaults pane, do any of the following, and then click OK: • Specify the default number of audio tracks and the default audio language. • Specify the default number of subtitle tracks, the default subtitle language, and the default subtitle length. (Subtitles are not supported for Blu-ray Disc or Flash export.
ENCORE CS3 137 User Guide • To add subtitles to an existing track, click the Track Selector (to the left of the subtitle track name) of the desired subtitle track. 3 Choose Window > Monitor to open the Monitor panel, and click the Show Safe Area button to display the safe area guides. 4 In the timeline, drag the current-time indicator to the first frame in which you want to add a subtitle. 5 Click either the Horizontal or Vertical Text tool. The pointer changes to an I-beam within a dotted box.
ENCORE CS3 138 User Guide 2 Change any of the following options in the Properties panel: • Choose the desired color group from the Highlight Group menu. (See “About subtitle colors” on page 147.) • Set the desired width option from the Stroke menu. The stroke outlines the type to increase the contrast and improve readability. • Change the duration of the subtitle. (See “Change the display time of subtitles” on page 139.) • In the Alignment text box, type a value from 0% to 100% and press Enter.
ENCORE CS3 139 User Guide • To change the color group, stroke weight, or alignment, click a selection tool, and select the clip in the timeline. Then, change the appropriate option in the Properties panel. (These properties apply to the entire clip, not to individual characters.) 6 Move the current-time indicator to the next subtitle you want to edit, select the subtitle clip, and repeat the previous step.
ENCORE CS3 140 User Guide Change the default display time of subtitles 1 Choose Edit > Preferences > Timelines (Windows) or Encore > Preferences > Timelines (Mac OS). 2 For Subtitle Duration, type the number of seconds you want subtitles to display, and then click OK. Encore changes the display time of all new subtitles. Existing subtitles remain unchanged.
ENCORE CS3 141 User Guide Importing subtitles Note: Subtitles are not supported by Blu-ray Disc or Flash. See also “Structure of script files” on page 144 Import text script files 1 Open the timeline to which you want to add subtitles. 2 Choose Timeline > Import Subtitles > Text Script. You can import directly from the timeline by right-clicking (Windows) or Control-clicking (Mac OS) the subtitle track header and choosing the appropriate import option from the menu.
ENCORE CS3 142 User Guide A D B E F C G H I Import Subtitles (Text Script) dialog box A. Subtitle within bounding box B. Text formatting and alignment options C. Coordinates of the text bounding box D. Options for formatting Chinese, Japanese, and Korean (CJK) characters E. Subtitle track and language F. Color set options G. Timecode offset options H. Text orientation I.
ENCORE CS3 143 User Guide Text position within bounding box Sets the position of the clip within the bounding box. A value of 0% aligns the first line of the subtitle with the top of the bounding box for horizontal text, and with the right edge of the bounding box for vertical text. A value of 100% aligns the last line of the subtitle with the bottom edge of the bounding box for horizontal text, and with the left edge of the bounding box for vertical text.
ENCORE CS3 144 User Guide Although many professionals obtain image files from a subtitling house or service, you can create your own. As with the subpictures you create to highlight buttons, you achieve the best results by limiting image files to three colors or fewer. Use sharp edges for text and graphics, avoiding gradients, feathering, or anti-aliasing. Image files can be in JPG, GIF, PNG, TIF, or BMP format.
ENCORE CS3 145 User Guide Important: Regardless of the type of script (text or image based), always save a script as a text file (TXT). To ensure that all the characters are correctly interpreted, choose Unicode UTF-8 or UTF-16 encoding when you save. This encoding option is available for text files in most text editors, such as Microsoft Notepad or TextEdit for Mac OS.
ENCORE CS3 146 User Guide Display_Area (000 000 720 480) Directory C:\Subtitles\Image Files\Caption Inc Images\ (Windows) or directory /Subtitles/Image Files/Caption Inc Images/ (Mac OS) 1 00;00;02;02 00;00;03;15 CATTALESS001.TIF 2 00;00;05;18 00;00;09;20 CATTALESS002.TIF Structure of FAB image scripts FAB image scripts contain separate position information for each image file. Unlike image scripts, you specify where to find the image files when you import a FAB image script.
ENCORE CS3 147 User Guide Subtitle colors About subtitle colors Timeline color sets specify the colors used in subtitles. You can use the same color set for the entire project or define a color set for each timeline. A color set is divided into three groups. You can select the appropriate color group for each clip to ensure maximum visibility or to distinguish, for example, between characters in a film.
ENCORE CS3 148 User Guide 8 Click OK. The new color replaces the original color in the Timeline Color Set dialog box. 9 Choose the desired opacity level from the Opacity menu adjacent to the color swatch. 10 Repeat steps 5 through 9 for any color you want to change. 11 For any subtitle group, select Create Anti-Alias Color From Fill And Stroke to automatically create an anti-alias color based on the values for Fill and Stroke. Selecting this option disables the manual anti-alias color setting.
ENCORE CS3 149 User Guide Change the color group applied to a subtitle clip You can use color groups to vary the subtitles depending upon the background or to help identify or distinguish between subtitles (such as to identify speakers). 1 Open the timeline containing the subtitle colors you want to change. 2 Select the subtitle clip (or clips) that you want to alter in the timeline. To select all the subtitles on a track, doubleclick the track name.
ENCORE CS3 150 User Guide The default setting for Set Audio and Set Subtitle is No Change, which leaves the audio track as set in the DVD player. For example, if a viewer has a DVD player set to French, and a DVD has a track identified as French, the DVD player chooses the French track automatically if No Change is selected.
ENCORE CS3 151 User Guide See also “Project navigation and links” on page 152 Indicate the active audio or subtitle track You can indicate to the viewer which audio or subtitle track is currently active when a menu is displayed. For example, if a viewer uses a menu to turn on French subtitles, watches the DVD, and then returns to the menu with subtitle options, the French subtitle option is selected, even if it wasn’t the default.
152 Chapter 9: Creating and managing links After you import the assets for your project, create menus, and prepare the timelines for the video, audio, and still images, it’s time to link them together. Understanding navigation Project navigation and links Menus and their buttons provide the primary method for a viewer to move through the disc’s content.
ENCORE CS3 153 User Guide End actions for menus are optional. You use them when you want to control the display if a viewer does not activate a button on the menu. Menu end actions are useful in projects that remain playing in a public place or educational setting. If a viewer leaves, for example, the menu can jump back to the main menu after a reasonable wait period, to be ready for the next person. End action override This is an optional setting that can override the end action of the destination.
ENCORE CS3 154 User Guide Timeline and chapter When linking to a timeline, you also specify one of its chapter points. The chapter point indicates the starting location within the timeline. Hollywood DVDs typically include a scene index menu that uses a single timeline for the entire movie with chapter points for each scene. Playlist A playlist is a group of timelines, slide shows, and chapter playlists that play sequentially. When linking to a playlist, you can also choose an end action.
ENCORE CS3 155 User Guide 2 In the Properties panel, choose a destination from the desired link menu (Link, End Action, or Override), and then choose the desired content from the submenu that appears (for example, a specific button, slide, or chapter). The link menus display up to 20 of the most recently used elements (such as menus, timelines, and slideshows). If the element you want is not listed, choose Specify Link (see below).
ENCORE CS3 156 User Guide Override (Optional) Temporarily changes the end action of the element you chose for First Play. Title Button Specifies what displays when a viewer presses the Title button on the remote control. You generally set the Title Button to return the viewer to the main menu of the disc. Main Timeline Identifies the primary feature on the disc. The main timeline is the first timeline written to the disc and acts as the default timeline.
ENCORE CS3 157 User Guide 3 In the Properties panel, specify a destination for Link. Encore displays the new link in the Properties panel using the format Menu:Button or Timeline:Chapter. (For information on using the pick whip, see “Specify a link” on page 154.) 4 If you want to change the end action for the Link set in step 3, select a destination for Override in the Properties panel.
ENCORE CS3 158 User Guide Selecting multiple menus, timelines, or buttons lets you make global changes to their properties. 1 Click the Project, Timelines, or Menus panel. (The Project panel displays all the elements in a project, while the Timelines and Menus panels only display the single element type.) 2 Select the desired elements. You can select only one type of element at a time.
ENCORE CS3 159 User Guide Playlists and chapter playlists Playlists A playlist is a group of timelines, slide shows, or chapter playlists that play sequentially (from each one’s specified chapter) and can include one end action. Playlists provide more efficient navigation possibilities than end action overrides alone. After creating a playlist, you populate and edit it by using the Playlist Properties panel. You can specify different audio and subtitle tracks for timelines accessed from a playlist also.
ENCORE CS3 160 User Guide 3 Enter a name for the playlist, and click OK. Encore creates a playlist and populates it with the selected assets. 4 Select the playlist in the Project panel, and bring the Playlist Properties panel to the front, if it’s not visible. 5 Edit the list of assets in the Playlist Properties panel as desired, by rearranging the order, or deleting or adding more of the assets. (See “Edit a playlist” on page 160 next.
ENCORE CS3 161 User Guide A B Drag chapters from Master Timeline panel (A) to Chapter Playlist panel (B) where you can reorder them and change their properties. Create a chapter playlist You can create a chapter playlist to present the chapters of a timeline in a nonsequential order. 1 Choose File > New > Chapter Playlist or choose Timeline > New Chapter Playlist. If a timeline is selected, a chapter playlist is created from it. If no timeline is selected, Encore prompts you to choose one.
ENCORE CS3 162 User Guide Working in the Flowchart Flowchart overview The Flowchart provides a graphic interface that lets you complete many common authoring tasks. You work with the Flowchart throughout the project, oftentimes in conjunction with other panels—notably the Properties panel. You can efficiently accomplish all of the following tasks in the Flowchart: • Create and update project navigation by visually arranging and linking elements. • Update properties quickly and easily for an element.
ENCORE CS3 163 User Guide A B CD E F Quick glance at section of Flowchart: Main Menu’s thumbnail shows that it’s a menu, indicated by its type icon (A), with default button set to Party Life, indicated by its info badge (B). Party Life button invokes link transition, indicated by link transition icon (C), before it plays Party Life, indicated by arrow (D). Party Life, which is a timeline, indicated by its type icon (E), begins playing from chapter 1, indicated by the info badge (F). A. Menu icon B.
ENCORE CS3 164 User Guide Type icons The icon in the upper left corner of an object’s thumbnail denotes the type of item: menu playlist , chapter playlist , or slide show . , timeline , Info badges The info badge in the upper-right corner of an item’s thumbnail details certain attributes, depending on the type of item. (The audio and subtitle track badges actually denote tracks specified by the incoming link, not attributes of the item.
ENCORE CS3 165 User Guide Set navigation in the Flowchart For smaller projects, you can drag items directly into the Flowchart panel and arrange them manually. For large, complex projects, you can use auto layout, letting Encore position items in the Flowchart. You can also choose to work with a combination of auto and manual layout. Use the Navigation Design workspace when you create and manage links. Choose Window > Workspace > Navigation Design to open the predesigned workspace.
ENCORE CS3 166 User Guide • Drag an element from the Project panel to the Flowchart. Note: If you can’t drag a file from the Project panel, make sure it’s been converted to an element type. For example, you can’t drag a movie file, but you can right-click (Windows) or Control-click (Mac OS) the movie file, choose New Timeline, and then drag the resulting timeline to the Flowchart. • Drag the pick whip from an element in the active panel to another element.
ENCORE CS3 167 User Guide • To automatically rearrange all the manually placed items, choose Auto-Layout All from the Flowchart panel menu. Jump from the Flowchart to other viewers You can open elements from the Flowchart directly into their corresponding viewer, start Project Preview mode from any point in the Flowchart, or open a menu from the Flowchart to edit it in Adobe Photoshop CS3.
ENCORE CS3 168 User Guide Previous/Next Chapter Lets the viewer move among chapters. Search For Chapter Lets the viewer search for a specific chapter. Title Remote Lets the viewer use the Title button on the remote control. Menu Remote Lets the viewer use the Menu button on the remote control. Note: Blu-ray Disc players (and remote controls) do not support the Menu Remote setting for a timeline. Change Presentation Mode Lets the viewer set the playback mode to 4:3 or 16:9.
169 Chapter 10: Testing and building the final product Before you build your final project or export it to an Adobe Flash format, it is important to preview and test your project. Previewing allows you to verify your navigation, menus, and buttons. Adobe Encore CS3 can also check your project for broken links, orphaned menus, bit rate problems, and other issues. When you are satisfied with your project, you can build it for different types of DVD or Blu-ray output, including burning directly to a disc.
ENCORE CS3 170 User Guide 2 Do any of the following: • To specify the audio output device, click the Audio Output Device button and make your selections in either the ASIO DirectSound Full Duplex Setup dialog box. • To display the Menu Viewer on an attached device, select Show Menu Editor On DV Hardware, choose the attached device from the Device menu, and click OK. Preview a project 1 Choose File > Preview to open the Project Preview window or click the Preview button in the Tools panel.
ENCORE CS3 171 User Guide Display Area Zoom Specifies the magnification of the preview. Audio Track The menu displays the available audio tracks and their language code, highlighting the currently selected track. Toggle Subtitle Display On Or Off Toggles the subtitle on and off. The menu displays the available subtitle tracks and their language code, highlighting the currently selected one. Status area Displays the name of the timeline or menu in the first line.
ENCORE CS3 172 User Guide Set Preview preferences By default, the Project Preview window uses a 4:3 frame aspect ratio. You can change the default ratio in order to preview widescreen projects. Preview preferences also specify the target language and region codes. These settings are used to mimic the behavior of your DVD or Blu-ray Disc player. The Project Preview window will show you how the disc will play on devices with the matching setup.
ENCORE CS3 173 User Guide 3 Click Start. The software lists any problems found. You can double-click a problem asset to open it. After you open and fix all the problem items, check the project again to make sure that you’ve corrected all the problems. Note: The Name and Problem columns appear by default. To view additional informational columns (such as Description and Menu), right-click (Windows) or Control-click (Mac OS) a column name and choose the desired column from the Columns menu that appears.
ENCORE CS3 174 User Guide 2 Specify the copy-protection settings, and then close the Build panel and save the project: CGMS Restricts the number of copies that can be made of your disc. Choose No Copies Allowed For CGMS to enable cascading style sheets (CSS) and Macrovision®. CSS Encrypts the video data, and then includes decryption keys that can only be read from the original disc. Dupli- cated copies do not include the decryption keys, so the video remains scrambled.
ENCORE CS3 175 User Guide ROM material is only available on personal computers. Furthermore, it’s only available from the desktop, not from the video content of a disc. You can specify a folder of additional ROM content to be added to the disc when Encore builds your project. Note: Only the files and folders inside the folder are added to the disc, not the folder. 1 To specify the location of the ROM content to include with the project, do one of the following: • Choose File > Select DVD-ROM Folder.
ENCORE CS3 176 User Guide DVD Image Or Blu-ray Image Builds a Blu-ray or DVD image on your hard drive. The image is typically used for local replication by using a third-party mastering application. DVD Master Writes to a digital linear tape (DLT) used for mass replication of DVDs. Creating a DVD master requires having a DLT drive connected to your computer. Building a master creates a DDP (Disc Description Protocol) report, which replication facilities might require.
ENCORE CS3 177 User Guide • BD-ROM Image Type Read-only format for computer software, games, and movie distribution For DVD output, Disc Info also includes the following settings: • Name The name entered in the Disc Properties panel appears here. To change the disc’s name, enter a new one. Note: For Blu-ray Disc output, Encore uses whatever name you specify in the Disc Properties panel. • Size Defaults to last size used. To change the disc size, select a size from the pop-up menu.
ENCORE CS3 178 User Guide Replicating discs To produce multiple copies of your DVD or Blu-ray disc, you can burn them yourself, either in Encore or by using a third-party mastering application. Producing them in Encore works best for limited quantities and requires the appropriate hardware or software. However, if you require a large quantity of discs, use a professional replication facility for mass production.
ENCORE CS3 179 User Guide 5 Click Build. Encore displays the progress of the build. When writing is complete, click OK. See also “Tips for creating Flash projects” on page 179 “Embed web links in your Flash project” on page 179 Tips for creating Flash projects Keep the following tips in mind as you plan your projects for interactive viewing on the web: 1.
ENCORE CS3 180 User Guide See also “Creating menus” on page 62 “Setting navigation and properties” on page 154 “Set disc properties and navigation” on page 155 “Export your current project to Flash” on page 178 “Tips for creating Flash projects” on page 179
181 Chapter 11: Keyboard shortcuts Adobe Encore CS3 provides a set of keyboard shortcuts. Because many commands and buttons have keyboard equivalents, you can create a project with minimal use of the mouse. Using keyboard shortcuts Find keyboard shortcuts ❖ Do one of the following: • For a tool or button, hold the pointer over the tool or button until its tool tip appears. If available, the keyboard shortcut appears in the tool tip after the tool description.
ENCORE CS3 182 User Guide Keys for working in the Project panel Result Windows shortcut Mac OS shortcut Replace selected asset Alt + Shift + R Command + Option + Shift + R Open asset Double-click Double-click Open selected asset Enter or Return Enter or Return Select asset above current selection Up Arrow Up Arrow Select asset below current selection Down Arrow Down Arrow Duplicate selected asset Ctrl + D Command + D Select all Ctrl + A Command + A Deselect all Ctrl + Shift + A Co
ENCORE CS3 183 User Guide Result Windows shortcut Mac OS shortcut Replace selected item Alt-double-click an item in the Library panel Option-double-click at item in the Library panel Replace selected item Alt-drag an item from the Library panel or Windows Explorer onto the item Option-drag an item from the Library panel or Mac OS Finder onto the item Replace without scale Ctrl-click the Replace button in the Library Command-click the Replace button in the Library Replace without scale Ctrl + A
ENCORE CS3 184 User Guide Result Windows shortcut Mac OS shortcut Move cursor to previous paragraph Ctrl + Up Arrow Command + Up Arrow Move cursor to beginning of line Home Home Move cursor to end of line End End Move cursor to beginning of text Ctrl + Home Command + Home Move cursor to end of text Ctrl + End Command + End Increase selection of text Shift-click Shift-click Increase selection by word Double-click + drag Double-click + drag Increase selection by line Triple-click + d
ENCORE CS3 185 User Guide Keys for working in the Timeline Viewer Result Windows shortcut Mac OS shortcut Play/Pause (toggle) Spacebar Spacebar Ripple delete Shift + Backspace Shift + Backspace Slip audio or video independently Alt-drag or Alt-click the audio or video portion of the clip with the Selection tool Opt-drag or Opt-click the audio or video portion of the clip with the Selection tool Move current-time indicator to end of last clip in timeline End End Move current-time indicator to
ENCORE CS3 186 User Guide Result Windows shortcut Mac OS shortcut Zoom out Alt-click with zoom tool Option-click with zoom tool Zoom out - (minus) on numeric keypad - (minus) on numeric keypad Zoom out Ctrl + , (comma) Command + , (comma) Keys for working in the Project Preview window Result Windows shortcut Mac OS shortcut Open Project Preview window Shift + Spacebar Shift + Spacebar Activate current button Enter Enter Activate a specific button Press the number (1 through 9) of the
ENCORE CS3 187 User Guide Result Windows shortcut Mac OS shortcut Switch to seventh workspace in Alt + Shift + 7 Workspace menu Option + Shift + 7 Switch to eighth workspace in Workspace menu Alt + Shift + 8 Option + Shift + 8 Switch to ninth workspace in Workspace menu Alt + Shift + 9 Option + Shift + 9 Keys for resetting application defaults Result Windows shortcut Mac OS shortcut Reset keys in registry file Ctrl + Shift while Encore starts Drag the Preferences file to the trash and resta
ENCORE CS3 188 User Guide Result Windows Mac OS Add an item to the selection Shift + Right Arrow, Left Arrow, Up Arrow, or Shift + Right Arrow, Left Arrow, Up Arrow, or Down Arrow Down Arrow Display Help F1 F1 Rename next Tab Tab Rename previous Shift+Tab Shift+Tab Select inverse in Filter panel Alt-click Option-click Clear filter items Ctrl+Alt+A Command+Option+A Display Loupe tool in Preview panel Click Click Additional Loupes in Preview panel (multiple selection) Ctrl-click Comm
189 Index A accessibility of Help 4 Adobe Premiere Pro editing clips in 124 importing markers from 42, 132 supported formats 39 trimming 122 using menus to select 150 activated state, menu 59 Adobe Video Workshop 5 Audio/Video Out preferences 169 activation of software 1 After Effects.
INDEX 190 buttons animating thumbnails 90 moving 133 naming and describing 133 applying highlight group 110 Character panel 79 auto activate 112 Check Project feature 172 changing color groups 110 CJK text converting from objects 74 converting to objects 74 creating subpictures in Photoshop 104 default button in Library panel 68 default menu button 68 drop shadow 76 highlighting 102, 153 formatting options 81 subtitle text script options 141 closed captions cropping menu objects 77 slides in slid
INDEX 191 DVD-compliant footage First Play setting importing 38, 39 about 152 transcoding 51 in Flash projects 178 DVDs authoring overview 12 specifying 155 Flash projects highlight groups about 109 applying to buttons 110 highlighting links 153 budgeting for space 29 embedded web links 179 build settings 176 exporting to 178 Hold Forever menu setting 90 building 175 features not supported in 179 horizontal lines, settings 97 copy protection for 173 flipping menu objects 77 layer breaks
INDEX 192 leading 79, 81 markers display time 90 letterboxing 37 See also chapter points drop shadows 76 Library panel duration 90 about 43, 61 importing from Adobe Premiere Pro 42 adding items to 43 importing from After Effects 42 looping 91 adding items to menus 65 mass-producing DVDs 178 customizing 43 Master output for DVDs 176 menu templates 92 mattes storing assets in 43 links about 152 buttons 156 chapter playlists 154 checking 172 link lines in the flowchart 164 managing 157 menu
INDEX 193 Next button creating 95 docking and grouping 18 Project Transcode Presets dialog box 53 prefixes 98 opening and closing 21 projects NTSC panels resizing 20 about 33 pixel aspect ratio 35 PCM Audio 55 building 175 TV standard 33 PDF files, adding to disc content 174 checking before building 172 Photoshop.
INDEX 194 resizing menu objects 77 scaling slides 130 setting slide options 128 requirements 105 updating text automatically 104 RGB color 97 slide duration 130 Ripple Delete command 123 subtitles 131 basics 136 ROM (Read Only Memory) content 174, 177 timeline, using to create 119 buttons, linking 150 transitions 129 color sets 147 rotating software subtitles, creating creating timelines 118 characters 82 activation 1 indicating active track 151 menu objects 77 downloads 10 multiple t
INDEX 195 text scripts, subtitles 140 tryouts 10 thumbnail layer 98 text. See type tsume text 81 thumbnails 87 thumbnail buttons TV standards trimming in timeline 122 creating 87 NTSC 33 video noise reduction filter 57 creating in Photoshop 88 PAL 33 Video Workshop 5 customizing 88 pixel aspect ratios 35 thumbnail videos type alignment 80 W web browser, viewing in Flash format 178 time graph.