
Operation Manual


To the top
To the top
word or widest image in the cell, then expand vertically as necessary to accommodate other contents.)
Header Formats the selected cells as table header cells. The contents of table header cells are bold and centered by default.
You can specify widths and heights as either pixels or percentages, and you can convert from pixels to percentages and
back.
Note: When you set properties on a column, Dreamweaver changes the attributes of the td tag corresponding to each cell in
the column. When you set certain properties for a row, however, Dreamweaver changes the attributes of the tr tag rather than
changing the attributes of each td tag in the row. When you’re applying the same format to all the cells in a row, applying the
format to the tr tag produces cleaner, more concise HTML code.
3. Press Tab or Enter (Windows) or Return (Macintosh) to apply the value.
Use Expanded Tables mode for easier table editing
Expanded Tables mode temporarily adds cell padding and spacing to all tables in a document and increases the tables’ borders to make editing
easier. This mode enables you to select items in tables or precisely place the insertion point.
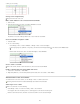
For example, you might expand a table to place the insertion point to the left or right of an image, without inadvertently selecting the image or table
cell.
A. Table in Standard mode B. Table in Expanded
tables mode
Note: After you make your selection or place the insertion point, you should return to the Standard mode of Design view to make your edits.
Some visual operations, such as resizing, will not give expected results in Expanded Tables mode.
Switch to Expanded Tables mode
1. If you are working in Code view, select View > Design or View > Code And Design (you cannot switch to Expanded Tables
mode in Code view).
2. Do one of the following:
Select View > Table Mode > Expanded Tables Mode.
In the Layout category of the Insert panel, click Expanded Tables Mode.
A bar labeled Expanded Tables Mode appears across the top of the Document window. Dreamweaver adds cell padding
and spacing to all tables on the page and increases the tables’ borders.
Switch out of Expanded Tables mode
Do one of the following:
Click Exit in the bar labeled Expanded Tables Mode at the top of the Document window.
Select View > Table Mode > Standard Mode.
In the Layout category of the Insert panel, click Standard Mode.
Format tables and cells
You can change the appearance of tables by setting properties for the table and its cells or by applying a preset design to the table. Before you set
table and cell properties, be aware that the order of precedence for formatting is cells, rows, and tables.
To format the text inside a table cell, use the same procedures you would use to format text outside of a table.
Change the format of a table, row, cell, or column
1. Select a table, cell, row, or column.
2. In the Property inspector (Window > Properties), click the expander arrow in the lower-right corner and change properties as
necessary.
3. Change the properties as necessary.
For more information on the options, click the Help icon on the Property inspector.
Note: When you set properties on a column, Dreamweaver changes the attributes of the td tag corresponding to each cell in
the column. When you set certain properties for a row, however, Dreamweaver changes the attributes of the tr tag rather than
191