Using ADOBE® PHOTOSHOP® ELEMENTS 8 EDITOR MAC OS X
© 2009 Adobe Systems Incorporated. All rights reserved. Copyright Using Adobe® Photoshop® Elements 8 for Mac OS® This user guide is protected under copyright law, furnished for informational use only, is subject to change without notice, and should not be construed as a commitment by Adobe Systems Incorporated. Adobe Systems Incorporated assumes no responsibility or liability for any errors or inaccuracies that may appear in the informational content contained in this guide.
©Copyright 1997 All rights reserved. Proximity Technology A Division of Franklin Electronic Publishers, Inc. Burlington, New Jersey USA. ©Copyright 1984 Updated 12 June 2009 Editions Fernand Nathan ©Copyright 1989 All rights reserved. Proximity Technology A Division of Franklin Electronic Publishers, Inc. Burlington, New Jersey USA. © Copyright 1983 S Fischer Verlag ©Copyright 1997 All rights reserved. Proximity Technology A Division of Franklin Electronic Publishers, Inc. Burlington, New Jersey USA.
iv Contents Chapter 1: Getting started Installing Photoshop Elements ........................................................................................ 1 Using Help and getting support ........................................................................................ 1 New and enhanced features ........................................................................................... 2 Working in Photoshop Elements ........................................................................
v USING PHOTOSHOP ELEMENTS 8 Contents Chapter 7: Selecting parts of an image Making selections . . . . . . . . . . . . . . . . . . . . . . . . . . . . . . . . . . . . . . . . . . . . . . . . . . . . . . . . . . . . . . . . . . . . . . . . . . . . . . . . . . . . . . . . . . . . . . . . . . . . 80 Modifying selections . . . . . . . . . . . . . . . . . . . . . . . . . . . . . . . . . . . . . . . . . . . . . . . . . . . . . . . . . . . . . . . . . . . . . . . . . . . . . . . . . . . . . . . . . . . . . . .
vi USING PHOTOSHOP ELEMENTS 8 Contents Setting up brushes Fills and strokes Patterns Gradients . . . . . . . . . . . . . . . . . . . . . . . . . . . . . . . . . . . . . . . . . . . . . . . . . . . . . . . . . . . . . . . . . . . . . . . . . . . . . . . . . . . . . . . . . . . . . . . . . . 219 . . . . . . . . . . . . . . . . . . . . . . . . . . . . . . . . . . . . . . . . . . . . . . . . . . . . . . . . . . . . . . . . . . . . . . . . . . . . . . . . . . . . . . . . . . . . . . . . . . . . . 223 . . . .
1 Chapter 1: Getting started Adobe® Photoshop® Elements software combines power and simplicity so you can easily make your photos look their best. You can share them in imaginative ways, and easily find and view all your photos. Installing Photoshop Elements Requirements To review the complete system requirements and recommendations for your Adobe® software, see the ReadMe file included with your software. Install the software 1 Close any other Adobe applications open on your computer.
2 USING PHOTOSHOP ELEMENTS 8 Getting started Help in the application Help in the application provides access to key tasks and concepts. If you aren’t connected to the Internet, Photoshop Elements launches Help in the application. Help in the application is a small subset of the complete Help available on the web. Help PDF Help is also available as a PDF that is optimized for printing. Click the Help PDF link at the top of each Help page.
3 USING PHOTOSHOP ELEMENTS 8 Getting started Do more with your photos Share in many ways from one convenient place Quickly and easily share your photos in various ways—including e- mail, web galleries, and burning to CD. Liven up your photo projects Use great-looking new themes and artwork to give your photo projects a professional look. Surface blur The Surface Blur filter blurs an image while preserving edges.
4 USING PHOTOSHOP ELEMENTS 8 Getting started When working in Photoshop Elements, use Adobe Bridge to find and manage your photos and Adobe PDF documents, even if they’re stored in different locations. Adobe Bridge automatically organizes photos by date as they download. You can further sort and categorize photos by adding star ratings, stacking photos, and assigning keyword tags to help you identify people, places, and events. You can quickly view every photo you’ve taken of your dog.
5 USING PHOTOSHOP ELEMENTS 8 Getting started Edit Guided mode walks you through each editing step to make improving your photos easier than ever. You can feel free to experiment, too, because you can undo or redo multiple steps with a click. Creating photo composites You can create beautiful composites, including perfect group shots and seamless panoramas, with easy-to-use tools.
6 USING PHOTOSHOP ELEMENTS 8 Getting started Use a single tool to easily combine the best facial expressions and body language from a series of group shots to create a single composite in which everyone looks great. Photomerge Exposure and Photomerge Scene Cleaner With Photomerge Scene Cleaner, you can create perfect scenic photos from multiple photos. For example, you can eliminate tourists that inadvertently wandered into the scenery.
7 USING PHOTOSHOP ELEMENTS 8 Getting started Photomerge Exposure Creating and sharing photo projects After you’ve perfected your photos in Photoshop Elements, you can use them in various fun projects that you can share with family and friends. For example, you can create printed photo projects, such as albums, scrapbook pages, greeting cards, CD/DVD labels and jackets, and photo collages that you can print at home.
8 USING PHOTOSHOP ELEMENTS 8 Getting started Create customized photo collages with graphical elements, such as frames, drop shadows, backgrounds, and text. You can also use your photos in projects such as online photo galleries and photo slide shows. As with print photo projects, Photoshop Elements guides you through the process of creating your project by helping you design the page, arrange the photos, customize the layout, and burn the project to a disc or upload it to the web.
9 Chapter 2: Photoshop Elements workspace Use the Photoshop Elements workspace for creating, editing, and fixing your images. You can add functionality with plug-in modules and expand system memory by using scratch disks. Select a photo and then choose Quick Fix, Full Edit, or Guided Edit to edit it. About the workspace The Welcome screen When you start Photoshop Elements, the Welcome screen opens by default. The Welcome screen is a convenient starting place, or hub, for major tasks.
10 USING PHOTOSHOP ELEMENTS 8 Photoshop Elements workspace A C B D G F E Full Edit workspace A. Inactive tab B. Active tab C. Active image area D Tools E. Project Bin F. Panel bin G. Panels Menu bar Contains menus for performing tasks. The menus are organized by topic. For example, the Enhance menu contains commands for applying adjustments to an image. Workspace buttons Moves you between the Guided Edit, Quick Fix, and Full Edit workspaces.
11 USING PHOTOSHOP ELEMENTS 8 Photoshop Elements workspace Use Application frames On the Mac, the Application frame groups all the workspace elements into a single, integrated window that enables you to treat the application as a single unit. When you move or resize the Application frame or any of its elements, all the elements within it respond to each other so that none overlap. Panels don’t disappear when you switch applications or when you accidentally click out of the application.
12 USING PHOTOSHOP ELEMENTS 8 Photoshop Elements workspace Using keyboard commands and modifier keys Keyboard commands let you quickly execute commands without using a menu; modifier keys let you alter how a tool operates. When available, the keyboard command appears to the right of the command name in the menu.
13 USING PHOTOSHOP ELEMENTS 8 Photoshop Elements workspace Toolbox overview A A B Navigation and measuring tools D Move (V) Cookie Cutter (Q) Zoom (Z) Straighten (P) Recompose (C+C) Eyedropper (I) D F Crop (C) Hand (H) C Crop tools E Brush (B) Pencil (N) Impressionist Brush (B) Color Replacement (B) Retouching tools Smart Brush (F) Detail Smart Brush (F) Red Eye Removal (Y) B Selection tools Rectangular Marquee (M) Elliptical Marquee (M) E Lasso (L) Magnetic Lasso (L) Polygonal Lasso
14 USING PHOTOSHOP ELEMENTS 8 Photoshop Elements workspace A D E B C F Using tools A. Toolbox B. Active tool C. Hidden tools D. Tool name E. Tool shortcut F. Hidden tool triangle More Help topics “Keys for selecting tools” on page 281 Set tool preferences 1 Choose Photoshop Elements > Preferences > General. 2 Set one or more of the following options, and click OK. • Select Show Tool Tips to show or hide tool tips.
15 USING PHOTOSHOP ELEMENTS 8 Photoshop Elements workspace A B C D Lasso options bar A. Tool icon B. Active tool C. Hidden tools D. Tool options 1 Select a tool. 2 Look in the options bar to see the available options. For more information on setting options for a specific tool, search for the tool’s name in Photoshop Elements Help.
16 USING PHOTOSHOP ELEMENTS 8 Photoshop Elements workspace Panel menus Some commands appear in both the panel menu and the menu bar. Other commands are exclusive to panel menus. Click panel menu to view the different commands in each panel. Pop-up sliders within panels Some panels and dialog boxes contain settings that use pop-up sliders (for example, the Opacity option in the Layers panel). If there is a triangle next to the text box, you can activate the pop-up slider by clicking the triangle.
17 USING PHOTOSHOP ELEMENTS 8 Photoshop Elements workspace B C A D The Panel Bin A. Change panel tools B. Adjust panel height C. Panel menu D. Scroll to view rest of panel 1 To show or hide the bin, choose Window > Panel Bin. 2 To use panels in the Panel Bin, do any of the following: • To remove a panel from the Panel Bin, drag the panel’s title bar out of the Panel Bin. • To add a panel to the Panel Bin, drag the panel’s title bar into the Panel Bin.
18 USING PHOTOSHOP ELEMENTS 8 Photoshop Elements workspace Note: If you want panels to always open in their default positions, choose Photoshop Elements > Preferences > General, and then deselect Save Panel Locations. The change takes effect the next time you start the application. • To move a panel and keep it open, drag the panel. To reset the panel to its default position, select Window > Reset Panels. Work with the Panel Bin The Panel Bin appears on the right side of the workspace.
19 USING PHOTOSHOP ELEMENTS 8 Photoshop Elements workspace Undo, redo, and cancel Undo, redo, or cancel operations Many operations can be undone or redone. For instance, you can restore all or part of an image to its last saved version. Available memory may limit your ability to use these options. 1 To undo or redo an operation, Choose Edit > Undo or choose Edit > Redo. 2 To cancel an operation, hold down the Esc key until the operation in progress has stopped.
20 USING PHOTOSHOP ELEMENTS 8 Photoshop Elements workspace Revert to the last saved version When editing a photo in Full Edit or Quick Fix, you can revert to the last saved version. ❖ Choose Edit > Revert. Note: Revert is added as a history state in the Undo History panel and can be undone. Revert to a previous state of an image ❖ In Full Edit, do any of the following: • Click the name of the state in the Undo History panel.
21 USING PHOTOSHOP ELEMENTS 8 Photoshop Elements workspace Redisplay disabled warning messages In certain situations, messages containing warnings or prompts are displayed. You can disable the display of these messages by selecting the Don’t Show Again option in the message, and reset the messages you’ve disabled at a later time. 1 Choose Photoshop Elements > Preferences > General. 2 Click Reset All Warning Dialogs, and click OK.
22 USING PHOTOSHOP ELEMENTS 8 Photoshop Elements workspace added to the Filter menu, or as file formats in the Open and Save As dialog boxes. If you install a large number of plug-ins, Photoshop Elements may not be able to list them all in their appropriate menus. If so, newly installed plug-ins appear in the Filter > Other submenu. To prevent a plug-in or folder of plug-ins from loading, add a tilde character (~) at the beginning of the plug-in name, folder, or directory.
23 Chapter 3: Import photos Importing photos About getting photos When you begin to use Photoshop Elements, you can use media files from many sources, whether a camera, scanner, CD, or a folder on your hard disk. If you simply want to start editing a photo on your hard disk, and you know its filename and location, use the File > Open command to browse to the file.
24 USING PHOTOSHOP ELEMENTS 8 Import photos For example, you might have many pictures from a recent vacation stored in your digital camera. Some of the pictures are from a family reunion, and the rest are pictures of tourist attractions visited along the way. During the import process, you can divide these photos into Place and Family folders, and then name them accordingly. Import keywords attached to photos When you receive photos that contain keyword metadata, you can import them with the photo.
25 USING PHOTOSHOP ELEMENTS 8 Import photos Note: If the name you entered already exists, the copied image filename is appended with “-1” or another appropriately numbered designator. Apply Metadata (Optional) Select the options to use for adding metadata to the photos. 4 Click Get Photos. The photos are copied to your hard drive. Set advanced photo downloading options The Advanced dialog box of the Adobe Photo Downloader offers several options not available in the Standard dialog box.
26 USING PHOTOSHOP ELEMENTS 8 Import photos Scanners About scanning Photoshop Elements connects to your scanner so that you can get images of your photos, negatives, and slides. You can get images from scanners in several ways: • Use the scanner driver plug-in module that came with your scanner. This software is either compatible with Photoshop Elements or uses the TWAIN® interface to scan and open images directly in Photoshop Elements.
27 USING PHOTOSHOP ELEMENTS 8 Import photos After the image is scanned, it appears in an untitled Photoshop Elements window. More Help topics “File formats for saving” on page 40 “About image size and resolution” on page 137 Local files, CDs, DVDs, and video Get photos from files and folders You can bring photos into Photoshop Elements from a hard disk or optical disc drive in your computer, either by dragging them, or by browsing to them using the File > Open or the File > Browse With Bridge command.
28 USING PHOTOSHOP ELEMENTS 8 Import photos Get photos from video You can capture frames from your digital videos if they are saved in a file format that Photoshop Elements can open, including AVI, MPEG, MPG, and MOV. Captured photos are saved with the name of the video file plus a number (for example, videoclip01, videoclip02, and so forth). Note: To create photos from the broadest range of video formats, install the latest version of standard video software.
29 Chapter 4: Working with files When working in Adobe® Photoshop® Elements the format that you save the file in is very important. For example, you often might have a file in one format, such as JPEG that you edit and then save to another format, such as PSD (the Photoshop Elements native file format, which preserves layer information and applies no compression). Understanding the differences between formats is therefore an important part of photo editing and sharing.
30 USING PHOTOSHOP ELEMENTS 8 Working with files 3 Click Open. In some cases, a dialog box appears, letting you set format-specific options. There may be instances when Photoshop Elements cannot determine the correct format of a file. For example, transferring a file between Mac OS® and Windows® can cause the format to be mislabeled. In such cases, you must specify the correct format in which to open the file.
31 USING PHOTOSHOP ELEMENTS 8 Working with files • For Resolution, accept the default (300 ppi) or type a new value. A higher resolution increases the file size. • Select Anti-aliased to minimize the jagged edges as the image is rasterized (bitmapped). 5 Select Suppress Warnings to hide any error messages during the import process. 6 Click OK to open the file.
32 USING PHOTOSHOP ELEMENTS 8 Working with files 6 (Optional) Rotate the placed artwork by doing one or more of the following: • Position the pointer outside the bounding box of the placed artwork (the pointer turns into a curved arrow), and drag. • In the options bar, enter a value (in degrees) for the Rotation option . 7 (Optional) Skew the placed artwork by holding down Command and dragging a side handle of the bounding box. 8 Set the Anti-alias option in the options bar.
33 USING PHOTOSHOP ELEMENTS 8 Working with files 6 Under Image Size, select Resize Images if you want each processed file resized to a uniform size. Then type in a width and height for the photos, and choose an option from the Resolution menu. Select Constrain Proportions to keep the width and height proportional. 7 To apply an automatic adjustment to the images, select an option from the Quick Fix panel.
34 USING PHOTOSHOP ELEMENTS 8 Working with files 3 Move the pointer into the image, or drag within the image to use the tool. The following information may appear, depending on which tool you’re using: The numeric values for the color beneath the pointer. The x- and y-coordinates of the pointer. The width (W) and height (H) of a marquee or shape as you drag, or the width and height of an active selection. The x- and y-coordinates of your starting position (when you click in the image).
35 USING PHOTOSHOP ELEMENTS 8 Working with files Viewing images Viewing images In Full Edit, Guided Edit, or Quick Fix, the Hand tool , the Zoom tools , the Zoom commands, and the Navigator panel let you view different areas of an image at different magnifications. The document window is where your image appears. You can open additional windows to display several views of an image at once (such as different magnifications). You can magnify or reduce your view using various methods.
36 USING PHOTOSHOP ELEMENTS 8 Working with files Dragging the Zoom tool to magnify the view of an image • Click the Zoom In or Zoom Out button in the Navigator panel. • Choose View > Zoom In or View > Zoom Out. • Enter the desired magnification level in the Zoom text box, either in the status bar or in the Navigator panel. When using a Zoom tool, hold down Option to switch between zooming in and zooming out.
37 USING PHOTOSHOP ELEMENTS 8 Working with files When Resize Windows To Fit is deselected, the window maintains a constant size regardless of the image’s magnification. This can be helpful when you are using smaller monitors or working with tiled images. Note: To automatically resize the window when using keyboard shortcuts to reduce or magnify an image view, choose Photoshop Elements > Preferences > General, and then select the Zoom Resizes Windows preference and click OK.
38 USING PHOTOSHOP ELEMENTS 8 Working with files Close windows ❖ In Full Edit, do one of the following: • Choose File > Close to close the active window. • Click the Close button on the title bar of the active window. • Right-click a thumbnail and choose Close. • Choose File > Close All to close all open windows.
39 USING PHOTOSHOP ELEMENTS 8 Working with files More Help topics “Change the size of the canvas” on page 134 “Change print dimensions and resolution without resampling” on page 138 Change the grid settings 1 In Full Edit or Quick Fix, choose Photoshop Elements > Preferences > Guides And Grid. 2 For Color, choose a preset color, or click the color swatch to choose a custom color. 3 For Style, choose the line style for the grid.
40 USING PHOTOSHOP ELEMENTS 8 Working with files File formats for saving Photoshop Elements can save images in the following file formats: BMP A standard Windows image format. You can specify either Windows or OS/2® format, and a bit depth for the image. For 4-bit and 8-bit images using Windows format, you can also specify RLE compression. CompuServe GIF (Graphics Interchange Format) Multiple layer documents can be saved as animated GIFs, using the Save For Web command.
41 USING PHOTOSHOP ELEMENTS 8 Working with files In addition, Photoshop Elements can open files in several other older formats: Photoshop 2.0, Pixel Paint, Alias Pix, IFF format, Portable bitmap, SGI® RGB, Soft Image, Wavefront RLA, and ElectricImage. You can also save files in the following formats: Alias PIX, IFF format, Photoshop 2.0, and PICT Resource.
42 USING PHOTOSHOP ELEMENTS 8 Working with files Save a file in GIF format 1 Choose File > Save As. 2 Specify a filename and location, and choose CompuServe GIF Format from the format list. Your image is saved as a copy in the specified directory (unless it's already in indexed-color mode). 3 If you are creating an animated GIF, select the Layers As Frames option. Each layer in the final file will play as a single frame in the animated GIF. 4 Click Save.
43 USING PHOTOSHOP ELEMENTS 8 Working with files 4 To display white areas in the image as transparent, select Transparent Whites. This option is available only for images in bitmap mode. 5 If you want to apply anti-aliasing to a printed low-resolution image, select Image Interpolation. 6 Click OK. Save a file in Photoshop PDF format 1 Choose File > Save As, and choose Photoshop PDF from the format list. 2 Specify a filename and location, select file-saving options, and click Save.
44 USING PHOTOSHOP ELEMENTS 8 Working with files Many applications cannot read layer data and skip it when opening a TIFF file. Photoshop Elements can read layer data in TIFF files. Although files that include layer data are larger than those that don’t, saving layer data eliminates the need to save and manage a separate PSD file to hold the layer data. Understanding file compression Many image file formats compress image data to reduce file size.
45 USING PHOTOSHOP ELEMENTS 8 Working with files More Help topics “Save changes in different file formats” on page 41 Guided Edit The Guided Edit mode provides more structure around specific tasks, helping you accomplish those tasks more easily, and with explanation throughout the process. The Guided Edit tab is located in the Edit tab of the Panel Bin. With Guided Edit, you can do the following: Basic Photo Edits Crop, recompose, rotate, straighten, and sharpen photos.
46 USING PHOTOSHOP ELEMENTS 8 Working with files The Rotate and/or Straighten Guided Edit Use the Rotate and/or Straighten Guided Edit to rotate a picture in 90-degree increments or draw a line through an image to realign it. You can view the after image only, or view both the before and after images either vertically or horizontally. For more on rotating an image, see “Rotate or flip an item” on page 156.
47 USING PHOTOSHOP ELEMENTS 8 Working with files For more on correcting color casts, see “Correcting color casts” on page 115. The Correct Skin Tone Guided Edit Use the Correct Skin Tone Guided Edit to correct skin tones (tan, blush, and ambient light) in an image. You can view the after image only, or view both the before and after images either vertically or horizontally. For more on correcting color casts, see “Adjust the color of skin tone” on page 121.
48 USING PHOTOSHOP ELEMENTS 8 Working with files Install actions created in Photoshop The Action Player in the Automated Actions Guided Edit can play actions created in Photoshop. Keep in mind that you can only play actions that use features supported in Photoshop Elements. ❖ Copy the .atn file to the following location, System library/Application Support /Adobe /Photoshop Elements /8.0/Locale/en_US/Workflow Panels/actions.
49 Chapter 5: Using layers Layers are useful because they let you add components to an image and work on them one at a time, without permanently changing your original image. For each layer, you can adjust color and brightness, apply special effects, reposition layer content, specify opacity and blending values, and so on. You can also rearrange the stacking order, link layers to work on them simultaneously, and create web animations with layers.
50 USING PHOTOSHOP ELEMENTS 8 Using layers More Help topics “About adjustment and fill layers” on page 62 “About layer clipping masks” on page 67 “Lock or unlock a layer” on page 54 “About opacity and blending options in layers” on page 60 About the Layers panel The Layers panel lists all layers in an image, from the top layer to the Background layer at the bottom. You can drag the panel by its title out of the Panel Bin to keep it visible as you work with it.
51 USING PHOTOSHOP ELEMENTS 8 Using layers Create a new layer. Create a new fill or adjustment layer. Delete a layer. The layer is linked to another layer. Lock transparency. Lock all layers. Also at the top are the panel Blending Mode menu (Normal, Dissolve, Darken, and so on), an Opacity text box, and panel options.
52 USING PHOTOSHOP ELEMENTS 8 Using layers More Help topics “Copy a layer from one image to another” on page 56 “Delete a layer” on page 55 “Duplicate a layer within an image” on page 56 “Specify a blending mode for a layer” on page 61 “Specify the opacity of a layer” on page 61 Create a new layer from part of another layer You can move part of an image from one layer to a newly created one, leaving the original intact. 1 Select an existing layer, and make a selection.
53 USING PHOTOSHOP ELEMENTS 8 Using layers • Select the Background layer, and choose Duplicate Layer from the More menu in the Layers panel to leave the Background layer intact and create a copy of it as a new layer. You can create a duplicate layer of the converted Background layer no matter how you convert the layer; simply select the converted Background layer and choose Duplicate Layer from the More menu. 2 Name the new layer.
54 USING PHOTOSHOP ELEMENTS 8 Using layers • To display just one layer, Option-click the eye icon for that layer. Option-click in the eye column again to show all the layers. More Help topics “About the Layers panel” on page 50 Resize or hide layer thumbnails 1 Choose Panel Options from the More menu in the Layers panel. 2 Select a new size, or select None to hide the thumbnails. Then click OK.
55 USING PHOTOSHOP ELEMENTS 8 Using layers Simplify a layer You simplify a smart object, frame layer, type layer, shape layer, solid color layer, gradient layer, or pattern fill layer (or a layer group imported from Photoshop) by converting it into an image layer. You need to simplify these layers before you can apply filters to them or edit them with the painting tools. However, you can no longer use the type- and shape-editing options on simplified layers.
56 USING PHOTOSHOP ELEMENTS 8 Using layers Copying and arranging layers Duplicate a layer within an image You can duplicate any layer, including the Background layer, within an image. ❖ Select one or more layers in the Layers panel, and do one of the following to duplicate it: • To duplicate and rename the layer, choose Layer > Duplicate Layer, or choose Duplicate Layer from the Layers panel More menu. Name the duplicate layer, and click OK.
57 USING PHOTOSHOP ELEMENTS 8 Using layers 3 Do one of the following: • Choose Select > All to select all of the pixels in the layer, and choose Edit > Copy. Then make the destination image active, and choose Edit > Paste. • Drag the layer’s name from the Layers panel of the source image into the destination image. • Use the Move tool to drag the layer from the source image to the destination image. The copied layer appears in the destination image, above the active layer in the Layers panel.
58 USING PHOTOSHOP ELEMENTS 8 Using layers Change the stacking order of layers The stacking order determines whether a layer appears in front of or behind other layers. By default, the Background layer must remain at the bottom of the stack. To move the Background layer, you need to convert it into a regular layer first. Dragging a layer below another layer changes the stacking order 1 In the Layers panel, select one or more layers.
59 USING PHOTOSHOP ELEMENTS 8 Using layers More Help topics “Understanding layers” on page 49 “About layer clipping masks” on page 67 Merge layers Layers can greatly increase the file size of an image. Merging layers in an image reduces file size. You should merge layers only after you have finished manipulating them to create the image you want. Example of merging You can choose to merge only the linked layers, only the visible layers, only a layer with the layer below it, or only selected layers.
60 USING PHOTOSHOP ELEMENTS 8 Using layers Note: If the bottom-most merged layer is a type, shape, solid color fill, gradient fill, or pattern fill layer, you must first simplify the layer. More Help topics “Merging adjustment layers” on page 65 “Simplify a layer” on page 55 Merge layers into another layer Use this procedure when you want to keep the layers you are merging intact. The result is a new merged layer plus all the original layers.
61 USING PHOTOSHOP ELEMENTS 8 Using layers You use layer blending modes to determine how a layer blends with the pixels in layers beneath it. Using blending modes, you can create a variety of special effects. Keep in mind that a layer’s opacity and blending mode interact with the opacity and blending mode of painting tools.
62 USING PHOTOSHOP ELEMENTS 8 Using layers More Help topics “Understanding layers” on page 49 “About blending modes” on page 205 Select all opaque areas in a layer You can quickly select all the opaque areas in a layer. This procedure is useful when you want to exclude transparent areas from a selection. 1 In the Layers panel, Command-click the layer thumbnail. 2 To add the pixels to an existing selection, press Command+Shift and click the layer thumbnail in the Layers panel.
63 USING PHOTOSHOP ELEMENTS 8 Using layers Adjustment and fill layers have the same opacity and blending mode options as image layers, and you can move and reposition them just as you do image layers. By default, adjustment and fill layers are named for their type (for example, Solid Color fill layer and Invert adjustment layer). A B Create Adjustment Layer menu A. Fill layers B.
64 USING PHOTOSHOP ELEMENTS 8 Using layers • To affect only one layer or several successive layers below the adjustment layer, choose Layer > New Adjustment Layer > [adjustment type]. In the New Layer dialog box, select Use Previous Layer To Create Clipping Mask. Levels Corrects tonal values in the image. Brightness/Contrast Lightens or darkens the image. Hue/Saturation Adjusts colors in the image. (Available only in color mode or on color layers.
65 USING PHOTOSHOP ELEMENTS 8 Using layers Edit an adjustment or fill layer 1 Open the adjustment or fill options dialog box by doing one of the following: • Double-click the adjustment or fill layer’s leftmost thumbnail in the Layers panel. • Select the layer in the panel and choose Layer > Layer Content Options. 2 Make your changes, and click OK.
66 USING PHOTOSHOP ELEMENTS 8 Using layers Painting a mask with black increases the area protected. 1 Select the adjustment or fill layer in the Layers panel. 2 Select the Paintbrush tool, or any painting or editing tool. 3 Use the following methods to view the layer mask: • To view only the mask, Option-click the Layer Mask’s thumbnail (the rightmost thumbnail). Option-click the thumbnail again to redisplay the other layers.
67 USING PHOTOSHOP ELEMENTS 8 Using layers Layer masks About layer clipping masks A clipping mask is a group of layers to which a mask is applied. The bottommost layer, or base layer, defines the visible boundaries of the entire group. For example, sometimes you have a shape in the base layer, a photograph in the layer above it, and text in the topmost layer. If you group them, the photograph and text appear only through the shape outline in the base layer. They also take on the opacity of the base layer.
68 USING PHOTOSHOP ELEMENTS 8 Using layers Remove a layer from a clipping mask Ungrouping the base layer from the layer above it ungroups all layers in the clipping mask. ❖ Do one of the following: • Hold down Option, position the pointer over the line separating two grouped layers in the Layers panel (the pointer changes to two overlapping circles ), and click. • In the Layers panel, select a layer in the clipping mask, and choose Layer > Release Clipping Mask.
69 USING PHOTOSHOP ELEMENTS 8 Using layers When you apply a style to a layer, a syle icon appears to the right of the layer’s name in the Layers panel. Layer styles are linked to the layer contents. When you move or edit the contents of the layer, the effects are modified correspondingly. Once you choose Layer > Layer Style > Style Settings, you can edit the settings of a layer’s style or apply other style settings or attributes available in the dialog box.
70 USING PHOTOSHOP ELEMENTS 8 Using layers A style icon indicates a layer style is applied to the layer. If you don’t like the result, press Command+Z to remove the style, or choose Edit > Undo. You can also drag the style to the image, where it is applied to the selected layer. Hide or show all layer styles in an image ❖ Choose one of the following: • Layer > Layer Style > Hide All Effects. • Layer > Layer Style > Show All Effects.
71 USING PHOTOSHOP ELEMENTS 8 Using layers Copy style settings between layers 1 In the Layers panel, select the layer containing the style settings you want to copy. 2 Choose Layer > Layer Style > Copy Layer Style. 3 Select the destination layer in the Layers panel, and choose Layer > Layer Style > Paste Layer Style. Remove a layer style 1 In the Layers panel, select the layer containing the style you want to remove. 2 Choose Layer > Layer Style > Clear Layer Style.
72 Chapter 6: Camera raw files You can process camera raw files from within Photoshop Elements and set certain values that are common to all image file formats (such as contrast, tonal range, and sharpness). After you process the raw image files, you can open the file, edit it, and then save it in any format supported by Photoshop Elements.
73 USING PHOTOSHOP ELEMENTS 8 Camera raw files A B C D E F G H I J K Camera Raw dialog box A. View options B. Click the Basic or Detail tab to access different controls C. RGB values D. Histogram E. Image settings F. More menu G. Camera and some EXIF information H. Tools I. Rotate buttons J. Zoom levels K. Bit depth options Open and process camera raw files 1 Choose File > Open. 2 Browse to select one or more camera raw files, and click Open.
74 USING PHOTOSHOP ELEMENTS 8 Camera raw files To undo your manual adjustments and make the adjustments automatically, select Auto. To restore all options to their initial settings, press Option and click Reset. Note: By default, Auto is always selected. To change this default, deselect one or more Auto options, click the triangle to the right of the Settings menu, and choose Save New Camera Raw Defaults.
75 USING PHOTOSHOP ELEMENTS 8 Camera raw files Moving the Luminance Smoothing slider to the right reduces grayscale noise. Save changes to camera raw images The Camera Raw dialog box lets you save changes you’ve made to a camera raw file. Be aware that saving the file does not open it in Photoshop Elements. (To open a camera raw file, just use the Open command, like you would with any other file. Then you can edit and save the file like any other image.
76 USING PHOTOSHOP ELEMENTS 8 Camera raw files Removes part of an image. Drag the tool within the preview image to select the portion you want to keep, and then press Enter. Crop tool You can use the Straighten tool to realign an image vertically or horizontally. This tool also resizes or crops the canvas to accommodate straightening the image. Straighten tool Red Eye Removal Removes red eye in flash photos of people and green or white eye in pets.
77 USING PHOTOSHOP ELEMENTS 8 Camera raw files White balance controls for camera raw A digital camera records the white balance at the time of exposure as metadata, which you can see when you open the file in the Camera Raw dialog box. This setting usually yields the correct color temperature. You can adjust it if the white balance is not quite right.
78 USING PHOTOSHOP ELEMENTS 8 Camera raw files Using White Balance to click a neutral white area, and resulting correction Tonal and image adjustments in camera raw files Exposure Adjusts the brightness or darkness of an image. Move the slider to the left to darken the image; move it to the right to brighten the image. The values are in increments equivalent to f-stops. An adjustment of +1.50 is similar to widening the aperture one and one-half stops. Likewise, an adjustment of -1.
79 USING PHOTOSHOP ELEMENTS 8 Camera raw files with no detail), Brightness compresses the highlights and expands the shadows when you move the slider to the right. In general, use the Brightness slider to adjust the overall brightness after you set the white and black clipping points with the Exposure and Shadow sliders. Contrast Adjusts the midtones in an image. Higher values increase the midtone contrast, and lower values produce an image with less contrast.
80 Chapter 7: Selecting parts of an image A selection defines the editable area in a photo (for example, you might want to lighten one part of a photo without affecting the rest). You can make a selection with either a selection tool or a selection command. A selection border, which you can hide, surrounds the selection. You can change, copy, or delete pixels inside the selection border, but you can’t touch areas outside the selection border until you deselect the selection.
81 USING PHOTOSHOP ELEMENTS 8 Selecting parts of an image About the selection tools The selection tools are located in the Tools panel, which is located, by default, on the left side of your screen. Rectangular Marquee tool Draws square or rectangular selection borders. Elliptical Marquee tool Draws round or Lasso tool Draws freehand selection borders. This tool is great for making very elliptical selection borders. precise selections.
82 USING PHOTOSHOP ELEMENTS 8 Selecting parts of an image • To smooth the edges of your selection, select Anti-aliased (Elliptical Marquee tool only). • From the Mode pop-up menu, choose Normal to visually set the size and proportions of the selection border; Fixed Ratio to set a width-to-height ratio for the selection border; or Fixed Size to specify the marquee’s height and width. 3 Drag over the area you want to select.
83 USING PHOTOSHOP ELEMENTS 8 Selecting parts of an image A B C D E F G Polygonal Lasso tool options A. Lasso tool B. Polygonal Lasso tool C. Magnetic Lasso tool D. New selection E. Add to selection F. Subtract from selection G. Intersect with selection 1 Select the Polygonal Lasso tool from the toolbox.
84 USING PHOTOSHOP ELEMENTS 8 Selecting parts of an image 2 (Optional) Set Magnetic Lasso tool options in the options bar located above your image: • Specify whether to create a new selection, add to an existing selection, subtract from a selection, or select an area intersected by other selections. • To soften the selection border so that it blends into the area outside the selection, enter a Feather value. • To smooth the edges of your selection, select Anti-aliased.
85 USING PHOTOSHOP ELEMENTS 8 Selecting parts of an image • To select only adjacent areas using the same colors, select Contiguous. When this option is deselected, pixels using the same colors are selected throughout the entire photo. • To select colors using data from all the visible layers, select Sample All Layers. When this option is deselected, the Magic Wand tool selects colors from only the active layer. 3 In the photo, click the color you want to select.
86 USING PHOTOSHOP ELEMENTS 8 Selecting parts of an image You can first make a rough selection with a marquee tool, Quick Selection Brush, or other selection tool, and then finetune your selection with the Selection Brush tool. You can add to the selection using the Selection Brush tool in Selection mode, or subtract from it in Mask mode. A B C D E F G Selection Brush tool options A. Add to selection B. Subtract from selection C. Brush pop-up panel D. Brush size E. Mode F. Hardness G.
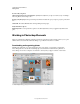
87 USING PHOTOSHOP ELEMENTS 8 Selecting parts of an image The Magic Extractor makes it easy to select people or objects so that you can superimpose them on other backgrounds. For example, you can remove yourself from a photo of you on your bicycle at home, and superimpose it on a photo of cyclists in the Tour de France. You can save the extracted image as a file that you can use again and again. A B C Using the Magic Extractor A. Area you want to extract marked with red dots B.
88 USING PHOTOSHOP ELEMENTS 8 Selecting parts of an image 9 To specify preview settings, do any of the following: • To change what is displayed in the preview area, choose either Selection Area or Original Photo from the Display menu. Or press the X key on your keyboard to switch between the two views. • To specify a different background, choose an option from the Background menu.
89 USING PHOTOSHOP ELEMENTS 8 Selecting parts of an image • To reselect the most recent selection, choose Select > Reselect. 2 To show or hide selection borders, choose View > Selection. Note: You can also deselect by clicking anywhere in the photo outside the selected area. However, you might accidentally make further selections if you’re using a selection tool that selects based on clicking, such as the Magic Wand tool.
90 USING PHOTOSHOP ELEMENTS 8 Selecting parts of an image Select an area that intersects an existing selection You can limit the area a selection affects. For example, in a picture of snow-capped mountains, you can select white clouds in the sky without selecting parts of the white mountain below them by selecting the entire sky, and then using the Magic Wand tool with Intersect With Selection selected and Contiguous deselected to select only the white areas included within the existing sky selection.
91 USING PHOTOSHOP ELEMENTS 8 Selecting parts of an image Using the Border command to create a 4-pixel border selection (top). Copying the selection to a new layer and filling to make an outline of the image (center). Filling the selection into the original image to create an outline around the image (bottom). 1 Use a selection tool to make a selection. 2 Choose Select > Modify > Border. 3 Enter a value between 1 and 200 pixels in the Width text box, and click OK.
92 USING PHOTOSHOP ELEMENTS 8 Selecting parts of an image Defringe a selection When you move or paste a selection, some of the pixels surrounding the selection border are included with the selection. These extra pixels can result in a fringe or halo around the edges of the selection. The Defringe Layer command replaces the color of any fringe pixels with the colors of nearby pixels containing pure colors (those without background color).
93 USING PHOTOSHOP ELEMENTS 8 Selecting parts of an image Smoothing selection edges with anti-aliasing and feathering Smooth the edges of a selection by anti-aliasing You can smooth the hard edges of a selection by anti-aliasing or feathering. Anti-aliasing smooths the jagged edges of a selection by softening the color transition between edge pixels and background pixels. Because only the edge pixels change, no detail is lost.
94 USING PHOTOSHOP ELEMENTS 8 Selecting parts of an image 2 Choose Select > Feather. 3 Type a value between .2 and 250 in the Feather Radius text box, and click OK. The feather radius defines the width of the feathered edge. Moving and copying selections Move a selection The Move tool lets you cut and drag a pixel selection to a new location in the photo. You can also use the tool to move or copy selections between photos and between photos in other applications.
95 USING PHOTOSHOP ELEMENTS 8 Selecting parts of an image Distribute menu Spaces selected layers apart. Options include spacing on the Left, Center, Right, Top, Middle, and Bottom. Multiple layers can be spaced simultaneously. To space layers apart, select a layer, hold down Shift, select another layer, and then choose an item from the Distribute menu.
96 USING PHOTOSHOP ELEMENTS 8 Selecting parts of an image A B C Copying a selection from one image to another A. Part of the original photo selected B. Photo to copy and paste into original C. Resulting image 1 Use the Copy command to copy the part of the photo you want to paste. (You can even copy from photos in other applications.) 2 Make a selection in the photo into which you want to paste the copied photo. Note: The copied photo appears only within the selection border.
97 USING PHOTOSHOP ELEMENTS 8 Selecting parts of an image Saving selection (top), loading selection (center), and using the selection to fill with a solid color (bottom) 1 Make a selection in your photo. 2 Choose Select > Save Selection. 3 In the Save Selection dialog box, choose New from the Selection pop-up menu. 4 Enter a name for the selection in the Name box, and then click OK.
98 USING PHOTOSHOP ELEMENTS 8 Selecting parts of an image Intersect With Selection Replaces the saved selection with the intersection between the current selection and the saved selection. You can also modify a saved selection by loading it and using selection tools to add to it (Shift-drag) or subtract from it (Option-drag). (See “Add to or subtract from a selection” on page 89.) Modify a new selection with a saved selection 1 Open a photo that contains a saved selection.
99 Chapter 8: Color and tonal correction Adobe® Photoshop® Elements has tools that let you adjust the tonal range, color, and sharpness of your photos. You can also remove dust spots or other defects from your photos. You can accomplish these tasks in different modes, depending on your experience and needs.
100 USING PHOTOSHOP ELEMENTS 8 Color and tonal correction Using the Auto Lighten Shadows adjustment in Quick Fix to instantly fix a photo 1 With a photo open in the Editor, click the arrow beside Edit, and select Edit Quick. Any photos that you have stored in the Photo Bin are accessible while you are in Quick Fix. 2 (Optional) Set preview options by making a selection from the View menu (located under the image preview).
101 USING PHOTOSHOP ELEMENTS 8 Color and tonal correction The Quick Fix panel provides the following tools to refine your photos: Smart Fix Adjusts lighting and color. Smart Fix corrects overall color balance and improves shadow and highlight detail, if necessary. Click the Auto button to apply this command. • Amount Drag the slider to vary the amount of the adjustment. Lighting Adjusts the overall contrast of an image, and could affect its color.
102 USING PHOTOSHOP ELEMENTS 8 Color and tonal correction Balance Adjusts the color balance of an image without affecting its contrast. • Temperature Drag the slider to make the colors warmer (red) or cooler (blue). Use this control to enhance sunsets or skin tones, or when the color balance set by your camera is off. • Tint Drag the slider to make the color more green or more magenta. Use this control to fine-tune the colors after using the Temperature control.
103 USING PHOTOSHOP ELEMENTS 8 Color and tonal correction Quick Fix and Editor options These tools work the same way in Quick Fix and the Editor. Zoom tool Sets the magnification of the preview image. Controls and options work like the Zoom tool in the toolbox. Hand tool Moves the image around in the preview window if the entire image is not visible. Press and hold the spacebar to access the Hand tool when another tool is selected.
104 USING PHOTOSHOP ELEMENTS 8 Color and tonal correction 1. Specify a color management option. Specify color management options. 2. View the image at 100% and crop, if necessary. Before making any color corrections, view the image at a zoom percentage of 100%. At 100%, Photoshop Elements displays the image most accurately. You can also check for image defects, such as dust spots and scratches.
105 USING PHOTOSHOP ELEMENTS 8 Color and tonal correction “Remove spots and small imperfections” on page 141 “Sharpening overview” on page 153 Automatically correct lighting and color Photoshop Elements provides several automatic lighting and color-correction commands in both Full Edit and Quick Fix. The command you choose depends on the needs of your image. You can experiment with each of the auto commands.
106 USING PHOTOSHOP ELEMENTS 8 Color and tonal correction A B C D E Histogram panel A. Channel menu B. Panel menu C. Uncached Refresh button D. Cache Data Warning icon E. Statistics If many pixels are bunched up at either the shadow or highlight ends of the chart, it may indicate that image detail in the shadows or highlights may be clipped—blocked up as pure black or pure white. There is little you can do to recover this type of image.
107 USING PHOTOSHOP ELEMENTS 8 Color and tonal correction More Help topics “About camera raw image files” on page 72 “Using the histogram and RGB values in camera raw” on page 76 View a histogram 1 If the Histogram panel is not open in the Panel Bin, choose Window > Histogram. 2 Choose the source of the histogram’s display from the Source menu: Entire Image Displays a histogram of the entire image, including all layers in the multilayered document.
108 USING PHOTOSHOP ELEMENTS 8 Color and tonal correction Adjusting shadows and light Adjust color and tonality using the Smart Brush tools The Smart Brush tool and the Detail Smart Brush tool apply tonal and color adjustments to specific areas of a photo. Certain effects can also be applied using these tools. You simply pick a preset adjustment and apply the correction. Both tools automatically create adjustment layers.
109 USING PHOTOSHOP ELEMENTS 8 Color and tonal correction Pins showing different adjustments in a photo Apply the Smart Brush tools 1 In the Editor, select the Smart Brush tool or the Detail Smart Brush tool from the toolbox. A pop-up panel opens displaying adjustment presets. 2 Choose an adjustment from the preset pop-up panel. Choose an option from the pop-up panel menu to view different sets of adjustments.
110 USING PHOTOSHOP ELEMENTS 8 Color and tonal correction More Help topics “About presets” on page 230 “Smoothing selection edges with anti-aliasing and feathering” on page 93 Modify Smart Brush tool correction settings 1 Do any of the following: • In the image, right-click a pin or an active selection, and choose Change Adjustment Settings. • If the Adjustment panel is not open, then in the Layers panel, double-click the layer thumbnail for the specific adjustment layer.
111 USING PHOTOSHOP ELEMENTS 8 Color and tonal correction You can do any of the following with the Levels dialog box: • Set the shadow and highlight values to make sure that your image uses the full tonal range. • Adjust the brightness of the image’s middle tones without affecting the shadow and highlight values. • Fix a color cast by making grays neutral. You can also enhance an image by adding a slight color cast, for example, by adding a warming effect on a sunset.
112 USING PHOTOSHOP ELEMENTS 8 Color and tonal correction Before adjusting shadows and highlights (top) and after (bottom). Adjusting softens the face and reveals more detail behind sunglasses. More Help topics “Remove a color cast automatically” on page 117 Adjust shadows and brightness using Levels 1 Do one of the following: • Choose Enhance > Adjust Lighting > Levels. • Choose Layers > New Adjustment Layer > Levels, or open an existing Levels adjustment layer. 2 Choose RGB from the Channel menu.
113 USING PHOTOSHOP ELEMENTS 8 Color and tonal correction Dragging the highlight slider to the left lightens the photo. Option-drag the Shadow slider to see which areas will be clipped to black (level 0). Option-drag the Highlight slider to see which areas will be clipped to white (level 255). Colored areas show clipping in individual channels. 4 To adjust the brightness of the middle tones without affecting the shadow and highlight values, drag the gray Input Levels (middle) slider.
114 USING PHOTOSHOP ELEMENTS 8 Color and tonal correction • Choose Layer > New Adjustment Layer > Brightness/Contrast to make adjustments to a layer. 2 Drag the sliders to adjust the brightness and contrast, then click OK. Dragging to the left decreases the level; dragging to the right increases it. The number at the right of each slider displays the brightness or contrast value. Quickly lighten or darken isolated areas The Dodge tool and the Burn tool lighten or darken areas of the image.
115 USING PHOTOSHOP ELEMENTS 8 Color and tonal correction Quickly saturate or desaturate isolated areas The Sponge tool saturates or desaturates areas of the image. You can use the Sponge tool to bring out or mute the color on an object or area. 1 Select the Sponge tool . If you do not see the Sponge tool, look for the Dodge or Burn tool. 2 Set the tool options in the Options bar. Brushes pop-up menu Sets the brush tip.
116 USING PHOTOSHOP ELEMENTS 8 Color and tonal correction Comparing color adjustments in the Color Variations dialog box 1 Choose Enhance > Adjust Color > Color Variations. The two preview images show the original image (Before) and the adjusted image after you’ve made changes (After). 2 Select an option to choose what you want to adjust in the image: Midtones, Shadows, or Highlights Specify which part of the tonal range to adjust: dark, middle, or light areas.
117 USING PHOTOSHOP ELEMENTS 8 Color and tonal correction More Help topics “Improve shadow and highlight detail” on page 111 “Adjust shadows and brightness using Levels” on page 112 Remove a color cast automatically A color cast is an unpleasant color shift in a photo. For example, a photo taken indoors without a camera flash may have too much yellow. The Remove Color Cast command changes the overall mixture of colors to remove color casts from an image.
118 USING PHOTOSHOP ELEMENTS 8 Color and tonal correction More Help topics “Color wheel” on page 165 “Adjust shadows and brightness using Levels” on page 112 “Remove a color cast automatically” on page 117 Adjust color curves The Adjust Color Curves command improves color tones in a photo by adjusting highlights, midtones, and shadows in each color channel.
119 USING PHOTOSHOP ELEMENTS 8 Color and tonal correction Adjusting color saturation and hue Adjust saturation and hue The Hue/Saturation command adjusts the hue (color), saturation (purity), and lightness of the entire image or of individual color components in an image. Use the Hue slider to add special effects, to color a black and white image (like a sepia effect), or to change the range of colors in a portion of an image. A B C Changing colors in an image using the Hue/Saturation command A.
120 USING PHOTOSHOP ELEMENTS 8 Color and tonal correction • Choose Layer > New Adjustment Layer > Hue/Saturation, or open an existing Hue/Saturation adjustment layer. The two color bars in the dialog box represent the colors in their order on the color wheel. The upper bar shows the color before the adjustment; the lower bar shows how the adjustment affects all hues at full saturation. 2 In the Edit drop-down menu, choose which colors to adjust: • Choose Master to adjust all colors at once.
121 USING PHOTOSHOP ELEMENTS 8 Color and tonal correction If you modify the adjustment slider so that it falls into a different color range, the name changes to reflect this. For example, if you choose Yellow and alter its range so that it falls in the red part of the color bar, the name changes to Red 2. You can convert up to six of the individual color ranges to varieties of the same color range (for example, Red 1 through Red 6).
122 USING PHOTOSHOP ELEMENTS 8 Color and tonal correction 4 (Optional) Drag any of the following sliders to fine-tune the correction: Tan Increases or decreases the level of brown in skin tones. Blush Increases or decreases the level of red in skin tones. Temperature Changes the overall color of skin tones. 5 When you’re finished, click OK. Or, to cancel your changes and start over, click Reset. Adjust saturation in isolated areas The Sponge tool changes the color saturation or vividness of an area.
123 USING PHOTOSHOP ELEMENTS 8 Color and tonal correction 5 Do one of the following to specify a new color: • Drag the Hue, Saturation, and Lightness sliders (or enter values in the text boxes) Hue and Saturation are available only in color mode or on color layers. • Click the Results box and specify a new color in the Color Picker, then click OK. 6 To cancel your changes and start over, hold down Option, and click Reset.
124 USING PHOTOSHOP ELEMENTS 8 Color and tonal correction 3 Choose Enhance > Convert To Black And White. 4 Select a style option that reflects the content of your image (for example, Portraits or Scenic Landscape). 5 Drag the Adjustment Intensity sliders to adjust red, green, blue, or contrast. Note: The Adjustment Intensity sliders for red, green, and blue don’t colorize your image; they simply include more or less data from the original color channels in the new black and white image.
125 USING PHOTOSHOP ELEMENTS 8 Color and tonal correction 3 Use the Hue slider to select a new color if desired. Use the Saturation slider to adjust the saturation. Then click OK. Adjustment filters Apply the Equalize filter The Equalize filter redistributes the brightness values of the pixels in an image so that they more evenly represent the entire range of brightness levels.
126 USING PHOTOSHOP ELEMENTS 8 Color and tonal correction 3 Specify the gradient fill you want to use: • To choose from a list of gradient fills, click the triangle to the right of the gradient fill displayed in the Gradient Map dialog box. Click to select the desired gradient fill, and then click in a blank area of the dialog box to dismiss the list. • To edit the gradient fill currently displayed in the Gradient Map dialog box, click the gradient fill.
127 USING PHOTOSHOP ELEMENTS 8 Color and tonal correction If you want a specific number of colors in your image, convert the image to grayscale and specify the number of levels you want. Then convert the image back to the previous color mode, and replace the various gray tones with the colors you want. 1 Select an image, layer, or area. 2 Do one of the following: • Choose Filter > Adjustments > Posterize.
128 USING PHOTOSHOP ELEMENTS 8 Color and tonal correction Apply the Photo filter The Photo Filter command mimics the technique of putting a colored filter in front of the camera lens to adjust the color balance and color temperature of the light transmitted through the lens and exposing the film. The Photo Filter command also lets you choose a color preset to apply a hue adjustment to an image.
129 USING PHOTOSHOP ELEMENTS 8 Color and tonal correction 4 Click OK. More Help topics “About filters” on page 178 “Apply a filter” on page 179 “Adjust the color of skin tone” on page 121 “About adjustment and fill layers” on page 62 Setting press target values Setting target values for print If you are preparing an image for printing by a commercial press, you can set target values for shadows and highlights. The values that you use depend on the ink percentages that the press can accommodate.
130 USING PHOTOSHOP ELEMENTS 8 Color and tonal correction Set press target values for images without specular highlights Use this press targeting method if you don’t have specular highlights in your image. If you do have specular highlights, use the Levels eyedropper method. 1 Do one of the following: • Choose Enhance > Adjust Lighting > Levels. • Choose Layers > New Adjustment Layer > Levels, or open an existing Levels adjustment layer.
131 USING PHOTOSHOP ELEMENTS 8 Color and tonal correction The pixel values throughout the image are adjusted proportionately to the new highlight values. Any pixels lighter than the area you clicked become specular white. The Info panel shows the values both before and after the color adjustment. 7 Double-click the Set Black Point eyedropper tool in the Levels dialog box to open the Color Picker. Enter the values to assign to the darkest area in the image, and click OK.
132 Chapter 9: Cropping, resizing, retouching, and transforming photos To create a customized image composition, you can crop and resize images. Cropping a photo can create a focal point for a picture, or remove distracting background images. Resizing a photo lets you include more pictures on a page, or fit photos better into a layout. You can retouch certain areas of a photo to fix red eye, replace colors, and soften, blur, and sharpen an image.
133 USING PHOTOSHOP ELEMENTS 8 Cropping, resizing, retouching, and transforming photos Note: When you specify values for the Width and Height boxes, the Aspect Ratio menu changes to Custom. 3 Drag over the part of the image you want to keep. When you release the mouse button, the crop marquee appears as a bounding box with handles at the corners and sides.
134 USING PHOTOSHOP ELEMENTS 8 Cropping, resizing, retouching, and transforming photos Use the Cookie Cutter tool The Cookie Cutter tool crops a photo into a shape that you choose. After you drag the shape in your photo, you can move and resize the bounding box until you have just the area you want. Use the Cookie Cutter tool to clip a photo into a fun shape. 1 Select the Cookie Cutter tool . 2 Click the Shapes menu in the options bar to view a library of shapes from which to choose.
135 USING PHOTOSHOP ELEMENTS 8 Cropping, resizing, retouching, and transforming photos Increasing the size of the canvas makes room for a colored border. 1 Choose Image > Resize > Canvas Size. 2 Do one of the following: • In the Width and Height boxes, enter the full dimensions of the new canvas. Choose the units of measurement you want from the adjacent menus.
136 USING PHOTOSHOP ELEMENTS 8 Cropping, resizing, retouching, and transforming photos Crop To Remove Background Crops the image to remove any blank background area that becomes visible after straightening. Some pixels will be clipped. Crop To Original Size Keeps the canvas the same size as the original image. The straightened image will include areas of blank background and some pixels will be clipped.
137 USING PHOTOSHOP ELEMENTS 8 Cropping, resizing, retouching, and transforming photos Image size and resolution About image size and resolution The image size (or pixel dimensions) of an image is a measure of the number of pixels along an image’s width and height. For example, your digital camera may take a photo that is 3000 pixels wide and 2000 pixels high. These two measurements have a direct correlation to the image’s file size, and both are an indication of the amount of image data in a photo.
138 USING PHOTOSHOP ELEMENTS 8 Cropping, resizing, retouching, and transforming photos About monitor resolution Your monitor’s resolution is described in pixel dimensions. For example, if your monitor resolution is set to 1600 x 1200 and your photo’s pixel dimensions are the same size, at 100%, the photo will fill the screen. The size an image appears on-screen depends on a combination of factors: the pixel dimensions of the image, the monitor size, and the monitor resolution setting.
139 USING PHOTOSHOP ELEMENTS 8 Cropping, resizing, retouching, and transforming photos 2 Make sure that Resample Image is deselected. If deselected, you can change the print dimensions and resolution without changing the total number of pixels in the image, but the image may not keep its current proportions. Note: Resample Image must be selected in order to use the Constrain Proportions. Resample Image and Constrain Proportions must be selected to use Scale Style functions.
140 USING PHOTOSHOP ELEMENTS 8 Cropping, resizing, retouching, and transforming photos To avoid the need for upsampling, scan or create the image at the resolution required for your printer or output device. If you want to preview the effects of changing pixel dimensions on-screen or print proofs at different resolutions, resample a duplicate of your file. If you’re preparing images for the web, it’s useful to specify image size in terms of the pixel dimensions. 1 Choose Image > Resize > Image Size.
141 USING PHOTOSHOP ELEMENTS 8 Cropping, resizing, retouching, and transforming photos 2 In the Options bar, set the Pupil Size and Darken Amount. 3 In the image, do one of the following: • Click a red area of an eye. • Draw a selection over the eye area. When you release the mouse button, the red is removed from the eyes. Note: You can also automatically fix red eyes by clicking Auto in the Red Eye Removal tool option bar.
142 USING PHOTOSHOP ELEMENTS 8 Cropping, resizing, retouching, and transforming photos Before and after using Healing Brush 1 Select the Healing Brush tool . 2 Choose a brush size from the options bar and set healing brush options: Mode Determines how the source or pattern blends with existing pixels. Normal mode lays new pixels over the original pixels. Replace mode preserves film grain and texture at the edges of the brush stroke. Source Sets the source to use for repairing pixels.
143 USING PHOTOSHOP ELEMENTS 8 Cropping, resizing, retouching, and transforming photos Original photo (top), after adding two starfish with the Clone Stamp tool (center), and after removing a person with the Clone Stamp tool (bottom) 1 Select the Clone Stamp tool . 2 (Optional) Set options in the options bar: Brushes Sets the brush tip. Click the arrow next to the brush sample, choose a brush category from the Brushes pop-up menu, and then select a brush thumbnail.
144 USING PHOTOSHOP ELEMENTS 8 Cropping, resizing, retouching, and transforming photos More Help topics “About blending modes” on page 205 Replace colors in an image The Color Replacement tool simplifies replacing specific colors in your image. You can paint over a targeted color— for example, a yellow flower in an image—with a different color, like red. You can also use the Color Replacement tool to correct colors. Replacing colors 1 Select the Color Replacement tool .
145 USING PHOTOSHOP ELEMENTS 8 Cropping, resizing, retouching, and transforming photos Original photo (left), and photo after blurring the background (right) 1 Select the Blur tool . 2 Set options in the options bar: Brushes pop-up menu Sets the brush tip. Click the arrow next to the brush sample, choose a brush category from the Brushes pop-up menu, and then select a brush thumbnail. Size Sets the size of the brush, in pixels. Drag the Size pop-up slider or enter a size in the text box.
146 USING PHOTOSHOP ELEMENTS 8 Cropping, resizing, retouching, and transforming photos Correct camera distortion 1 Select Filter > Correct Camera Distortion. 2 Click Preview. 3 Set any of the following options to correct your image, and then click OK: Remove Distortion Corrects lens barrel or pincushion distortion. Type a number in the box, or move the slider to straighten horizontal and vertical lines that bend either away from or toward the center of the image.
147 USING PHOTOSHOP ELEMENTS 8 Cropping, resizing, retouching, and transforming photos More Help topics “Adjust color curves” on page 118 “Improve shadow and highlight detail” on page 111 Use Photomerge Group Shot Use Photomerge Group Shot to create the perfect group photo from multiple photos. Note: For best results, the multiple images used to create Photomerge Group Shot should be from the same photo session. 1 Open two to 10 group shots you want to use as source images for the Photomerge Group Shot.
148 USING PHOTOSHOP ELEMENTS 8 Cropping, resizing, retouching, and transforming photos Photomerge Group Shot window Note: Photomerge Group Shot does not support the PSE file format. If you try to create a photomerge group shot with a PSE file, you will get an error message. This is a known issue. Use Photomerge Faces Use Photomerge Faces to combine multiple facial features to create one composite face. 1 Open all the face images you want to use as source images for the Photomerge Faces.
149 USING PHOTOSHOP ELEMENTS 8 Cropping, resizing, retouching, and transforming photos 6 Set the following: Show Strokes Click this to show your Pencil strokes in the source image. Show Regions Click this to reveal the selected regions in the final image. 7 Click Reset to start the process over, Done to complete the Photomerge Faces, or Cancel to close Photomerge Faces.
150 USING PHOTOSHOP ELEMENTS 8 Cropping, resizing, retouching, and transforming photos The Editor is now in Guided Edit mode with the Photomerge Scene Cleaner Guided Edit panel containing tools and directions. 3 Select the best photo and then drag it from the Project Bin to the Final window. This photo becomes the base image for the final photo. 4 Click a photo in the Project Bin (color-coded to help you keep track). It appears in the Source window.
151 USING PHOTOSHOP ELEMENTS 8 Cropping, resizing, retouching, and transforming photos Photomerge Exposure Use Photomerge Exposure to efficiently handle scenes in photos with exposure challenges. You can blend two photos together to get a perfectly exposed photo. For example, if you have a photo with a window in the background and you want a perfect photo with the following properties: • A good exposure of the scenery outside the window. • A good exposure of the darker objects inside the room.
152 USING PHOTOSHOP ELEMENTS 8 Cropping, resizing, retouching, and transforming photos Photomerge Exposure Automatic Photomerge Exposure You can select and deselect the photos through the Project Bin. 1 In the Photoshop Elements Editor, open the required files using File > Open. a Select a minimum of two and a maximum of ten photos from the Project Bin. b Select File > New > Photomerge Exposure. Photoshop Elements Editor displays the selected photos. 2 In the Photomerge panel, select Automatic.
153 USING PHOTOSHOP ELEMENTS 8 Cropping, resizing, retouching, and transforming photos c Select File > New > Photomerge Exposure. The Photoshop Elements Editor displays the selected photos. 2 In the Photomerge panel, select Manual. The first image in the Project Bin is displayed as the source photo. You can select an image from the Project Bin as the background photo. 3 Set the following: Show Strokes Click this option to show your Pencil strokes in the source image.
154 USING PHOTOSHOP ELEMENTS 8 Cropping, resizing, retouching, and transforming photos The Sharpen tool focuses soft edges in a photo to increase clarity or focus. Oversharpening a photo gives it a grainy look. You can avoid oversharpening by setting a lower Strength value in the options bar. It’s best to make the sharpening subtle and increase it as necessary by dragging over the area several times, building up the sharpness each time.
155 USING PHOTOSHOP ELEMENTS 8 Cropping, resizing, retouching, and transforming photos 2 Set options in the options bar: Brushes menu Sets the brush tip. Click the arrow next to the brush sample, choose a brush category from the Brushes menu, and then select a brush thumbnail. Size Sets the size of the brush, in pixels. Drag the Size pop-up slider or enter a size in the text box. Mode Determines how the paint that you apply blends with the existing pixels in the image.
156 USING PHOTOSHOP ELEMENTS 8 Cropping, resizing, retouching, and transforming photos The Unsharp Mask filter adds contrast to reduce fuzziness. 1 Select an image, layer, or area. 2 Choose Enhance > Unsharp Mask. 3 Select the Preview option. 4 Set any of these options and click OK: Amount Determines how much to increase the contrast of pixels. For high-resolution printed images, an amount between 150% and 200% is usually best. Radius Specifies the number of pixels to sharpen around edges.
157 USING PHOTOSHOP ELEMENTS 8 Cropping, resizing, retouching, and transforming photos A B D E C F G Rotating an image A. Rotate 90° left B. Flip Horizontal C. Rotate 90° right D. Rotate 180° E. Original image F. Free rotate G. Flip Vertical Freely rotate an item With the Free Rotate Layer and Free Rotate Selection commands, you can rotate an item by any amount. Use the Free Rotate Layer command to straighten image, and click the Commit button to apply the rotation.
158 USING PHOTOSHOP ELEMENTS 8 Cropping, resizing, retouching, and transforming photos 4 Do one of the following to specify the rotation amount: • Click and drag the rotate handle at the bottom of the bounding box. The cursor will change to concentric arrows when it’s hovering over the handle. To constrain the rotation to 15° increments, hold down Shift as you drag.
159 USING PHOTOSHOP ELEMENTS 8 Cropping, resizing, retouching, and transforming photos Note: If you select a photo that is a Background layer (such as a photo imported from a camera or scanner), you are given the option of turning it into a regular layer so that you can transform it. 3 Drag a handle to skew or distort the bounding box.
160 USING PHOTOSHOP ELEMENTS 8 Cropping, resizing, retouching, and transforming photos 4 Do one or more of the following to transform the object: • To scale, drag any handle of the bounding box. To scale the width and height proportionally, either press Shift as you drag a corner handle, or select Constrain Proportions in the options bar, and then drag a corner handle. • To rotate, move the pointer outside of the bounding box and drag.
161 USING PHOTOSHOP ELEMENTS 8 Cropping, resizing, retouching, and transforming photos Before Recompose (left) and after Recompose If you want to preserve or remove specific areas when scaling an image, Recompose enables you to intelligently protect content during resizing. A B C A. Photo selected for Recompose B. Areas marked for protection (green) and for removal (red) C.
162 USING PHOTOSHOP ELEMENTS 8 Cropping, resizing, retouching, and transforming photos • Right-click the photo, and select Clear Protect Highlights. 6 Mark the areas you want to remove (areas that are unimportant) using the Remove brush tool . Red indicates the areas marked for removal. Right-click the photo, and select Clear All Highlights to erase protected and unprotected marked areas. 7 Do one of the following to erase portions of unwanted marked areas (red): • Erase using the red Eraser tool .
163 USING PHOTOSHOP ELEMENTS 8 Cropping, resizing, retouching, and transforming photos Recompose a photo in a photo project You can also use the Recompose tool to Recompose photos in the following photo projects: • Photo Book • Greeting Card • Photo Collage 1 Create a photo book, greeting card, or a photo collage. 2 Right-click the photo in the photo project, and select Recompose Photo. 3 (Optional) Mark the areas you want to protect using the Protect brush Green indicates the protected areas.
164 Chapter 10: Understanding color In Adobe® Photoshop® Elements, you use two color models to manipulate color. One model is based on the way the human eye sees color—hue, saturation, and brightness (HSB), while the other model is based on the way computer monitors display color (in amounts of red, green, and blue or RGB). The color wheel is another tool that helps you understand the relationships between colors.
165 USING PHOTOSHOP ELEMENTS 8 Understanding color RGB model A large percentage of the visible spectrum can be represented by mixing red, green, and blue (RGB) light in various proportions and intensities. These three colors are called the additive primaries. Added together, red, green, and blue light make white light. Where two colors overlap, they create cyan, magenta, or yellow. The additive primary colors are used for lighting, video, and monitors.
166 USING PHOTOSHOP ELEMENTS 8 Understanding color Using image modes and color tables About image modes An image mode determines the number of colors that can be displayed in an image and can also affect the file size of the image. Photoshop Elements provides four image modes: RGB, bitmap, grayscale, and indexed color. A B C D Image modes A. Bitmap mode B. Grayscale mode C. Indexed-color mode D. RGB mode Bitmap mode Uses one of two color values (black or white) to represent the pixels in an image.
167 USING PHOTOSHOP ELEMENTS 8 Understanding color Note: Hidden layers are discarded and images are flattened automatically when you convert them into bitmap or indexed-color mode, because these modes do not support layers. RGB Color mode The default mode of new Photoshop Elements images and images from your digital camera. In RGB mode, the red, green, and blue components are each assigned an intensity value for every pixel—ranging from 0 (black) to 255 (white).
168 USING PHOTOSHOP ELEMENTS 8 Understanding color Convert a bitmap-mode image to grayscale Before converting, keep in mind that a bitmap-mode image edited in grayscale mode may not look the same when converted back to bitmap mode. For example, consider a pixel that is black in bitmap mode and then edited to a shade of gray in grayscale mode. If the gray value of the pixel is light enough, it will become white when converted back to bitmap mode. 1 Choose Image > Mode > Grayscale.
169 USING PHOTOSHOP ELEMENTS 8 Understanding color Selective applies the panel to individual images; Master Selective applies the selected panel to multiple images (for example, for multimedia production). • Local or Master Adaptive Creates a panel by sampling the colors from the spectrum appearing most often in the image. For example, an RGB image with only the colors green and blue produces a panel made primarily of greens and blues. Most images concentrate colors in particular areas of the spectrum.
170 USING PHOTOSHOP ELEMENTS 8 Understanding color Edit colors in an indexed-color table You can edit colors in the color table to produce special effects, or assign transparency in the image to a single color in the table. 1 Open the indexed-color image. 2 Choose Image > Mode > Color Table. 3 Click or drag within the table to choose the color or range of colors you want to change. 4 Choose a color from the Color Picker or sample a color from the image.
171 USING PHOTOSHOP ELEMENTS 8 Understanding color Setting up color management About color management Color management helps you to achieve consistent color among digital cameras, scanners, computer monitors, and printers. Each of these devices reproduces a different range of colors, called a color gamut. As you move an image from your digital camera to your monitor, and finally to a printer, the image colors shift.
172 USING PHOTOSHOP ELEMENTS 8 Understanding color Profiling devices For color management to work, you must profile your devices or use an ICC profile created by the device’s manufacturer. Capture devices Profiling is not critical for capture devices such as digital cameras or scanners. You may want to profile a scanner, however, if you want to accurately reproduce the colors in scanned transparencies, and reduce your color correction workload in Photoshop Elements.
173 Chapter 11: Filters, effects, styles, and artwork You can enhance images by using a variety of filters, effects, styles, and artwork. Using the deinterlace and NTSC color filters, you can smooth lines in a video or prepare it for television reproduction. You can also install and use third-party plug-in filters or create custom filters. Effects Using the Effects panel The Effects panel provides a single location from which you can apply effects.
174 USING PHOTOSHOP ELEMENTS 8 Filters, effects, styles, and artwork B A C Content panel A. Category B. More menu C. Sample thumbnails In the Content panel, the following sections provide a variety of items that can enhance your images: Choose from a selection of decorative backgrounds. Filter For Backgrounds Filter For Frames Filter For Graphics Filter For Shapes Filter For Text Effects Filter For Themes Choose from preset frames to enhance your image or project.
175 USING PHOTOSHOP ELEMENTS 8 Filters, effects, styles, and artwork • Double-click a thumbnail. • Drag the thumbnail to the image. 4 Use the Move tool to relocate or resize the shape or graphic. More Help topics “About projects” on page 247 “About shapes” on page 241 “Select or move a shape” on page 245 Add an artistic background to an image When you add an artistic background to an image, you replace the existing background layer.
176 USING PHOTOSHOP ELEMENTS 8 Filters, effects, styles, and artwork 5 Use the Move tool to center the image, then click the Commit icon icon to apply the change, or click the Cancel . More Help topics “About projects” on page 247 About photo effects Photo effects lets you quickly create different looks for your images. In the Effects panel, click Photo Effects choose one of the subcategories, such as Faded Photo, Misc. Effects, Monotone Color, or Vintage Photo.
177 USING PHOTOSHOP ELEMENTS 8 Filters, effects, styles, and artwork Dragging an image effect to a photo More Help topics “About projects” on page 247 “About photo effects” on page 176 “Improve performance with filters and effects” on page 182 “Understanding layers” on page 49 Add stylized text to an image When you add text to an image, a text layer is added, so you can modify the text without affecting the original image.
178 USING PHOTOSHOP ELEMENTS 8 Filters, effects, styles, and artwork “Edit type in a type layer” on page 236 “Change the orientation of a type layer” on page 239 Add artwork or effects to Favorites When you see artwork or effects that you would like to quickly access in the future, add it to the Favorites section of the Effects panel. ❖ In the Effects or Content panel, hold Control and click the thumbnail and choose Add To Favorites.
179 USING PHOTOSHOP ELEMENTS 8 Filters, effects, styles, and artwork Tips for applying filters The following information can help you understand the process of applying filters to your images. • Preview the filter’s result. Applying filters to a large image can be time-consuming. It’s quicker to preview what the filter does in the Filter Gallery. Most filters also let you preview their result in the Filter Options dialog box and the document window.
180 USING PHOTOSHOP ELEMENTS 8 Filters, effects, styles, and artwork 4 If available, select the Preview option to preview the filter in the document window. Depending on the filter and how you are applying it, use one of the following methods to preview the filter: • Use the + button or - button under the preview window to zoom in or zoom out. • Click the zoom bar (where the zoom percentage appears) to choose a zoom percentage.
181 USING PHOTOSHOP ELEMENTS 8 Filters, effects, styles, and artwork Texture filters Give the appearance of depth or substance, or add an organic look. Video filters Restrict the gamut of colors to those acceptable for television reproduction, and smooth moving images captured from video. Other filters Let you create your own filter effects, modify masks, offset a selection within an image, and make quick color adjustments. Digimarc filter Lets you read a Digimarc watermark.
182 USING PHOTOSHOP ELEMENTS 8 Filters, effects, styles, and artwork A B C D E F G H I Filter Gallery dialog box A. Filter category B. Thumbnail of selected filter C. Show/Hide filter thumbnails D. Filters menu E. Options for selected filter F. List of filter effects to apply or arrange G. Hidden filter H. Filters applied cumulatively but not selected I.
183 USING PHOTOSHOP ELEMENTS 8 Filters, effects, styles, and artwork • Adjust filter settings to make memory-intensive filters less complex. Memory-intensive filters include Lighting Effects, Cutout, Stained Glass, Chrome, Ripple, Spatter, Sprayed Strokes, and Glass. (For example, to reduce the complexity of the Stained Glass filter, increase cell size. To reduce the complexity of the Cutout filter, increase Edge Simplicity, decrease Edge Fidelity, or both.
184 USING PHOTOSHOP ELEMENTS 8 Filters, effects, styles, and artwork Paint Daubs The Paint Daubs filter makes an image appear painted. You can set the brush size, image sharpness, and brush types. Panel Knife The Panel Knife filter reduces detail in an image to give the effect of a thinly painted canvas that reveals the texture underneath. You can set the stroke size, stroke detail, and edge softness.
185 USING PHOTOSHOP ELEMENTS 8 Filters, effects, styles, and artwork Blur filters Average The Average filter finds the average color of an image or selection, and then fills the image or selection with the color to create a smooth look. For example, if you select an area of grass, the filter changes the area into a homogeneous patch of green. Blur and Blur More The Blur filters soften a selection or an image, and are useful for retouching.
186 USING PHOTOSHOP ELEMENTS 8 Filters, effects, styles, and artwork Radial Blur The Radial Blur filter simulates the blur of a zooming or rotating camera to produce a soft blur. The Amount option controls the blur amount. Spin blurs along concentric circular lines, and lets you specify a degree of rotation. Zoom blurs along radial lines, as if zooming in on or out of the image, and lets you specify an amount from 1 to 100.
187 USING PHOTOSHOP ELEMENTS 8 Filters, effects, styles, and artwork Ink Outlines The Ink Outlines filter redraws an image with fine narrow lines over the original details, in pen-and-ink style. You can set the stroke length, and dark and light intensity levels. Spatter The Spatter filter replicates the effect of a spatter airbrush. You can set the spray radius and smoothness. Sprayed Strokes The Sprayed Strokes filter repaints a layer using its dominant colors with angled, sprayed strokes of color.
188 USING PHOTOSHOP ELEMENTS 8 Filters, effects, styles, and artwork 5 Select how to fill voids that are created by the filter in the image, and click OK. Wrap Around Fills voids with content from the opposite edge of the image. Repeat Edge Pixels Extends the colors of pixels along the image’s edge in the direction you specify. 6 Select and open the displacement map. Photoshop Elements applies the map to the image.
189 USING PHOTOSHOP ELEMENTS 8 Filters, effects, styles, and artwork Reconstruct Fully or partially reverses the changes you’ve made. 5 In the Tool Options section, adjust the brush size and pressure of the tool, as needed: • To change the brush size, drag the pop-up slider, or enter a brush size value from 1 to 600 pixels. • To change the brush pressure, drag the pop-up slider, or enter a brush pressure value from 1 to 100. A low brush pressure makes more gradual changes.
190 USING PHOTOSHOP ELEMENTS 8 Filters, effects, styles, and artwork Shear The Shear filter distorts an image along a curve. More Help topics “About filters” on page 178 Apply the Shear filter 1 Select an image, layer, or area. 2 Choose Distort > Shear from the Filter menu. 3 To define a distortion curve, do one of the following in the Shear dialog box: • Click anywhere on either side of the vertical line. • Click on the vertical line, and then drag the new curve point.
191 USING PHOTOSHOP ELEMENTS 8 Filters, effects, styles, and artwork Apply the Wave filter 1 Select an image, layer, or area. 2 Choose Distort > Wave from the Filter menu. 3 Select a wave type in the Type section: Sine (creates a rolling wave pattern), Triangle, or Square. 4 To set the number of wave generators, drag the slider or enter a number between 1 and 999. 5 Drag the minimum and maximum Wavelength sliders to set the distance from one wave crest to the next.
192 USING PHOTOSHOP ELEMENTS 8 Filters, effects, styles, and artwork Noise filters Add Noise The Add Noise filter applies random pixels to an image, simulating the result of shooting pictures on high-speed film. This filter can also be used to reduce banding in feathered selections or graduated fills, to give a more realistic look to heavily retouched areas, or to create a textured layer. You can set the amount of noise, the type of noise distribution, and color mode.
193 USING PHOTOSHOP ELEMENTS 8 Filters, effects, styles, and artwork Pixelate filters Color Halftone The Color Halftone filter simulates the result of using an enlarged halftone screen on the layer. The filter divides the image into rectangles and replaces each rectangle with a circle. The circle size is proportional to the brightness of the rectangle. Apply the Color Halftone filter 1 Select an image, layer, or area. 2 Choose Pixelate > Color Halftone from the Filter menu.
194 USING PHOTOSHOP ELEMENTS 8 Filters, effects, styles, and artwork Pointillize The Pointillize filter redraws a layer as randomly placed dots, as in a pointillist painting, and uses the background color in the toolbox as a canvas area between the dots. You can set the cell size. Render filters Clouds The Clouds filter generates a soft cloud pattern using random values that vary between the foreground and the background color in the toolbar.
195 USING PHOTOSHOP ELEMENTS 8 Filters, effects, styles, and artwork 3 Specify options, as desired, and click OK. Preview area Displays a preview of the lighting effect so you can adjust each light (see “Adjust a light” on page 196). You can also create a new light by dragging the light icon into the preview area (you can create up to 16 lights). To delete a light, select the light in the preview window and drag the light (by its center circle) to the Trash.
196 USING PHOTOSHOP ELEMENTS 8 Filters, effects, styles, and artwork Properties Contains these options for the image you’re shining the light on: • Gloss Determines how much the surface reflects light, from Matte (low reflectance) to Shiny (high reflectance). • Material Determines whether the light or the object on which the light is cast reflects more light. Plastic reflects the light’s color; Metallic reflects the object’s color.
197 USING PHOTOSHOP ELEMENTS 8 Filters, effects, styles, and artwork Sketch filters Bas Relief The Bas Relief filter transforms an image to appear carved in low relief and lit to accent the surface variations. Dark areas of the image take on the foreground color, light areas use the background color. You can set relief detail and smoothness. Chalk & Charcoal The Chalk & Charcoal filter redraws an image’s highlights and midtones with a solid midtone gray background drawn in coarse chalk.
198 USING PHOTOSHOP ELEMENTS 8 Filters, effects, styles, and artwork Note Paper The Note Paper filter simulates the texture of handmade paper by combining the effects of the Emboss and Grain filters. Dark areas in the image appear as holes in the top layer of paper, revealing the background color. You can set the image balance, graininess, and relief. Photocopy The Photocopy filter simulates the effect of photocopying an image.
199 USING PHOTOSHOP ELEMENTS 8 Filters, effects, styles, and artwork Emboss The Emboss filter makes a selection appear raised or stamped by converting its fill color to gray and tracing the edges with the original fill color. You can set the embossing angle, height, and a percentage for the amount of color within the selection. Extrude The Extrude filter gives a three-dimensional texture to a selection or layer. Apply the Extrude filter 1 Select an image, layer, or area.
200 USING PHOTOSHOP ELEMENTS 8 Filters, effects, styles, and artwork Tiles The Tiles filter breaks up an image into a series of tiles, offsetting the selection from its original position. You can set the number of tiles and the offset percentage.
201 USING PHOTOSHOP ELEMENTS 8 Filters, effects, styles, and artwork Texturizer The Texturizer filter allows you to simulate different texture types or select a file to use as a texture. Texture options make images appear as if they were painted onto textures, such as canvas and brick, or viewed through glass blocks. Video filters De-Interlace The De-Interlace filter smooths moving images captured on video by removing either the odd or even interlaced lines in a video image.
202 USING PHOTOSHOP ELEMENTS 8 Filters, effects, styles, and artwork Use the Save and Load buttons to save and reuse custom filters. Apply a Custom filter 1 Select an image, layer, or area. 2 Choose Other > Custom from the Filter menu. 3 Select the center text box, which represents the pixel being evaluated. Enter the value by which you want to multiply that pixel’s brightness value, from -999 to +999. 4 Select a text box representing an adjacent pixel.
203 USING PHOTOSHOP ELEMENTS 8 Filters, effects, styles, and artwork More Help topics “About filters” on page 178 “Filter categories” on page 180 “Apply a filter” on page 179 Detect the Digimarc filter 1 Choose Filter > Digimarc > Read Watermark. If the filter finds a watermark, a dialog box displays the Digimarc ID, copyright year (if present), and image attributes. 2 Click OK. If you have a web browser installed, click Web Lookup to get more information about the owner of the image.
204 Chapter 12: Painting The painting tools change the color of pixels in an image. The Brush tool and the Pencil tool work like traditional drawing tools by applying color with brush strokes. The Gradient tool, Fill command, and Paint Bucket tool apply color to large areas. Tools like the Eraser tool, Blur tool, and Smudge tool modify the existing colors in an image. The power of painting in Adobe® Photoshop® Elements is in the options that you can set to specify how a tool applies or modifies color.
205 USING PHOTOSHOP ELEMENTS 8 Painting About foreground and background colors You apply the foreground color when you paint with the Brush or Pencil tools, and when you fill selections with the Paint Bucket tool. The color you apply to the Background layer with the Eraser tool is called the background color. You can see and change the foreground and background colors in the two overlapping boxes at the bottom of the toolbox. The top box is the foreground color, and the bottom box is the background color.
206 USING PHOTOSHOP ELEMENTS 8 Painting The Multiply blending mode (top), Screen blending mode (center), and Luminosity blending mode (bottom) applied to the starfish layer. You can choose any of the following blending modes from the Mode menu in the options bar: Normal Edits or paints each pixel to make it the result color. This is the default mode. (Normal mode is called Threshold when you’re working with an image in bitmap or indexed-color mode.
207 USING PHOTOSHOP ELEMENTS 8 Painting Lighten Looks at the color information in each channel and selects the base or blend color—whichever is lighter—as the result color. Pixels darker than the blend color are replaced, and pixels lighter than the blend color do not change. Screen Looks at each channel’s color information and multiplies the inverse of the blend and base colors. The result color is always a lighter color. Screening with black leaves the color unchanged.
208 USING PHOTOSHOP ELEMENTS 8 Painting Color Creates a result color with the luminance of the base color and the hue and saturation of the blend color. This preserves the gray levels in the image and is useful for coloring monochrome images and for tinting color images. Using the Color blending mode to change the color of a shirt Luminosity Creates a result color with the hue and saturation of the base color and the luminance of the blend color.
209 USING PHOTOSHOP ELEMENTS 8 Painting If you want the color always to be available, you can add the sampled color to the Color Swatches panel. You can also specify the size of the area that the Eyedropper tool samples. For example, you can set the eyedropper to sample the average color values of a 5-by-5- or 3-by-3-pixel area under the pointer. A B Selecting a foreground color with the eyedropper. A. Point sample B. 5 by 5 Average sample 1 Select the Eyedropper tool in the toolbox.
210 USING PHOTOSHOP ELEMENTS 8 Painting Use the Color Swatches panel The Color Swatches panel (Window > Color Swatches) is a good place to store the colors that you use often in your images. You can select a foreground or background color by clicking a color swatch in the Color Swatches panel. You can add or delete colors to create a custom swatch library, save a library of swatches, and reload them for use in another image.
211 USING PHOTOSHOP ELEMENTS 8 Painting 4 If prompted to save the swatch library, enter a new name in the Save dialog box and click Save. Save and use custom swatch libraries ❖ Do any of the following in the Color Swatches panel: • To save a library of swatches, choose Save Swatches from the pop-up menu. To make the set appear in the panel’s swatch libraries pop-up menu, save the file to the Photoshop Elements\Presets\Color Swatches folder.
212 USING PHOTOSHOP ELEMENTS 8 Painting A B C D E F G H Adobe Color Picker. A. Adjusted color B. Original color C. HSB color values D. RGB color values E. Displays only web colors F. Color field G. Color slider H. Hexadecimal color value 1 Click the foreground or background color boxes in the toolbox to display the Color Picker. 2 Click inside the color field.
213 USING PHOTOSHOP ELEMENTS 8 Painting 2 Select the Brush tool in the toolbox. 3 Specify Brush tool options in the options bar as desired, and then drag within the image to paint. To draw a straight line, click a starting point in the image. Then hold down Shift and click an ending point. You can specify any of the following Brush tool options: Brushes Sets the brush tip. Click the arrow next to the brush sample, choose a brush category from the Brushes pop-up menu, and then select a brush thumbnail.
214 USING PHOTOSHOP ELEMENTS 8 Painting Auto Erase Paints with the background color over areas containing the foreground color. If you begin dragging from an area that doesn’t contain the foreground color, the tool paints with the foreground color.
215 USING PHOTOSHOP ELEMENTS 8 Painting More Help topics “About brush options” on page 219 Smart Brush tools The Detail Smart Brush tool automatically creates an adjustment layer as you paint. It doesn’t alter the original image layer. You can paint and change the adjustments as many times as you want without degrading your original photo. See “Adjust color and tonality using the Smart Brush tools” on page 108.
216 USING PHOTOSHOP ELEMENTS 8 Painting More Help topics “Understanding layers” on page 49 “About brush options” on page 219 Use the Eraser tool The Eraser tool changes pixels in the image as you drag through them. If you’re working in the Background layer or in a layer with locked transparency, erased pixels change to the background color; otherwise, erased pixels become transparent. Transparent pixels are indicated by the transparency grid. 1 Select the Eraser tool from the toolbox.
217 USING PHOTOSHOP ELEMENTS 8 Painting Original image (left), and after erasing the clouds (right) 1 In the Layers panel, select the layer containing the areas you want to erase. Note: If you select the Background, it automatically becomes a layer when you use the Magic Eraser. 2 Select the Magic Eraser tool or the Background Eraser tool in the toolbox. (If you don’t see it in the toolbox, select either the Eraser tool , and then click the Magic Eraser tool icon in the options bar.
218 USING PHOTOSHOP ELEMENTS 8 Painting Use the Background Eraser tool The Background Eraser tool turns color pixels to transparent pixels so that you can easily remove an object from its background. With careful use, you can maintain the edges of the foreground object while eliminating background fringe pixels. The tool pointer is a circle with a cross hair indicating the tool’s hotspot .
219 USING PHOTOSHOP ELEMENTS 8 Painting Setting up brushes About brush options You can simulate actual brush strokes by setting the rates at which the brush tool strokes fade out. You can specify which options dynamically change over the course of a brush stroke, including scattering, size, and color. The brush thumbnail in the options bar reflects the brush changes as you adjust the brush dynamics options.
220 USING PHOTOSHOP ELEMENTS 8 Painting Hardness Controls the size of the brush’s hard center. Type a number, or use the slider to enter a value that’s a percentage of the brush diameter. Brush strokes with different hardness values Scatter Brush scattering determines how brush marks are distributed in a stroke. A low value produces a denser stroke with less paint scattering, and higher values increase the scattering area.
221 USING PHOTOSHOP ELEMENTS 8 Painting More Help topics “About blending modes” on page 205 Add a new brush to the brush library 1 Select the Brush tool . 2 Click the arrow next to the brush sample to display the pop-up panel in the options bar; choose a category from the Brushes pop-up menu, and then select a brush to modify in the brush list. 3 Use the options bar to modify the original brush. 4 Click the arrow next to the brush sample to display the panel menu, and then choose Save Brush.
222 USING PHOTOSHOP ELEMENTS 8 Painting Creating a custom brush of a dog. When you paint with this brush, you paint on dogs. 1 Do one of the following: • To use part of the image as a custom brush, select part of an image. • To use the entire layer as a custom brush, deselect everything. Use the painting tools to draw the brush shape and select it. You can use hard-edged or soft-edged strokes, or vary the opacity of strokes to achieve soft-edge effects.
223 USING PHOTOSHOP ELEMENTS 8 Painting Fills and strokes Use the Paint Bucket tool The Paint Bucket tool fills an area that is similar in color value to the pixels you click. You can fill an area with the foreground color or a pattern. 1 Choose a foreground color. 2 Select the Paint Bucket tool in the toolbox. 3 Set options in the options bar, as desired, and then click the part of the image you want to fill.
224 USING PHOTOSHOP ELEMENTS 8 Painting Custom Pattern Specifies the pattern to use if you choose Pattern from the Use menu. You can use patterns from the pattern libraries or create your own patterns. Mode Specifies how the color pattern that you apply blends with the existing pixels in the image. Opacity Sets the opacity of the color pattern to apply. Preserve Transparency Fills only opaque pixels.
225 USING PHOTOSHOP ELEMENTS 8 Painting To customize your images, or to make one-of-a-kind scrapbook pages, you can create your own patterns. You can save patterns that you create in a library, and then load libraries of patterns using the Preset Manager or the Pattern pop-up panel, which appears in the options bar of the Pattern Stamp tool and the Paint Bucket tool. Saving patterns allows you to easily use a pattern in multiple images. A B C Creating a custom pattern A.
226 USING PHOTOSHOP ELEMENTS 8 Painting Add a custom pattern to the pattern picker 1 Do one of the following: • To create a pattern from part of the image, make a rectangular selection with Feather set to 0 pixels. • To create a pattern from the entire image, deselect everything. 2 Choose Edit > Define Pattern. 3 Enter a name for the pattern in the Pattern Name dialog box. 4 To deselect the original selection, choose Select > Deselect.
227 USING PHOTOSHOP ELEMENTS 8 Painting Using the Gradient tool and Gradient Editor, you can create a custom mix of colors in your photos. You can choose any of the following gradient types in the options bar. Linear gradient Shades from the starting point to the ending point in a straight line. Radial gradient Shades from the starting point to the ending point in a circular pattern. Angle gradient Shades in a counterclockwise sweep around the starting point.
228 USING PHOTOSHOP ELEMENTS 8 Painting Opacity Sets the opacity of the gradient. A low opacity setting allows pixels under the gradient to show through. Drag the pop-up slider or enter an opacity value. Reverse Switches the order of the colors in the gradient fill. Dither Creates a smoother blend with less obvious bands of color. Transparency Uses the gradient’s transparency (instead of any transparent areas in the image) if the gradient has transparent areas.
229 USING PHOTOSHOP ELEMENTS 8 Painting • Choose Foreground from the Color pop-up menu to use the current foreground color. • Choose Background from the Color pop-up menu to use the current background color. • Choose User Color from the Color pop-up menu to always use the color you chose for the gradient, other than the current foreground or background. 5 To adjust the color stop location of a color, drag the stop left or right.
230 USING PHOTOSHOP ELEMENTS 8 Painting To remove an intermediate opacity, drag its transparency stop up and off the gradient bar, or select the stop and click the Delete button. 9 To save the gradient to the gradient presets, enter a new name in the Name text box, and then click New. This creates a new gradient preset with the transparency setting you specified. 10 Click OK to exit the dialog box and select the newly created gradient. Make sure that Transparency is selected in the options bar.
231 USING PHOTOSHOP ELEMENTS 8 Painting A B Viewing the Cookie Cutter pop-up panel in the options bar A. Click to show the pop-up panel. B. Click to view the pop-up panel menu, which contains preset libraries. You can change the display of a pop-up panel to view presets by their names, as thumbnail icons, or with both names and icons. You can use the Presets Manager to load different preset libraries.
232 USING PHOTOSHOP ELEMENTS 8 Painting • To load the default set of brushes, gradients, or patterns, open the pop-up panel menu and choose the Reset command. Change the display of items in a pop-up panel menu 1 Do one of the following: • To change the display of one panel, open the pop-up panel menu by clicking the triangle in the upper-right corner of the pop-up panel. • To change the display for all panels, choose Edit > Preset Manager to open the Preset Manager, and then click the More button.
233 USING PHOTOSHOP ELEMENTS 8 Painting Replace Replaces the current library with the contents of another library. Save a subset of a library 1 In the Preset Manager, Shift-click to select multiple contiguous presets or Command-click to select multiple noncontiguous presets. Only the selected presets are saved in the new library. 2 Click Save Set, then enter a name for the library. If you want to save the library in a folder other than the default, navigate to the new folder before saving.
234 Chapter 13: Adding text and shapes You can add text and shapes of different color, styles, and effects to an image. Use the Horizontal Type and Vertical Type tools to create and edit text. You can create single-line text or paragraph text. In Photoshop Elements, shapes are resolution-independent vector graphics (lines and curves defined by their geometric characteristics instead of pixels) that can be moved, resized, or changed without losing detail, clarity, or quality.
235 USING PHOTOSHOP ELEMENTS 8 Adding text and shapes The small line through the I-beam marks the position of the type baseline. For horizontal type, the baseline marks the line on which the type rests; for vertical type, the baseline marks the center axis of the type characters. 3 (Optional) Select type options, such as font, style, size, and color, in the options bar. 4 Type the characters you want. If you did not create a text box, you can press Return to create a new line.
236 USING PHOTOSHOP ELEMENTS 8 Adding text and shapes Underline Applies an underline to new text or selected existing text. Strikethrough Applies a line through new text or selected existing text. Leading menu Sets the space between lines of new or selected text. Color menu Applies a color to new text or selected text. Warp text Warps text on the selected layer. Text Orientation Changes vertical text to horizontal and horizontal text to vertical.
237 USING PHOTOSHOP ELEMENTS 8 Adding text and shapes • Double-click to select a single word. • Triple-click to select an entire line of text. • Click a point in the text and then Shift-click to select a range of characters. • Choose Select > All to select all the characters in the layer. • To use the arrow keys to select characters, hold down Shift and press the Right Arrow or Left Arrow key.
238 USING PHOTOSHOP ELEMENTS 8 Adding text and shapes Change text color You can change the type color before or after you enter text. When editing existing text layers, you can change the color of individual characters or all type in a layer. You can also apply a gradient to text in a text layer. The Color menu in the options bar displays many preset color swatches from which you can choose. 1 Do one of the following: • To change the color of text before you type it, select a type tool.
239 USING PHOTOSHOP ELEMENTS 8 Adding text and shapes 3 Select additional type options (See “Type tool options” on page 235), and enter your text. The type selection border appears in the image on the active layer. Warp type Warping allows you to distort type to conform to a variety of shapes; for example, you can warp type in the shape of an arc or a wave. Warping applies to all characters in a text layer—you cannot warp individual characters. Also, you can’t warp faux bold text.
240 USING PHOTOSHOP ELEMENTS 8 Adding text and shapes Work with Asian type Display Asian type options Photoshop Elements provides several options for working with Asian type. Asian fonts are often referred to as doublebyte fonts or CJK fonts, meaning Chinese, Japanese, and Korean fonts. 1 Choose Photoshop Elements> Preferences > Type. 2 Set text options: • Show Asian Text Options to display Asian type options. • Show Font Names in English to display Asian font names in English. 3 Click OK.
241 USING PHOTOSHOP ELEMENTS 8 Adding text and shapes 4 Select Tate-Chuu-Yoko. Turn on or turn off mojikumi Mojikumi determines spacing between punctuation, symbols, numbers, and other character classes in Japanese type. When mojikumi is turned off, full-width spacing is applied to these characters. When mojikumi is on, half-width spacing is applied to these characters.
242 USING PHOTOSHOP ELEMENTS 8 Adding text and shapes Vector objects created with the shape tools in Photoshop Elements More Help topics “Select or move a shape” on page 245 “Transform a shape” on page 245 “Apply a layer style to a shape” on page 245 Draw a rectangle, square, or rounded rectangle 1 Select the Rectangle tool or Rounded Rectangle tool toolbox, and then choose a tool from the list that appears. .
243 USING PHOTOSHOP ELEMENTS 8 Adding text and shapes From Center Draws an ellipse from the center of where you begin drawing (usually an ellipse is drawn from the upper- left corner). 3 Drag in your image to draw the ellipse. Draw a multisided shape 1 Select the Polygon tool . If necessary, press and hold another shape tool in the toolbox, and then choose this tool from the list that appears.
244 USING PHOTOSHOP ELEMENTS 8 Adding text and shapes Draw a custom shape The Custom Shape tool provides many different shape options for you to draw. When you select the custom shape tool, you can access these shapes in the options bar. 1 Select the Custom Shape tool . If necessary, press and hold another shape tool in the toolbox, and then choose this tool from the list that appears. 2 In the options bar, select a shape from the Shape pop-up panel.
245 USING PHOTOSHOP ELEMENTS 8 Adding text and shapes Editing shapes Select or move a shape Use the Shape Selection tool to select shapes with one click. If you convert a shape into a bitmap element by simplifying the shape layer, the Shape Selection tool will no longer select the shape (use the Move tool instead). If a layer contains multiple shapes, you can reposition all the shapes together using the Move tool.
246 USING PHOTOSHOP ELEMENTS 8 Adding text and shapes Before (left) and after (right) applying a layer style to a custom shape. 1 In the Layers panel, click the New Layer button. 2 In the Content panel, select a shape and insert it into the new layer. 3 In the Effects panel, click the Layer Styles button and double-click the thumbnail you want to apply to the shape.
247 Chapter 14: Making projects Projects are albums of images that you create with Photoshop Elements. You can use and share projects in traditional print formats, in digital format online, and with electronic media. Projects overview About projects You can use your images in photo albums, scrapbooks, greeting cards, CD/DVD labels and jackets, and photo collages. These print-oriented items are called photo projects and can be printed with your home printer, or professionally printed using online services.
248 USING PHOTOSHOP ELEMENTS 8 Making projects Note: Photo Books are photo projects. However, they have their own workspace mode, with a limited toolbox and limited access to the Content panel. Photo Books are designed specifically for online printing. You can print them locally, but each side of a spread is treated as a separate page. If a project has a single page, it’s saved in Photoshop format (PSD) by default.
249 USING PHOTOSHOP ELEMENTS 8 Making projects Setting photo project options For example, if you click Photo Collage in Create tab, the photo projects dialog box provides the following options: Page Size Provides preset page sizes for each project. The size chosen becomes the default for all pages in the project, but it can be later modified. Each project type offers different size options. For example, the greeting card template sizes are smaller than the photo album template sizes.
250 USING PHOTOSHOP ELEMENTS 8 Making projects Number Of Pages Specifies the number of pages for the project. If you selected Auto-Fill With Project Bin Photos in the Projects panel, the required number of pages are identified for a chosen layout. You can change this setting. For example, if you know that a project will continue to grow, and the selected photos require only four pages, you can specify 10 pages to accommodate images added later.
251 USING PHOTOSHOP ELEMENTS 8 Making projects About greeting cards Greeting cards let you add a variety of layouts and designs to your images, and allow adding up to 22 photos on a page. Greeting cards can be printed with your home printer, saved to your hard drive, and sent by e-mail. Greetings cards can be ordered online from Adobe Photoshop Services from some locales.
252 USING PHOTOSHOP ELEMENTS 8 Making projects Sample CD and DVD labels More Help topics “Make a photo collage, greeting card, or other projects” on page 252 Make a photo collage, greeting card, or other projects 1 Select the Create tab , and then the Projects button.
253 USING PHOTOSHOP ELEMENTS 8 Making projects More Help topics “Using the photo projects dialog box” on page 248 “Using the Effects panel” on page 173 “Editing photo projects” on page 253 Editing photo projects About photo projects edits You can modify photo collages, greeting cards, and CD/DVD disc jackets and labels. The Content panel lets you add a variety of frames, textures, backgrounds, and graphics to your projects, as well as apply text effects.
254 USING PHOTOSHOP ELEMENTS 8 Making projects • To add a new page that uses the current layout, click Edit > Add Page Using Current Layout, or right-click a page in the Project Bin, and then select this option from the context menu. You can also drag a new page to a different location in the project. For example, you might want to move the new page somewhere else in the project.
255 USING PHOTOSHOP ELEMENTS 8 Making projects Rotate photos in a photo project 1 To rotate a photo and frame together, click the photo once. To rotate a photo within a frame, double-click the photo. 2 Do any of the following: • Click anywhere within the bounding box and a circle appears below the selection. Position the cursor over the circle. When the curved four-headed arrow appears, drag the track ball handle to rotate the image.
256 USING PHOTOSHOP ELEMENTS 8 Making projects Making digital projects About digital projects You don’t have to know anything about HTML programming to create a Web Photo Gallery; the Web Photo Gallery dialog box provides styles that you can easily select, customize, and save. It creates a folder containing all the necessary web page and linked image files. You send this folder by FTP to your web server (or online service). Create a photo book 1 Click Create, and select Photo Book.
257 USING PHOTOSHOP ELEMENTS 8 Making projects 6 Type a name for the gallery folder in the Gallery Name box. This folder contains the web page and image files you can share later. If you want to change the default storage location, select Save To Disk and click Browse. Select the location where you want to save the Web Photo Gallery files. Creating slide shows About slide shows Slide shows are a fun way to share photos.
258 USING PHOTOSHOP ELEMENTS 8 Making projects Keep the camera level Although Photomerge Panorama can process slight rotations between pictures, a tilt of more than a few degrees can result in errors when automatically assembling the panorama. Using a tripod with a rotating head helps maintain camera alignment and viewpoint. When photographing a panoramic scene from a high place, the natural inclination is to keep the horizon level in the viewfinder.
259 USING PHOTOSHOP ELEMENTS 8 Making projects A B C D E Photomerge dialog box. A. Lightbox B. Tools C. Work area D. Selected image E. Status bar • To navigate, select the Move View Tool and drag within the work area. Or, drag the view area (the red box) or the scroll bar of the navigator. • To zoom, click the Zoom In icon and Zoom Out icon , or use the Zoom tool . Hold down Option to zoom out with the Zoom tool.
260 USING PHOTOSHOP ELEMENTS 8 Making projects 2 Select the Set Vanishing Point Tool , and click on an image in the work area to make it the vanishing point image. There can only be one vanishing point image in a composition. Note: Hold down the Option key when you move the pointer over an image to show the selection border of the photo. 3 If necessary, use the Select Image tool to adjust the position of the non-vanishing point images.
261 Chapter 15: Optimizing for the web Optimization for the web is the process of compressing images and setting display options for optimal use on the Internet. When you put images on the Internet, file size becomes important; you want to achieve a file size that is small enough to allow a reasonable download time, but large enough to preserve colors and details to your satisfaction. There are three major graphic file formats that are used on the web: GIF, JPEG, and PNG.
262 USING PHOTOSHOP ELEMENTS 8 Optimizing for the web A B C D E F G H I Save For Web dialog box A. Toolbox B. Eyedropper color C. Optimization settings D. Image Size E. Animation options F. Zoom level menu G. Original image H. Optimized image I. Browser preview menu Optimization options appear on the right side of the Save For Web dialog box.
263 USING PHOTOSHOP ELEMENTS 8 Optimizing for the web PNG-24 Like JPEG, this is a good format for photographs. Choose PNG-24 rather than JPEG only when your image contains transparency. (JPEG does not support transparency; you must fill it with a matte color.) PNG-24 files are often much larger than JPEG files of the same image. GIF GIF is the format to use for line art, illustrations with large areas of solid color and crisp detail, and text.
264 USING PHOTOSHOP ELEMENTS 8 Optimizing for the web About the GIF format The GIF format uses 8-bit color and efficiently compresses solid areas of color while preserving sharp details like those in line art, logos, or type. You also use the GIF format to create an animated image and preserve transparency in an image. GIF is supported by most browsers. The GIF format uses LZW compression, which is a lossless compression method.
265 USING PHOTOSHOP ELEMENTS 8 Optimizing for the web PNG-8 with 256 colors and no dither (left), and PNG-8 with 16 colors and dithering (right) More Help topics “Preserve background transparency in a GIF or PNG image” on page 270 About the PNG-24 format The PNG-24 format supports 24-bit color. Like the JPEG format, PNG-24 preserves the subtle variations in brightness and hue found in photographs. Like the GIF and PNG-8 formats, PNG-24 preserves sharp details like those in line art, logos, or type.
266 USING PHOTOSHOP ELEMENTS 8 Optimizing for the web Images in separate layers can be sequenced together to create an animation. More Help topics “Understanding layers” on page 49 “Preview an animation” on page 274 Apply a preset optimization setting You can quickly and easily optimize an image for the web by choosing a predefined optimization setting, called a preset, from the Preset menu near the upper-right corner of the Save For Web dialog box.
267 USING PHOTOSHOP ELEMENTS 8 Optimizing for the web 5 Select Progressive to display the image progressively in a web browser; that is, to display it first at a low resolution, and then at progressively higher resolutions as downloading proceeds. Note: Some browsers do not support progressive JPEGs. 6 To preserve the ICC profile of the original image in the optimized file, select ICC Profile. Some browsers use ICC profiles for color correction.
268 USING PHOTOSHOP ELEMENTS 8 Optimizing for the web 8 If the image contains transparency, select Transparency to preserve transparent pixels; deselect Transparency to fill fully and partially transparent pixels with the matte color. 9 To create an animated GIF, select Animation. 10 To save your optimized image, click OK. In the Save Optimized As dialog box, type a filename, and click Save.
269 USING PHOTOSHOP ELEMENTS 8 Optimizing for the web More Help topics “Preview an animation” on page 274 “Understanding layers” on page 49 Using transparency and mattes About transparent and matted web images Transparency makes it possible to create nonrectangular images for the web. Background transparency, supported by the GIF and PNG formats, preserves transparent pixels in the image and allows the background of the web page to show through the transparent areas of your image.
270 USING PHOTOSHOP ELEMENTS 8 Optimizing for the web More Help topics “Adding layers” on page 51 “Optimized file formats for the web” on page 262 Preserve background transparency in a GIF or PNG image GIF and PNG-8 formats support one level of transparency—pixels can be fully transparent or fully opaque, but not partially transparent.
271 USING PHOTOSHOP ELEMENTS 8 Optimizing for the web Create hard-edged transparency in a GIF or PNG-8 file Use hard-edged transparency when you don’t know the background color of a web page, or when the web page background contains a texture or pattern. However, keep in mind that hard-edged transparency can cause jagged edges in the image. 1 Open or create an image that contains transparency, and choose File > Save For Web. 2 In the Save For Web dialog box, select GIF or PNG-8 as the optimization format.
272 USING PHOTOSHOP ELEMENTS 8 Optimizing for the web Dithering simulates continuous tones Use colors in the Web panel to ensure that colors won’t dither when displayed in Windows or Mac OS systems capable of displaying 256 colors. When creating an original image, you can use the Color Picker to choose web-safe colors.
273 USING PHOTOSHOP ELEMENTS 8 Optimizing for the web 3 To preview dither in Photoshop Elements, choose Browser Dither from the document panel menu in the Save For Web dialog box. (To view the menu, click the triangle in the upper-right corner of the optimized image.) 4 To preview dither in a browser, follow these steps: • Set your computer’s color display to 8-bit color (256 colors). See your operating system’s documentation for information on changing the color display.
274 USING PHOTOSHOP ELEMENTS 8 Optimizing for the web More Help topics “About optimizing” on page 261 Preview variations in color display When optimizing an image for the web, consider how the image will appear on different monitors. In general, an image appears darker in Windows systems than on Mac OS systems. You can simulate cross-platform display differences in the Save For Web dialog box. 1 Open an image and choose File > Save For Web. 2 Choose your optimization settings.
275 Chapter 16: Printing and sharing photos Printing photos Printing overview Photoshop Elements provides several options for printing your photos. You can have photos professionally printed by online providers through Adobe Photoshop Services (which you can register for through the Adobe website), or you can print your photos with your home printer. You can print individual photos, sheets (thumbnails of each selected photo), and picture packages (a page of one or more photos printed at various sizes).
276 USING PHOTOSHOP ELEMENTS 8 Printing and sharing photos • Color Management Printing Choices Enables you to specify the following settings: • Photo Details You can print the date, caption, and filename by selecting the following options: • Show Date • Show Caption • Show File Name • Border You can specify the following details for the border: • Thickness in inches, mm, or points. • Color of the border • Background color • Iron-on Transfer Select Flip Image to use image for T-shirt transfers.
277 USING PHOTOSHOP ELEMENTS 8 Printing and sharing photos Reposition an image You can change the placement of a photo before printing. ❖ Choose File > Print, and using the panning operation, reposition the image. Use Photo Prints You can print photos using the Photo Prints option. 1 Open the photos you want to print. 2 Select Create > Photo Prints. 3 Follow the onscreen instructions to print your photos.
278 USING PHOTOSHOP ELEMENTS 8 Printing and sharing photos Sample contact sheet 1 In Adobe Bridge, select a folder of images or specific image files. From the Bridge Tools menu, choose Photoshop Elements > Contact Sheet II. Unless you select specific images, the contact sheet will include all images currently displayed in Adobe Bridge. You can select a different image folder or select other currently open images after the Contact Sheet II dialog box opens.
279 USING PHOTOSHOP ELEMENTS 8 Printing and sharing photos Picture packages come in a variety of sizes 1 If you are using pictures from Adobe Bridge, open Adobe Bridge and select the images. 2 In Photoshop Elements, choose File > Picture Package. 3 Select the location of the source images. 4 Set Document and Label options. An example of the layout option you select appears in the Layout box.
280 USING PHOTOSHOP ELEMENTS 8 Printing and sharing photos You can share files by e-mail in the following ways (regardless of the format, all tags, and metadata are preserved in your e-mailed file): PDF Slide Show Combines image and media files into a single PDF file. Your recipients can view the PDF file as a slide show by using the free Adobe Reader software. E-mail Attachments Lets you send image as individual e-mail attachments. You can specify the size of the photo.
281 Chapter 17: Keyboard shortcuts Shortcuts help you view, select, edit, and use many of the other tools that are available in Full Edit mode. Shortcuts Keys for viewing images (Full Edit) This partial list includes the most helpful shortcuts. You'll find additional shortcuts in menu commands and tool tips.
282 USING PHOTOSHOP ELEMENTS 8 Keyboard shortcuts Result Shortcut Eyedropper tool I Rectangular Marquee tool M Elliptical Marquee tool Lasso tool L Magnetic Lasso tool Polygonal Lasso tool Magic Wand tool W Selection Brush tool (or Quick Selection tool) A Horizontal Type tool T Vertical Type tool Horizontal Type Mask tool Vertical Type Mask tool Crop tool C Recompose tool C Cookie Cutter tool Q Straighten tool P Red Eye Removal tool Y Spot Healing Brush tool J Healing Brush tool
283 USING PHOTOSHOP ELEMENTS 8 Keyboard shortcuts Result Shortcut Rectangle tool U Rounded Rectangle tool Ellipse tool Polygon tool Line tool Custom Shape tool Shape Selection tool Blur tool R Sharpen tool Smudge tool Sponge tool O Dodge tool Burn tool Show/Hide all panels (not including Content and Layers panel) Tab Default foreground and background colors D Switch foreground and background colors X Keys for selecting and moving objects This partial list includes the most helpful shortcuts.
284 USING PHOTOSHOP ELEMENTS 8 Keyboard shortcuts Result Shortcut Increase/decrease detection width Magnetic Lasso tool + [ or ] Accept cropping or exit cropping Crop tool + Enter or Esc Toggle crop shield off and on / (forward slash) Keys for the Magic Extractor dialog box This partial list includes the most helpful shortcuts. You'll find additional shortcuts in menu commands and tool tips.
285 USING PHOTOSHOP ELEMENTS 8 Keyboard shortcuts Result Shortcut Switch to Eyedropper tool Any painting tool or shape tool + Option (except Impressionist Brush) Select background color Eyedropper tool + Option-click Set opacity, tolerance, or exposure for painting Any painting or editing tool + number keys (for example, 0 = 100%, 1 = 10%, 4 and 5 in quick succession = 45%).
286 USING PHOTOSHOP ELEMENTS 8 Keyboard shortcuts Keys for the Layers panel This partial list includes the most helpful shortcuts. You'll find additional shortcuts in menu commands and tool tips.
287 USING PHOTOSHOP ELEMENTS 8 Keyboard shortcuts Result Shortcut Darken Shift + Option + K Multiply Shift + Option + M Color Burn Shift + Option + B Linear Burn Shift + Option + A Lighten Shift + Option + G Screen Shift + Option + S Color Dodge Shift + Option + D Linear Dodge Shift + Option + W Overlay Shift + Option + O Soft Light Shift + Option + F Hard Light Shift + Option + H Vivid Light Shift + Option + V Linear Light Shift + Option + J Pin Light Shift + Option + Z Hard
288 USING PHOTOSHOP ELEMENTS 8 Keyboard shortcuts Keys for the Filter Gallery This partial list includes the most helpful shortcuts. You'll find additional shortcuts in menu commands and tool tips.
289 USING PHOTOSHOP ELEMENTS 8 Keyboard shortcuts Result Shortcut Step backward Command + Z Step forward Command + Shift + Z Move selected image 1 pixel Right Arrow, Left Arrow, Up Arrow, or Down Arrow Change Cancel button to Reset Option Show individual image border Option-move pointer over image Keys for the Camera Raw dialog box This partial list includes the most helpful shortcuts. You'll find additional shortcuts in menu commands and tool tips.
290 Chapter 18: Glossary The glossary is your guide to unfamiliar terms in Photoshop Elements and digital imaging terms. If you don’t find a term here, search for it in Help to find a feature-specific definition. Find definitions for terms ❖ In the Contents tab of Help, expand the letters below “Digital imaging terms.” If you don’t find a term there, enter it in the Search box to find it elsewhere in Help.
291 USING PHOTOSHOP ELEMENTS 8 Glossary alpha channels Masks, which let you manipulate, isolate, and protect specific parts of an image. In Photoshop Elements, alpha channels are called saved selections. To save an alpha channel, choose Select > Save Selection. To load an alpha channel, choose Select > Load Selection. ambient light The existing lighting conditions under which a photo is taken, without enhancement from a camera flash.
292 USING PHOTOSHOP ELEMENTS 8 Glossary blur The softening of the detail in an image or parts of a image. BMP A standard file format for saving bitmap files in Windows. Windows can display BMP files on any type of display device. bounding box A rectangular border around an image, shape, or text that you can drag to rotate or resize. brightness The relative lightness or darkness of an image, which determines the intensity of colors. Also, the relative lightness or darkness of any color.
293 USING PHOTOSHOP ELEMENTS 8 Glossary color cast An unwanted or unexpected color shift in a photo. For example, a photo taken indoors without a camera flash may have too much yellow. color channels The component colors from which all colors in an image are created. Usually refers to red, green, and blue (RGB). color depth Measures how much color information is available to display or print each pixel in an image.
294 USING PHOTOSHOP ELEMENTS 8 Glossary craquelure Hairline surface cracking seen in old paintings, and the effect used to simulate surface cracking in photographic images. cropping Trimming a portion of an image to improve its composition or to create a frame around it. custom shape A shape listed in the Custom Shape menu in the options bar. The Custom Shape menu is available when you select the Custom Shape tool. D definition Sharpness or clarity of detail in an image.
295 USING PHOTOSHOP ELEMENTS 8 Glossary exposure A measure of the amount of light in which a photo was taken. Underexposed digital photos are too dark; overexposed ones, too light. extension module A plug-in for Photoshop Elements that enhances performance or adds features. F fade When used with painting tools, fade controls the number of steps until the paint flow fades to nothing. fall-off Decrease in light as it travels from its source.
296 USING PHOTOSHOP ELEMENTS 8 Glossary gradient Any of several methods for achieving a smooth transition between two adjacent colors, including black and white. Gray working space profile A predefined profile that determines how best to display and print grayscale images for a given color setting. grayscale A single-channel image that includes only black, white, and shades of gray. Depending on the bit depth, grayscale images can reproduce various shades of gray.
297 USING PHOTOSHOP ELEMENTS 8 Glossary interlacing The display of a series of low-resolution versions of an image in a browser while the full image file is downloaded. J jitter Specifies the randomness of a brush stroke. JPEG Joint Photographic Experts Group. A committee of experts that develops algorithms for compressing computer image files. Also, any graphic file to which a JPEG algorithm is applied. JPEG is the format generally used to share photographs over the web.
298 USING PHOTOSHOP ELEMENTS 8 Glossary mezzotint An effect that simulates the pattern of light and shade seen in engravings made from a roughened plate. Microsoft Panel file A color table attached to an image file. midtone An area that falls between the brightest highlight and the darkest shadow. moire A wavy striped pattern in an image, resembling the pattern of watered silk. Moire can be an artifact caused by a camera’s inability to capture the detail in an image.
299 USING PHOTOSHOP ELEMENTS 8 Glossary phosphor The substance that coats the interior surface of a CRT monitor. It emits light in response to electrical stimulation and affects how colors appear on the screen. Over time, changes in the phosphor make it necessary to recalibrate or reprofile the monitor. Photomerge A family of features for creating a single composite image from multiple source images.
300 USING PHOTOSHOP ELEMENTS 8 Glossary PSD The native file format of Adobe Photoshop and Adobe Photoshop Elements. PSE The file format for saving and opening multiple pages as a single file in Adobe Photoshop Elements. Photoshop and other editors will open the individual PSDs that compose the PSE. Q QuickTime Software from Apple that allows you to view movies and other multi-media files on your computer.
301 USING PHOTOSHOP ELEMENTS 8 Glossary scanning The process of converting a tangible image, such as a slide or print, into a digital image by using light shining onto sensors such as Charged Couple Devices (CCDs). scatter Determines how brush marks are distributed in a stroke. scatter spacing Determines the spacing between elements in a brush stroke. Scitex file A high-resolution file for use with proprietary Scitex systems. Photoshop Elements can open Scitex files that are in RGB color mode.
302 USING PHOTOSHOP ELEMENTS 8 Glossary stack Photos that you group together under one photo. You can create stacks when you have multiple photos of the same subject and you don’t want them all to clutter up the Bridge Content panel. stroke (1) An outline around an image or part of an image created with the Stroke command or with a drawing, painting, or selection tool. (2) The characteristics of the lines created with one of the painting or drawing tools, especially brushes.
303 USING PHOTOSHOP ELEMENTS 8 Glossary transparency In digital photography, the functionality that supports transparent areas in an image or image layer. Certain image formats do not support transparency. trim To remove pixels from an image by using the Trim command in Photoshop. Photoshop Elements doesn’t have a Trim command. TWAIN A protocol by which applications and devices, such as scanners and cameras, exchange information. type mask A selection outline in the shape of text.