
Operation Manual


467
Print production tools (Acrobat Pro DC)
Last updated 4/7/2015
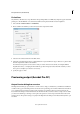
Edit Object Allows you to select, move, and edit both raster and vector objects. You can edit individual object
properties, such as tags, color space, or rendering intent.
Convert Colors Allows you to convert any color space in the document to the target color space.
Flattener Preview Allows you to define and apply flattening settings for transparent objects. Includes a preview for
viewing transparent objects and the effects your settings have on those objects. You can save the settings as presets to
apply to other pages or PDFs.
Save As PDF/X Allows you to save the current document as per the PDF/X standards.
Set Page Boxes Allows you to define the crop, trim, bleed, art, and media boxes on a page. The elements are important
for proper page positioning and placement of printer marks, especially for imposition.
Add Printer Marks Adds standard printer marks to a PDF page for positioning. These marks are embedded in the PDF.
Fix Hairlines Based on user settings, finds hairlines and replaces them with heavier-weight lines.
Ink Manager Modifies the way inks are treated while the current PDF is open. The Acrobat Ink Manager uses the same
options and controls as other Adobe applications.
Trap Presets Allows you to create and apply trap settings for later execution by an Adobe RIP that licenses Adobe In-
RIP Trapping.
Add Article Box Allows you to define a series of article boxes.
Printer marks and hairlines (Acrobat Pro DC)
About printer marks in PDFs
When you prepare a document for print production, a number of marks are needed to help the print service provider
align separation films for producing proofs, measure film for correct calibration and ink density, trim film to size, and
so on. Printer marks indicate the boundaries of document boxes supported by Adobe PDF, such as trim boxes and bleed
boxes.
You can add printer marks temporarily at print time using the Marks And Bleeds panel of the Advanced Print Setup
dialog box, or you can embed printer marks in the file (and optionally in a layer) using the Add Printer Marks dialog
box. For information about adding printer marks to just the printed output, see
Include marks and bleeds (Acrobat Pro
DC).
Note: A PDF created from Adobe InDesign CS and later can include printer marks, either in a separate layer or on the page.
You can view these marks using the Layers tab in Acrobat. If the printer marks were exported as a layer, any printer marks
you create using the Acrobat Add Printer Marks feature replace the InDesign printer marks. If the printer marks are not in
a layer, Acrobat printer marks overlay InDesign printer marks and might not align.
Embed printer marks in a PDF
1 Choose To o ls > Print Production > Add Printer Marks.
2 Specify the pages to mark.
3 Specify the marks and settings.