
Operation Manual


296
Security
Last updated 4/7/2015
Specify the default digital ID
To avoid being prompted to select a digital ID each time your sign or certify a PDF, you can select a default digital ID.
1 Choose Edit > Preferences > Signatures. In Identities & Trusted Certificates, and click More.
2 Click Digital IDs on the left, and then select the digital ID you want to use as the default.
3 Click the Usage Options button , and choose a task for which you want the digital ID as the default. To specify
the digital ID as the default for two tasks, click the Usage Options button again and select a second option.
A check mark appears next to selected options. If you select only the signing option, the Sign icon appears next
to the digital ID. If you select only the encryption option, the Lock icon appears. If you select only the certifying
option, or if you select the signing and certifying options, the Blue Ribbon icon appears.
To clear a default digital ID, repeat these steps, and deselect the usage options you selected.
Change the password and timeout for a digital ID
Passwords and timeouts can be set for PKCS #12 IDs. If the PKCS #12 ID contains multiple IDs, configure the password
and timeout at the file level.
Note: Self-signed digital IDs expire in five years. After the expiration date, you can use the ID to open, but not sign or
encrypt, a document.
1 Choose Edit > Preferences > Signatures. In Identities & Trusted Certificates, and click More.
2 Expand Digital IDs on the left, select Digital ID Files, and then select a digital ID on the right.
3 Click Change Password. Type the old password and a new password. For each keystroke, the password strength
meter evaluates your password and indicates the password strength using color patterns. Confirm the new
password, and then click OK.
4 With the ID still selected, click the Password Timeout button.
5 Specify how often you want to be prompted for a password:
Always Prompts you each time you use the digital ID.
After Lets you specify an interval.
Once Per Session Prompts you once each time you open Acrobat.
Never Yo u’re n e ver prompted for a p a s s w ord .
6 Type the password, and click OK.
Be sure to back up your password in a secure place. If you lose your password, either create a new self-signed digital ID
and delete the old one, or purchase one from a third-party provider.
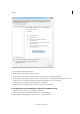
Delete your digital ID
When you delete a digital ID in Acrobat, you delete the actual PKCS #12 file that contains both the private key and the
certificate. Before you delete your digital ID, ensure that it isn’t in use by other programs or required by any documents
for decrypting.
Note: You can delete only self-signed digital IDs that you created in Acrobat. A digital ID obtained from another provider
cannot be deleted.
1 Choose Edit > Preferences > Signatures. In Identities & Trusted Certificates, and click More.