
Operation Manual


295
Security
Last updated 4/7/2015
Create a self-signed digital ID
Sensitive transactions between businesses generally require an ID from a certificate authority rather than a self-signed
one.
1 Choose Edit > Preferences > Signatures.
2 Select Identities & Trusted Certificates and click More.
3 Select Digital IDs on the left, and then click the Add ID button .
4 Select the option A New Digital ID I Want To Create Now, and click Next.
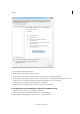
5 Specify where to store the digital ID, and click Next.
New PKCS#12 Digital ID File Stores the digital ID information in a file, which has the extension .pfx in Windows and
.p12 in Mac OS. You can use the files interchangeably between operating systems. If you move a file from one
operating system to another, Acrobat still recognizes it.
Windows Certificate Store (Windows only) Stores the digital ID to a common location from where other Windows
applications can also retrieve it.
6 Type a name, email address, and other personal information for your digital ID. When you certify or sign a
document, the name appears in the Signatures panel and in the Signature field.
7 Choose an option from the Key Algorithm menu. The 2048-bit RSA option offers more security than 1024-bit RSA,
but 1024-bit RSA is more universally compatible.
8 From the Use Digital ID For menu, choose whether you want to use the digital ID for signatures, data encryption,
or both.
9 Type a password for the digital ID file. For each keystroke, the password strength meter evaluates your password
and indicates the password strength using color patterns. Reconfirm your password.
You can export and send your certificate file to contacts who can use it to validate your signature.
Note: Make a backup copy of your digital ID file. If your digital ID file is lost or corrupted, or if you forget your password,
you cannot use that profile to add signatures.
Register a digital ID
To use your digital ID, register your ID with Acrobat or Reader.
1 Choose Edit > Preferences > Signatures. In Identities & Trusted Certificates, and click More.
2 Select Digital IDs on the left.
3 Click the Add ID button .
4 Choose one of the following options:
A File Select this option if you obtained a digital ID as an electronic file. Follow the prompts to select the digital ID
file, type your password, and add the digital ID to the list.
A Roaming Digital ID Stored On A Server Select this option to use a digital ID that’s stored on a signing server. When
prompted, type the server name and URL where the roaming ID is located.
A Device Connected To This Computer Select this option if you have a security token or hardware token connected
to your computer.
5 Click Next, and follow the onscreen instructions to register your digital ID.