
User`s manual


38 Getting Started
PXI-3920/3910
User’s Manual
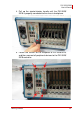
3.9 Using PXI-3920/3910 with PXI-2558T-B Chassis
This section describes the usage of PXI-3920/3910 controllers in
PXI-2558T-B Chassis. This chassis is unique in that it supports a
built-in LCD display and warrants special BIOS configurations to
properly operate the system controller.
The PXI-3920/3910 controller supports a rear I/O option. The rear
I/O option is designed to operate with a matching rear transition
module which provides internal chassis I/O, including video sig-
nals, USB signals, etc. The ADLINK PXI-2558T-B is a 3U 8-slot
PXI chassis with built-in 8.4" LCD touch panel. It contains a match-
ing rear transition module for PXI-3920/3910 to support internal
signal transmission.
While installing PXI-3920/3910 in a PXIS-2558T-B chassis, please
make sure you configure the correct BIOS settings to turn on the
LCD touch panel using the following steps:
X Press DEL while booting to enter the BIOS setup screen.
X Select the "Advanced Chipset Features" option.
X Set the "Boot Display" option to "CRT + LVDS".
X Set the "Panel Resolution" to "800 x 600".
X Save your settings and exit the BIOS.
NOTE:
NOTE:
Currently PXIS-2558T-B is the only PXI chassis with a
built-in LCD touch panel which supports PXI-3920/3910
controllers. Please DO NOT install PXI-3920/3910 con-
trollers in other chassis with built-in LCD panel, such as
PXIS-2556T, PXIS-2650T, PXIS-2680P, or PXIS-2690P.