
Instructions / Assembly
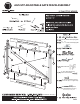

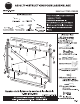
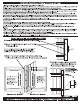
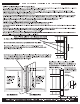

NOTE: For best results this Adjust-A-Gate kit is designed to open
INWARD but can be modied to open outward. See Step D.
I
N
W
A
R
D
E
D
G
E
O
U
T
W
A
R
D
E
D
G
E
PG.2
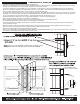
Set Post Hinges1”
from post to edge of
hinge pin
Set Post Hinges 2”
from post to edge of
hinge pin
For OUTWARD swing
leave 2” of hinge exposed
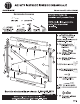
• Familiarize yourself with the gate hardware frames and instructions
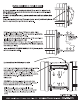
• Note that the HINGE SIDE of the frame is marked “HINGE SIDE” and the pre-drilled hole for the TRUSS CABLE is located on the inside of
the upper side of the frame, be sure to assemble with this hole at the top of the frame
• This frame is designed to open INWARD (into your fenced area), if your application calls for an OUTWARD opening you can adjust the
placement of the POST HINGES to the opposite side of the post – see STEP 1. (The post hinges will be off-set to either side of the post,
never centered). Additional modifications may be needed for outward swinging gates.
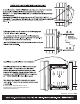
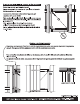
• For double drive gates openings of up to 16’ post to post use two gates. The gates will assemble the same way, just reversed. For the latch
installation on a double-drive gate, first attach the STRIKER BAR, bring both gates together and line up the LATCH CATCH with the striker
bar for correct alignment to gate frame and attach. Suggested space between double gates is 1 inch.
• Hardware Designed for Wood Post Only, use appropriate hardware for concrete or steel applications.
• Watch our Install video at www.youtube.com/watch?v=eCzc8XsKn-s
• When installing a double-drive gate you must drill into the Adjust-A-Gate frame or 2x4 to attach the catch
• For double-drive gates drop rod kits are highly recommended (sold separately).
• As a Security precaution - Installing Bolt (E) with the top bolt facing down and the bottom bolt facing up will prevent the potential theft by
locking the frame into itself
• Make sure all 4x4’s posts and 2x4’s rails are straight (bowing or crooked 4x4 & 2x4’s may make the adjust-a-gate out of alignment
• Spray all cut ends of the telescope bar with a Rust Oleum type product to prevent rusting
• Note that the LATCH SIDE of the frame is marked “LATCH SIDE
• Note the pre-drilled holes in the HORIZONTAL FRAME BARS and TELESCOPING BARS, may or may not line up depending on the width of
your opening. Use available holes to drill screws into your 2x4 rail.
03-AG72LTP 2016-04-11