
Manual
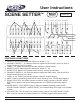


Running A Program With The Speed Slider:
1. Be sure the audio is disengaged. The AUDIO BUTTON (FIG. 20), green led should be
turned off. The MODE SELECT BUTTON (FIG.10) must be in ‘CHNS SCENES’ to
controll the audio mode.
2. Press the MODE SELECT BUTTON (FIG.10) and select ‘CHNS SCENES.’
3. Press the PARK BUTTON (FIG. 18) to select MIX CHASE MODE. A yellow LED will indicate this
selection.
4. Select your program as described on page 5.
5. Slide the SPEED SLIDER (FIG. 11) to the SHOW MODE position (The Bottom).
6. Press and hold the REC SPEED BUTTON (FIG. 25) and the FLASH BUTTON (FIG. 7) that stores
the program you wish to apply the beat time to. Release both buttons.
7. Repeat steps 4 and 5 until you have applied time to all your desired programs.
8. The program(s) will then run controlled by the speed slider.
9. Run your program.
10. As you run your program move the SPEED SLIDER (FIG. 30) until 0.10 (Top) appears in the
LCD
display the program will run with 10 steps per a second. 3.00 will give you 1 step per
a second, 5.00 will give a step every three second, etc.
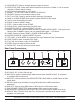
SPEED SETTING
Setting To 5 Minute Operating Mode:
1. In any mode press and hold the RECORD BUTTON (FIG. 16).
2. While holding down the RECORD BUTTON (FIG. 16), tap the number 5 FLASH BUTTON
(FIG. 3) three time.
3. Release the RECORD BUTTON (FIG. 16).
4. The 5 MIN
LED show light up indicating the speed slider is set to run in the 5 minute mode.
Setting To 10 Minute Operating Mode:
1. In any mode press and hold the RECORD BUTTON (FIG. 16).
2. While holding down the RECORD BUTTON (FIG. 16)
, tap the number 10 FLASH BUTTON
(FIG. 3) three time.
3. Release the RECORD BUTTON (FIG. 16).
4. The 10 MIN
LED show light up indicating the speed slider is set to run in the 10 minute mode.
ENABLING MIDI OPERATION
Setting MIDI IN:
1. Press and hold the RECORD BUTTON (FIG. 16).
2. While holding down the RECORD BUTTON (FIG. 16)
, tap the number one (1) FLASH
BUTTON (FIG. 3) three time.
3. Release the RECORD BUTTON (FIG. 16).
4. ‘ChI’ should appear in the LCD
display indicating MIDI IN is available.
5. Press the corresponding FLASH BUTTON (FIG. 7) to assign ‘MIDI IN’ to your desired program
its LED will
light indicating ‘MIDI IN’ is set.
©Elation Professional® Los Angeles, CA 90058 -Scene Setter User Manual page 6