
Manual


4. Continue steps 2, 3, and 4 until all the desired steps have been modified.
Exit Edit Mode:
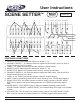
1. Press and hold the RECORD BUTTON (FIG. 16).
2. While Holding down the RECORD BUTTON (FIG. 16) press and release the REC EXIT BUTTON
(FIG. 14).
3. Release the RECORD BUTTON (FIG. 16).
SELECT AND RUNNING PROGRAMS
Running programs:
1. To run a program; press the MODE SELECT BUTTON (FIG. 10) and select ‘CHNS
SCENES,’ this will be indicated by a red led.
2. Press the PAGE BUTTON (FIG. 12) to select the correct page (1-4) the program youwish to
run is located.
3. Be sure your MASTER A (FIG. 23) and MASTER B (FIG. 26) faders are in the 10 position
(maximum). Note: The 10 position is opposite for MASTER A (FIG. 23) and MASTER B
(FIG.26) fader.
4. Move the desired SCENE CHANNEL SLIDER (FIG. 6) to its maximum position to trigger
the scene, the YELLOW LED (FIG. 5) should light noting scene selection. Note: If the
desired channel slider is al;ready in it raised position and the program does not start,
lower the slider to its minimum level and raise it back to its maximum level to engage
the program!
Running A Program To Audio:
1. Be sure an audio source is plugged into the RCA AUDIO JACK (FIG. 38) in the rear of
the unit.
2. Select your program as described above.
3. Press the AUDIO BUTTON (FIG. 20), its green led should light indicating its selection.
4. Use the AUDIO LEVEL CONTROLLER SLIDER (FIG. 22) to just the music sensitivity.
5. To return to normal operating mode deselect the AUDIO BUTTON (FIG. 20) to disengage
audio mode.
Running A Program With A Standard Beat:
1. Be sure the audio is disengaged. The AUDIO BUTTON (FIG. 20), green led should be
turned off. The MODE SELECT BUTTON (FIG.10) must be in ‘CHNS SCENES’ to
control the audio mode.
2. Press the MODE SELECT BUTTON (FIG.10) and select ‘CHNS SCENES.’
3. Press the PARK BUTTON (FIG. 18) to select MIX CHASE MODE. A yellow LED will indicate this
selection.
4. Select your program as described above.
5. Move the SPEED SLIDER (FIG. 11) to your desired speed adjustment, or tap the TAP SYNC
BUTTON (FIG. 15) twice to define your beat time.
6. Press and hold the REC SPEED BUTTON (FIG .25) and the FLASH BUTTON (FIG. 7) that stores
the program you wish to apply the beat time to.
7. Repeat steps 4 and 5 until you have applied time to all your desired programs.
8. The program(s) will then run with the set time or beat when they are engaged.
©Elation Professional® Los Angeles, CA 90058 -Scene Setter User Manual page 5