
Manual


BASIC OPERATING INSTRUCTIONS
Record Enable
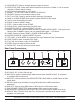
1. Press and hold down the RECORD BUTTON (FIG. 16)
2. While holding down the RECORD BUTTON press bumpers 1, 6, 6, and 8
(FIG. 3) in
sequence.
3. Release the RECORD BUTTON (FIG. 16) - The Record LED should light up.
Exit Record
1. Press and hold down the RECORD BUTTON (FIG. 16).
2. While holding down the RECORD BUTTON (
FIG. 16) press and release the REC EXIT
BUTTON (FIG.14)
3. Release the RECORD BUTTON
(Fig.16),
Erase All Programs
1. Press and hold down the RECORD BUTTON (FIG. 16).
2. While holding down the RECORD BUTTON (FIG. 16) press bumpers 1, 4, 2, and 3
(Fig.3), in sequence.
3. Release the RECORD BUTTON (FIG. 16) all LEDs will flash. Programs should be erased.
Clear Memory
1. Enter the record mode (see RECORD ENABLE on page 2).
2. Press and hold down RECORD BUTTON (FIG.
16).
3. While holding the RECORD BUTTON (FIG. 16) press and release the REC CLEAR
BUTTON (FIG.
12).
4. Release the RECORD BUTTON (FIG. 16), All LEDs will flash. Memory should be clear.
PROGRAMMING SCENES
1. Enter record mode (As describe above:RECORD ENABLE).
2a.Select the1-24 SINGLE mode by using the Mode Select button (FIG. 10). This will
give you control of all 24 channels as you program.
2b.Be sure that the MASTER FADERS A & B (FIGS. 2 and 3) are both set at 10 or maximum
(Note that slider ‘A’ starts at 0 and that slider ‘B’ starts at 10).
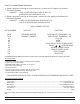
3a.Use FADERS 1-24 (FIGS. 2 and 3) to set intensities. At 0% or DMX 0, the fader should
be at the 0 position (fader at bottom) and at 100% or DMX255 the fader should be
at the10 position (Fader at top).
3b.After all faders have been adjusted to their desired setting press the
RECORD
BUTTON
(FIG. 16) to send this step to memory. Repeat steps 1 through 3b until all
the desired steps have been placed into memory (You may record up to 4200 steps into
memory).
3c. At this point you need to select a chase bank or SCENE (FIG. 7) to store your pro-
gram. Using the PAGE BUTTON (
FIG. 12) select a page to store your chase (pages 1-4 .
To store your chase or scene hold down the RECORD BUTTON (FIG. 16) while pressing
a FLASH BUTTON (FIG.7) between 13 and 24.
**** YOU MAY STORE UP TO 48 SCENES ON FOUR PAGES (12 SCENES PER A PAGE)****
4. Exit Record Mode: (See Exit record Page 2) Hold the RECORD BUTTON (FIG. 16) and
KILL (FIG. 14) button then release. LED should go off. Your scene or chase should
now be recorded.
©Elation Professional® Los Angeles, CA 90058 -Scene Setter User Manual page 3