
User Manual


Table Of Contents
- 一、Overview
- 二、Thanks and Commitment
- 三、What is 3D Printer?
- 四、Printing
- 4.1ADIMLab-gantryArchitecture:
- 4.2Assembly and wiring
- (Please reference SD card file contents“2.Assembly and debugging tutorial”“HCmaker7Assembly instruction”1~2)
- 4.3 First time test the maker7
- (Please reference SD card file contents“2.Assembly and debugging”“HCmaker7Assembly instruction”3)
- 4.3.1 Home test:
- 4.3.2Heating test:
- 4.4First time prepare printing:
- (Please reference SD card file contents“2.Assembly and debugging”“HCmaker7Assembly instruction”4)
- 4.4.1XaxisHeight calibration:
- 4.4.2Leveling Heating Platform:
- 4.4.3 First time test the maker7:
- (Please reference SD card file contents“2.Assembly and debugging”“HCmaker7Assembly instruction”5)
- (1)“Info screen” Press the knob,Rotate select“Print from SD”,Click OK:
- 五、Slice software installation and configuration
- 9 Support and service
39
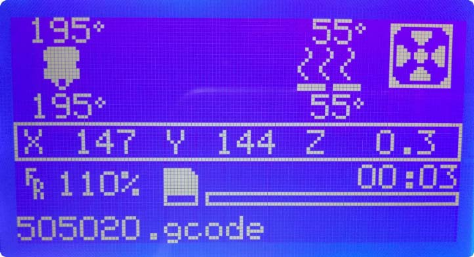
(6) Preheating ok,star printing:
6.5Printing finish,take the model:
After finish printing,waiting platform cooling,take the model(Lateral
output makes it easier to remove the model)Observe, measure
七、Printer operating:
7.1Replace filament:
Please refer to the following steps to standardize the operation
Note: need to be heated to the melting temperature of the printer
supplies replacement supplies (such as PLA need to be heated to 200
DEG C), and then press the lever supplies downward after a period of
pull out, prevent the residual material supplies card to the channel, and
print out material inserting effect. The ejector pin of the machine is
used for dredging the runner.