
User`s guide


Chapter 8: IP-65 Option
8.
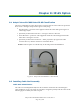
Install the splash guard using two M6 x 20 screws, two M6 lock washers, and two M6
flat washers. See Figure 8-7.
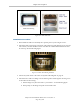
8.3 Robot Outer Link Cover Removal and Reinstallation
The robot outer link cover has special sealing hardware to ensure nothing can enter the inside
of the robot. If you need to remove the outer link cover from the robot for any reason, follow
the procedures below.
Cover Removal Procedure
1.
Turn off main power to the power chassis.
Lock out and tag out power.
2.
Turn off the air supply to the robot. Clean the exterior of the outer link thoroughly to
remove any dust or particles that might fall inside the robot when the cover is removed.
3.
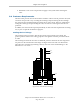
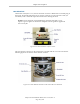
Unscrew the collar nut on the top of the outer link. See Figure 8-8.
4.
Remove 2 screws and nylon washers on the top of the outer link.
5.
Remove 2 screws (one on each side) at the front of the outer link. Make sure the O-ring
on each screw stays in place and is not lost.
6.
For the 8 screws along the side of the cover (4 on each side; see Figure 8-8), loosen only
1 to 2 turns, just enough to loosen the inside clamp nuts. You do not want to completely
remove the screws. See the label on the side of the outer link cover.
CAUTION:Do not loosen these screws any more than 2
turns, because the special clamp nut on the inside of the
cover might come loose and fall inside the robot.
Remove this screw
(one on each side)
Remove this screw
(one on each side)
Caution: loosen these screws only 1-2 turns. (Four screws on each side.)
If you loosen more than that, the internal clamp nut could come loose
and fall inside the robot.
Collar
Nut
Figure 8-8. Cover Removal Instructions
Adept Cobra ePLC600/800 Robot, User’s Guide, Rev A
Page 94 of 108