
User`s guide


Chapter 5: Maintenance
NOTE:Dispose of the battery according to all local and national environmental
regulations regarding electronic components.
Battery Replacement Procedure
1.
Obtain the replacement battery pack.
2.
Switch off the 24 VDC input supply to the robot.
3.
Switch off the 200/240 VAC input supply to the robot.
4.
Disconnect the 24 VDC supply cable from the robot +24 VDC input connector. For the
connector location, see System Cable Diagram on page 23.
5.
Disconnect the 200/240 VAC supply cable from the robot AC input connector.
6.
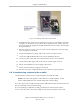
Using a 5 mm hex wrench, carefully unscrew the eAIB chassis securing screw. See
Figure 5-2. Note that the screw does not need to be completely removed in order to
remove the chassis, as this screw is captured on the chassis heat sink.
7.
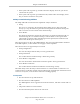
While holding the chassis heat sink, carefully and slowly lower the chassis down, see
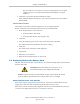
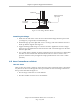
Figure 5-3. This provides access to the battery pack, as shown in the following figure.
Figure 5-9. Location of Encoder Battery Pack
8.
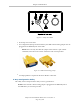
The battery cable assembly has two sets of connectors. Locate the secondary (unused)
battery cable in the wire bundle in the base area.
9.
Place the new battery pack next to the original one, but do not disconnect the original
one.
10.
Connect the new battery pack to the connectors on the secondary battery cable. Make
sure to verify the positive and negative connections are correct.
11.
Once the new battery pack is connected, disconnect and remove the original battery
pack.
Adept Cobra ePLC600/800 Robot, User’s Guide, Rev A
Page 67 of 108