
User`s guide

Chapter 4: System Operation
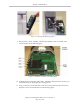
3.
Turn on the 24 VDC power to the robot.
l
The Status Panel displays OK.
l
The Robot Status LED will be off.
4.
Verify the Auto/Manual switch on the Front Panel is set to Auto Mode.
5.
Switch on the PLC.
The Adept web site has some examples for the Allen Bradley PLC using RS Logix:
http://www.adept.com/index.php?option=com_
content&view=article&id=367&Itemid=484&dir=JSROOT%2FDownload-
Library/ePLC-Examples
This gives some examples to start with.
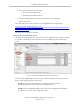
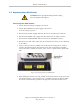
Using the PLC to Enable High Power
The details of enabling high power to the robot will vary, depending on the software running
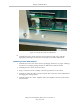
on your PLC. The following screen shot shows RS Logix 5000 being used to enable high
power.
Figure 4-8. Example:Enabling High Power with RS Logix
In this example, double-clicking Controller Tags, and then setting the value of pv_rbt_reset_
fault to 1 will enable high power on the robot.
NOTE:pv_rbt_reset_fault is the name for a register which is fixed when
downloading the PLC code example from the Adept Web site.
NOTE:The use of the blinking High Power button can be configured (or eliminated)
in software. Your system may not require this step.
Adept Cobra ePLC600/800 Robot, User’s Guide, Rev A
Page 51 of 108