
User`s guide


Chapter 4: System Operation
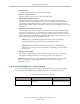
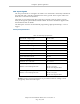
1.
XFP connector
Connects to the XFP connector on the XSYSTEM cable.
2.
System 5 V Power-On LED
Indicates whether or not power is connected to the robot.
3.
Manual/Automatic Mode Switch
Switches between Manual and Automatic mode. In Automatic mode, executing
programs control the robot, and the robot can run at full speed. In Manual mode, the
system limits robot speed and torque so that an operator can safely work in the cell.
Manual mode initiates software restrictions on robot speed, commanding no more than
250 mm/sec.
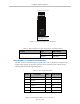
4.
High Power On/Off Switch and Lamp
Controls high power, which is the flow of current to the robot motors. Enabling high
power is a two-step process. An “Enable Power” request must be sent from the user-
supplied PC, an executing program, or the Adept pendant. Once this request has been
made and the High Power On/Off lamp/button is blinking, the operator must press and
release this button, and high power will be enabled.
NOTE:The use of the blinking High Power button can be configured (or
eliminated) in software. Your system may not require this step.
NOTE:If enabled, the Front Panel button must be pressed while blinking
(default time-out is 10 seconds). If the button stops blinking, you must enable
power again.
5.
Emergency Stop Switch
The E-Stop is a dual-channel, passive E-Stop that supports Category 3 CE safety
requirements. Pressing this button turns off high power to the robot motors.
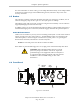
NOTE:The Front Panel or its jumper plug must be installed before you can Enable
Power to the robot. To operate without a Front Panel, the user must supply
equivalent circuits.
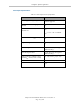
4.5 Connecting Digital I/O to the System
You can connect digital I/O to the system from the eAIB or from your PLC. The following
section addresses the eAIB I/O only, as different PLCs may use different I/O setups.
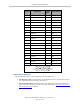
Table 4-3. Digital I/O Connection Options
Product I/O Capacity For more details
XIO Connector on Robot 12 inputs
8 outputs
see Using Digital I/O on
Robot XIO Connector on page
43
Adept Cobra ePLC600/800 Robot, User’s Guide, Rev A
Page 42 of 108