
User`s guide


Connecting 200-240 VAC Power to Robot
Adept Quattro s650H Robot User’s Guide, Rev A 59
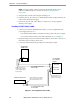
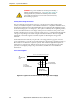
Figure 4-5. Single-Phase AC Power Installation from a Three-Phase AC Supply
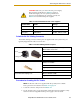
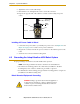
Details for AC Mating Connector
The AC mating connector is supplied with each system. It is typically shipped in the
cable/accessories box. The plug is internally labeled for the AC power connections (L, E,
N).
NOTE: The AC power cable is not supplied with the system. However, it
is available in the optional Power Cable kit. See Table 4-1 on page 52.
Procedure for Creating 200-240 VAC Cable
1. Locate the AC mating connector shown in Table 4-6.
2. Open the connector by unscrewing the screw on the shell and removing the cover.
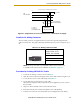
3. Loosen the two screws on the cable clamp. See Figure 4-6.
4. Use 18 AWG wire to create the AC power cable.
Select the wire length to safely reach from the user-supplied AC power source to
the robot base.
5. Strip 18 to 24 mm insulation from each of the three wires.
6. Insert the wires into the connector through the removable bushing.
7. Connect each wire to the correct terminal screw and tighten the screw firmly.
Table 4-6. AC Mating Connector Details
AC Connector details AC in-line power plug,
straight, female, screw
terminal, 10 A, 250 VAC
Qualtek P/N 709-00/00
Digi-Key P/N Q217-ND
E
E
N
L3
L
L1
L2
F5 10 A
F4 10 A
Adept Quattro
s650H Robot
1Ø 200–240 VAC
User-Supplied
AC Power Cable
Note: F4 and F5 are user-supplied, must be slow-blow.
3Ø
200–240 VAC
L = Line 1
N = Line 2
E = Earth Ground
200–240 VAC